Announcement

This site will be migrating to a new address.
Please visit me at @Køkken and change your subscription to this blog to my RSS Feed

You Will Be Redirected!

Please do not leave any more messages on this blog. I will not be publishing or responding to any more comments left here. You will be automatically redirected to http://www.atkokken.com All posts have been migrated. You will be able to locate any posts by performing a quick search at my new site. Thank you.

Sunday, March 28, 2010

Pandan Coconut Panna Cotta

Pandan Panna

Panna2

Panna3

The first time I made Panna Cotta was almost 8 years ago when I was staying in China. The 2 little girls of our Mexican business partner was in Singapore for a short holiday and during one of our trips to Holland Village, we had tasted a Pandan Panna Cotta at fine food store, Bunalun. It was so delicious, the girls absolutely loved it. It was then, that I started to experiment on my own to come up with a Pandan Coconut flavoured Panna Cotta that had become a 'star' treat among my friends. Come to think of it, I have never made a plain or traditional Panna Cotta, ever... possibly because I am not really a big dairy fan.Panna Cotta, literally means 'cooked cream' in Italian where it originated, requires a generous portion of cream and milk to be cooked and set with gelatine.

I have not made this dessert for quite a while now and am suddenly reminded of it after I attended the Fabulous Fruit Desserts baking class yesterday at Shermay's Cooking School. The very talented Joycelyn Shu was conducting the demo class and for those who are interested, you can find her beautiful creations at her fabulous blog Kuidaore - hers was the first food blog I got to know about 3 years back and possibly the only food blog I visited for a couple of years before I started doing my own last year. I loved going to Joycelyn's blog for her prose, she writes so well, it is pure literature. Her photos and creations are even more amazing. However, she does not blog as often now, she almost only posts nowadays to give a peek at what she would be doing for classes - but the photos are still as stunning as ever.

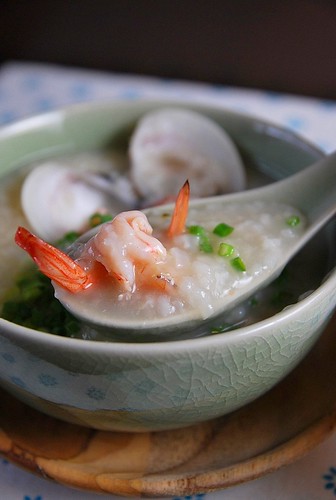
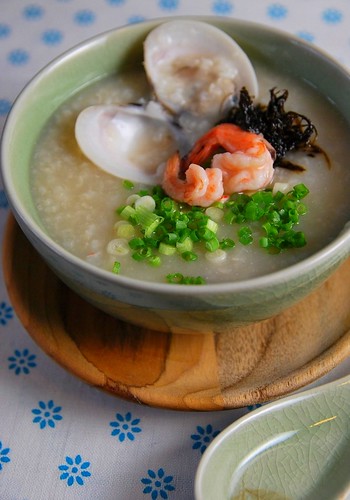
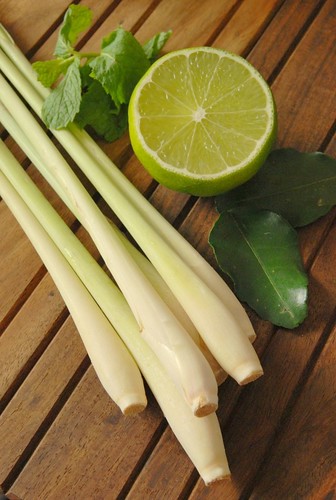
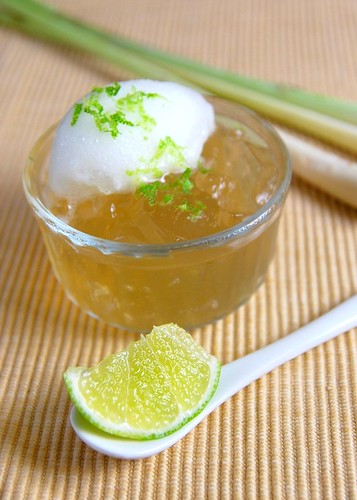
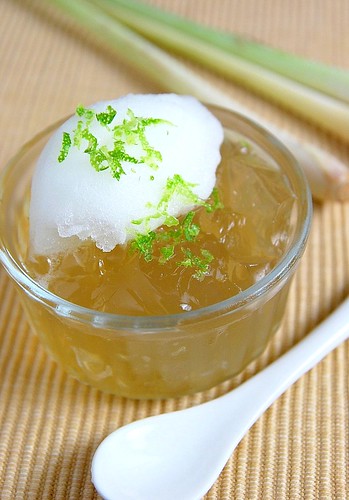
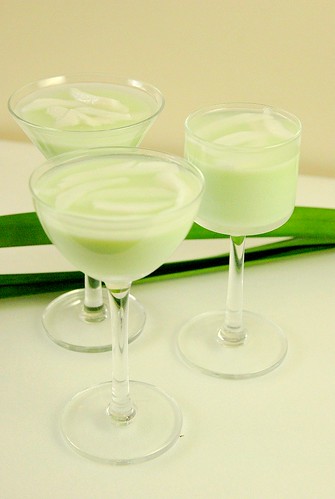
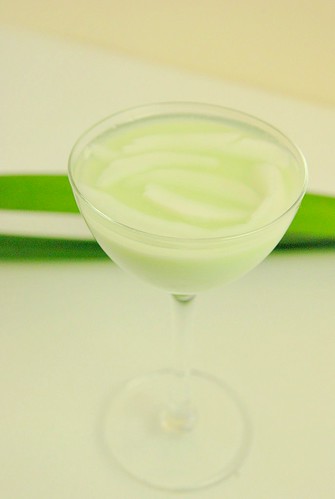
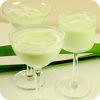
During yesterday's class, one of the featured recipe was a Orange & Honey Panna Cotta. A recipe that is zested with orange and sweetened with honey, she had deliberately designed it set to the softest pudding. As a result of which, this is the most creamy Panna Cotta I have ever tasted. Inspired by the texture, I immediately wanted to apply it to my Pandan Coconut Panna Cotta. I took to sweeten the dessert with a very mild honey (clover) instead of sugar and replacing part of the cream and milk with coconut cream. I had wanted to add a dash of chic-ness to it by accompanying it with something refreshing to cut through/balance the heaviness of the cream. I thought of making a Lemon Grass Syrup but felt too lazy to go through all the works. In the end I topped it with some fresh coconut juice and young coconut meat. Not the most chic approach, I must say, because the watery topping, I feel makes the whole presentation look rather sloppy. A more syrupy consistency would probably work better.

One more tip to share - I always serve my Panna Cotta in small shot glasses. The rich, creamy dessert will have you swooning at the first 2 mouthfuls but I, for one, will never be able to work through a bigger serving. You would want to have your guest enjoy the dessert till the last mouthful and  leave them longing for more. When things are left unfinished, the drab sets in....

P.S. : I've had the most disappointing photo shoots today. Everything turned out really under exposed.... After filtering and editing, these are the ones I manage to salvage... :(

Pandan Panna(100)
Recipe :

150g            Whipping cream
32 g             Clover honey
Salt              Pinch
3/4tsp          Gelatine powder
120g            Coconut milk
2                  Pandan Leaves
6 drops        Green Pandan Paste
1                  Young coconut

Method :

1. Heat the cream , honey, pandan leaves and salt in a saucepan over low heat. Stir to dissolve honey. Once honey is dissolved, remove saucepan from heat and let the pandan leaves steep in the cream for 15 mins.

2. Over a Bain Marie, dissolve gelatine in coconut milk.
3. Remove pandan leaves from (1) and add (2). Add Pandan Paste (essence) until well combined. Sieve the cream mixture to remove any undissolved particles.
4. Pour into molds/ shot glasses and chill until set.
5. Top with coconut juice and coconut flesh. Serve immediately.

Sunday, March 21, 2010

Seafood Congee

Clam Congee

Clam Congee close up

Clam Congee

With the festive period of Christmas and Chinese New Year behind us, business gets serious. No more excuses of slow activities due to the holidays. First quarter budget has to be reviewed, new projects need to be commercialised. Hence, the relentless pursuit of sales can only become more grueling... which means blogging will have to be relegated a lesser priority. I had wishfully planned to keep up with regular postings, having pictures all taken before I hit the road last weekend - thinking that I can write while I am on the flight or when I snuggle up in bed after work. However, I didn't count on being totally blocked out of Blogger,Facebook, Flickr etc.. in China. I knew that they do that and I admit it was an oversight on my part. So now you know why we never get to see blog visitors from China....

This was my last meal at home last weekend. I had seen some clams on sale at the market and had remembered the sweetness clams had imparted to miso soup and the spicy korean tofu soup - hence was inspired to use them for congee - the ultimate comfort food, in my opinion.

However, I have to admit that I probably had bought the wrong clam species to begin with. The variety that is usually used for soup are the smaller species - what the Japanese refer to as Asari.  These bigger ones, I realise would be more suited for frying with garlic and chilli. The congee turned out most satisfying anyway, thanks to the sweetness from the tiny prawns and the smooth mushy texture of the porridge which I had cooked with a combination of glutinous rice and Thai fragrant rice. Pairing this with preserved/pickled Olive Vegetables (榄菜) , black salty fibrous leaves in glass bottles, I succumbed to multiple refills....  ok, got to go. Midsomer Murders is showing on TV and a murder is just about to take place....

Clam Congee 2 (100)
Recipe :

300g             Clams (soaked in salt water for 30mins)
300g             Prawns
100g             Thai fragrant rice
50g               Glutinous rice
2.5 liters        Water / chicken stock (I use water here)

Method :

1. Wash rice with water until water runs clear.
2. Bring water / stock and washed rice to vigoros boil. Allow to boil until rice splits
3. Add clams and continue to boil over medium heat until porridge is cooked and attain a gluey texture. Add more hot water if the mixture becomes too thick.
4. Add prawns and boil over low heat for a few minutes until prawns are cooked. Season with salt to taste.
5. Serve garnished with spring onions and preserved Olive vegetables. (I under season the congee with salt as the Olive vegetables will be salty)

Saturday, March 13, 2010

Lemongrass Jelly

Lemongrass

Lemon Grass Jelly2

Lemon Gass Jelly 3


Lemongrass Drink

When I was in Bangkok earlier last week for a short business trip, I headed for my favourite supermarket jaunt after my appointment. I love going to this particular supermarket at the basement of the upmarket mall, Paragon - for 2 reasons -
1. the variety of local fast food is a treat, there is so much to eat but so little space in the stomach to hold them.
2. the spread of local fruits, vegetables and Thai cooking ingredients are so complete that I can spend hours wandering up and down the aisle.

As this was a short trip, I did not bring a check in luggage with me, hence, I really had to retrain myself as I browsed. Mangoes are in season now and faced with the plump, juicy fruits, I watched longingly as shoppers buy them by the boxes. Then, there were the pink pomeloes, pomenagrates, biwas... as tempting and colourful as they may be, I am glad I didn't get any of them. I ended up buying, of all things - Lemongrass!

I have always loved lemongrass and I will find ways to add them to different dishes. The scent of Lemongrass calms me and whether it is just sipping a Lemongrass drink or burning the oil in my oil burner, it always evoke an exotic, spa-like atmosphere.
Lemongrass are readily available in Singapore and are not uncommon for us. But the ones that caught my eyes at the Thai supermarket are so clean, white and young - I just couldn't resist. I ended paying S$0.50 for about 15 pieces of  lemongrass. When I worked with them today, I really regretted not getting more, for the fragrance is so much more superior than the ones we get in Singapore.

It has been terribly hot in Singapore for the last 2-3 weeks.  Making a cold treat with the Lemongrass is a no-brainer. I used to serve a drink made by boiling Lemongrass and pandan leaves at my gathering parties. It has somewhat become my signature drink among friends. Improvising on this leads to a jelly recipe I saw in Forest Leong's Thai Cookbook. Forest Leong is local celebrity chef Sam Leong's wife. She is Thai and one of the sweetest ladies I have ever met. I have attended one of her cooking classes and her instructions were clear and she was eager to impart knowledge.

The concoction, gelled with gelatine and served with a squirt of lime juice and a dollop of Lime Sorbet is the ultimate chill out dessert for today's hot and humid weather. I thought I could even sense a breeze blowing as I dug into the jello...

Lemongrass 2(100)
Recipe (adapted from Forest Leong's Cooking Classics, Thailand)

Lemon grass           10 stalks, bruised and chopped
Kaffir Lime leaf       4-5
Pandan leaves         3, knotted
Mint leaves             a handful
Water                     3 litre
Gelatine powder     40g
Sugar                      200g (I cut it down by half)
Lime                       1

Method :

1. Bring Lemon grass, kaffir lime leaf, pandan leaves and mint leaves and water to boil. Lower heat and simmer for 1 hour.

2. Remove from heat and strain out the leaves. Continue to heat the strained liquid while adding sugar and gelatine powder. Stir well until sugar is completely dissolved .

3. Pour into container to cool down. Chill in fridge to solidify jelly.

4. Scoop out jelly into serving bowls and top with lime sorbet, lime zest and a squirt of lime juice.

Friday, March 12, 2010

Japanese Cheesecake - Coffee Flavour

Japanese Cheese Cake

Japanese Cheese Cake 1

Japanese Cheese Cake

Japanese Cheesecake
The failure from 2nd bake.... the only photo taken in daylight with the DSLR.

Japanese Cheesecake has a souffle like texture which is discernibly different from the heavier American cheesecakes. The recipe is  readily available. At least 3 recipe books on my book shelf carry a recipe for the Japanese Cheesecake. There are some slight variations among them but in a nutshell, this cake requires one to melt the cream cheese and butter over a Bain Marie. Egg whites are beaten separately to get an airy meringue and added to the rest of the ingredients. The batter is then baked gently in a water bath.

I think every avid Asian baker in the blogosphere would have made this at one time or another. I, however, have never made this cake and when I saw the recipe, I thought it would be a piece of cake for I am quite comfortable at baking chiffon cakes. Well, as it always happens when I get over confident, I have to be humbled by repeated failures.

I first approached it like I would with the chiffon cake - the cake, though tasted good, split at the surface like an overzealous Huat Kuay - only this time, I didn't want to 'Huat' !

2nd attempt, I beat the egg white gingerly, unsure of when to stop. In the end, I think I stopped beating the egg white too soon, ending up with a rather 'wet' mixture - the cake was soggy and 'uncooked'.

Finally, 3rd attempt I decided to take a couple more precautions. I premixed the flour with the egg yolk and part of the liquid in order to avoid too much folding which could trap air bubbles - causing it to split again.
And I tried my best to identify the right end point in the egg white beating.

This time, the cake did not split and appear to be decently cooked. Though I think I can still afford to beat the egg white a little more to get a more airy texture.

In addition to getting the cake right, I was also looking forward to play with the Nikon DSLR which my friend, Michelle had generously lend to me to experiment. I am trying to compare the difference in picture quality with my own compact camera. The first thing I noticed is that the exposure appears to be more true with the DSLR.  With my compact camera, it has always been a hit or miss with the exposure - even when the metering appears right, the exposure tends to appear harsher. The DSLR has a softer more natural finish.  I took all the slices at night with artificial light, without exposure compensation on the camera.Suprisingly, they look... pretty decent - I didn't even have to tweak the exposure or colour intensity with photoshop. I don't know if this is for real or just fluke but I am not going to run out and buy a DSLR just yet, that's for sure. I will continue to play some more with the DSLR and see if I can get more consistent results.


Japanese Cheese Cake

Recipe :

125g       Cream cheese
25g         Unsalted butter
25g         Milk

3             Egg yolks
25g         Milk
30g         Pastry flour
10g         Corn flour
1/8tsp     Salt
1 tbsp     Coffee Extract

3             Egg white
1/8 tsp    Cream of tartar
70g         Sugar


Method :

1. Preheat oven to 160C.
2. Over a Bain Marie, melt cream cheese, butter and milk to get a smooth, creamy consistency. Leave to cool. Tip 1: mix with a spatula. Do not use a whisk.
3. In a mixing bowl, beat the egg yolk with a hand whisk lightly, add milk and flour/corn flour/ salt. Add in coffee extract. Add in 2 and mix well with a spatula.
4. In a separate mixing bowl, whisk egg white until foamy. Add the sugar/cream of tartar to the egg white in 2 additions. Beat egg white until soft peaks are acheived. I beat until the peaks were droopy when the whisk is inverted.  Do not over beat unless you are looking for a split cake.
5. Mix 1/3 of meringue with the egg yolk/cheese batter. Fold the rest of the meringue into the batter.
6. Pour into a greased baking tin lined with parchment paper at the bottom of the tin.
7, Bake the cake in a water bath at 160C for 50mins. (water level should be around 2inch deep)

Monday, March 8, 2010

Jajangmyon - 杂酱面

JaJangmyeon

JaJangMyeon2


IMG_0047

Yesterday, Singapore had its 2nd mass cycling event, the first was held a year ago with great success. This year, it gets even better. I participated in the 40km event which saw more than 6000 participants and am really glad that I finished the race without....coming in last! (LOL)  - in fact, I did better than last year, completing the 40km in 2 hours, without any soreness or pain in my butt as I pedalled furiously to maintain an average speed of 20km/hr.  This, anyone who bikes will know, is snail pace. However, for my fitness level, and with zero training prior, this was the best I could realistically aim for. Honestly, even up to the last minute, I was still trying to conjure up believable excuses to pull out of the event. I started feeling breathless even during the 1st 5km - and was seriously contemplating to pull up at the 1st aid stop to tell them that I had a pinched nerve and had to stop. It was also especially nerve wrecking as I noticed all the road bikes, half the weight of my mountain bike were overtaking me effortlessly - I felt like I was riding on a hippo!

9FSW7_pnk
My Pink Hippo...

Then, at some point, I started to ignore those whizzing road bikes and focus on just maintaining the 20-21km/hr figure displayed on my speed indicator. It was then that I found myself panting less and my legs started to acquire the rhythm to pedal with smooth continuity.... and before I realised it, I was already 25km into the race and the remaining 10km or so lying ahead did not look so unachievable anymore.

One of the best part of pushing your body to the limits is the total restfulness that follows the exertion . After showering, I literally spent the rest of my Sunday morning and afternoon, lounging on my couch, watching TV... it felt good to be able to give in to the exhaustion and let the body just slump... it was after 3 episodes of Friends, 2 episodes of American Idol, that I surfed over to the Chinese station that was showing a Korean Drama. It was odd, but over the span of 30mins, Jajangmyon was mentioned more than 10 times in the show. It immediately stirred up my craving for Jajangmyon - which is a Korean noodle dish which originated from China. The key ingredient of this dish is the Chinese bean past sauce, (杂酱) Jajang. It is a favourite dish among Korean children. I remember a Korean colleague once told me he had to cook Jajangmyon for her daughter every Sunday and it is the one dish that she prefers from her dad than her mum.

Such is the power of food craving... it was strong enough to have me drag my listless body out of the couch, and out to the supermarket to get the Korean Bean paste!
I am not sure if I have prepared this correctly but the bean paste was so tasty that I suspect it wouldn't be easy to make this taste bad. Following dinner, I went to bed early and slept like a baby.

IMG_0053(250)
Recipe :

1                   potato, diced
1                   small carrot, diced
1                   onion, diced
50g               minced pork
2 tbsp           Jajang (black bean paste)
1tsp              Sugar mixed with 1/2 cup water
1 tbsp           Oil

Noodles ( the Koreans will use wheat noodle. I used a thinner version Japanese Udong)

Method:

1. Heat oil in a hot wok.
2. Add in Jajang and fry until a little dry.
3. Add diced potato, onions and minced pork and fry for a few minutes. Add sugar solution. Cover and cook over low fire until vegetables are softened.
4. If the sauce become too dry, add a little water.
5. In a spearate saucepan, boil some water and once water boils, add and blanch noodles. Drain noodles
6. Divide noodles into 2 portion, lay sauce over the noodle. Garnish with cucumber strips and hard boil egg.

Friday, March 5, 2010

Corned Beef Hash ..?

Corned Beef Hash 1

CHB6

Corned Beef

I went to the Philippinnes for the first time just before Chinese New Year. There was a production start up at an important new account and I had to go to lend support. Despite all the kidnapping tales and stories about rifles-armed gurkhas guarding factories, I actually found myself looking forward to my first trip to Manila. Long before I had any idea that the new account would commercialise in Manila, I had known exactly what I wanted from Manila - Tabang Talangka- the famous crab fat/crab roe that I had first read about at Chubby Hubby's guest blog by Amy Ma.

Hence, when my trip was set to take place, I contacted Trissa for advice on where to eat and what to buy when I am in Manila. I touched down in Manila at about 4pm and had a business appointment at 7pm. The hour or so in between, I headed straight to the nearest super market.

Priority was of course, the Crab Fat- which I got but as I browsed through the aisles, I started to understand a little about the Filipinos' eating preferences. One particular section I lingered over for a long time were the shelves for Corned Beef...
I was in awe. It was clear, Filipinos love corned beef. Unlike in Singapore, where we probably will get 2, at most 3 brands of corned beef at the supermarket - they devote a whole aisle to Corned beef - of different brands, different packing sizes and different forms. What first lured me into the aisle was the tiny 100g corned beef cans - smaller than our smallest sardine cans, they were selling for S$0.50 (which is US$0.35). I thought the small packing was brilliant as it is extremely convenient for quick snacks or one to two person. Then, they have Corned beef chunks, corned beef flakes and corned beef in extra long shreds... I was dazzled... For fun, I bought 2 tiny cans of flaked CB and a mid sized can in extra long shreds.

When I got back and shared my observation with my Philippinno HR director, he affirmed my observation and told me the tiny cans are convenient for snacking  and that I can mix them with egg white and make corned beef hash.. There were no directions but I wondered about his suggestion. When I googled on corned beef hash, I did not come across any recipes that are made by pan frying CB with egg white. Instead, there are many recipes that called for corned beef to be cooked with onions, potatoes, tomatoes etc. Filipino versions almost always serve these with rice - and very often, you find this topped with an egg either poached or fried and almost always with a runny yolk.

Hence, armed with these impressions, I set out to experiment without following any recipes in particular... and with that, I have consumed my first mini can of flaky corned beef... and... whisper whisper, corned beef hash tastes amazingly good with rice - I was rather taken by suprise.

CBH4

Recipe :

Ingredients

1x 100g can of corned beef flakes
1/2 onion,diced
2 cloves garlic
1 egg
1/2 bowl cooked white rice
1 medium sized potato

Method:

1. I peeled and shredded the potato into ribbon shreds with my Microplane Ribbon cheese grater. Many recipes used diced potatoes. Soak shredded potato in salt water.

When ready to cook, drain potato and squeeze dry.

2. In a hot frying pan add oil and fry onion and garlic quickly. Add corned beef and continue to fry. Add potato and mix well in the frying pan. Flatten 'hash' into a flat pancake. Let pancake fry to brown and crisp texture.

3. Lay this on white rice. Separately, fry an egg to set egg white. Egg yolk should remain runny. Top this on the Corned Beef Hash.

* There is already too much seasoning in the corned beef, hence I did not have to add any more salt. However, I believe a little pepper would work well.

Tuesday, March 2, 2010

Char Kuay Teow - Fried Rice Noodle With Cockles

CKT 4

CKT 5

CKT 1

Cockles

Blogging motivates one to contemplate strange things. I can honestly say that if not for blogging, I would probably never ever think of making Char Kuay Teow by myself. For readers who are not living in Singapore or Malaysia, Char Kuay Teow is one of those iconic local street dish that practically everyone who has been away from home craves for. Possibly one of the most oily, unhealthy local street dishes which we can find in this part of the world, it is also one of those dishes that would set our saliva ducts active at its mere thought. Here in Singapore, we are always sussing out every possible Char Kuay Teow stores we can find and rank them according to taste and preference. Crazy is the one who contemplates to make it at home.. and here I am succumbing to the madness. Yes, blogging very often evokes madness in the blogger - I guess it stems from the urge to share something different,something suprising and when you see fellow bloggers such as Pig Pigs Corner who has recently made her own Bak Kwa(!!) (barbequed pork) , the feverish excitement rubs off on you... so really, frying your own Char Kuay Teow is really mild in comparison

The idea to fry Char Kuay Teow occurred to me when I saw cockles at the market this morning. It is not everyday that these are available. Cockles is easily the soul of Char Kuay Teow. To me,without this integral ingredient, Char Kuay Teow is just not the same. I bought a dollar worth of cockles and used a quarter of it for my Char Kuay Teow.

CKT 7
So how did my Char Kuay Teow turn out? Not impressive, I would say  - it was not oily enough and lacks the fragrance of lard, but I got my kick out of it and I think considering it is home made, it will still be able to elicit some appreciative gushing from supportive friends  Roll

Recipe :

Water                      6 tbsp
salt                          1tsp
Lard/ Oil                 8 tbsp (I used less)
Garlic                      2 tsp minced
Bean Sprouts          310g
Flat Rice Noodle     310g
Dark Soya Sauce    2 tbsp
Egg                         4 beaten
Chilli Paste              1 tsp (I used sambal belachan)
Chinese Sausage      2, sliced and pan fried
Fish Cake                50g sliced.
Cockles                   115g
Prawns                     100g
Dark Sweet Sauce   1-2 tbsp

Method :

1. Mix water and salt together and set aside.
2. Heat wok still smoking hot. Add 4 tbsp of oil and add minced garlic. Fry quickly to light brown and add bean sprouts, Rice Noodle (Kuay Teow) and (1) and Soya Sauce. Fry quickly over high heat for 1 min.
3. Push Kuay Teow to one side of the wok, add the remaining 4 tbsp of oil, add the beaten egg and fry quickly. Fry Kuay Teow with egg.
4. Add chilli sauce to taste.
5. Add Chinese sausage, fish cake, prawns and fry for another 1 min.
6. Spread out Kuay Teow in wok and add cockles*, cover the cockles with the noodles. Add dark sweet sauce and fry for 1/2 min after homogenous. Dish out and serve.

* I soaked the cockles in salted water for 30mins. The salted water is drained off and boiling hot water is added to the cockles. Drain off hot water immediately. The cockles can now be pried open easily. Deshell and use the clam morsel for frying.

LinkWithin

Related Posts with Thumbnails