Announcement

This site will be migrating to a new address.
Please visit me at @Køkken and change your subscription to this blog to my RSS Feed

You Will Be Redirected!

Please do not leave any more messages on this blog. I will not be publishing or responding to any more comments left here. You will be automatically redirected to http://www.atkokken.com All posts have been migrated. You will be able to locate any posts by performing a quick search at my new site. Thank you.

Monday, May 31, 2010

Hainanese Pork Chop - 海南猪排

Pork chop1

Pork Chop 4

Pork Chop 3

I am a Hainanese, that minority Han tribe that hails from the Southern Chinese Island known as the Hainan Island.(The Chinese would call it the Hawaii of China. I wouldn't know, I have never been to either Hawaii or Hainan Island) There are enough Hainanese who had migrated to Singapore to make this quite a well known clan - after the main stream clans such as the Cantonese, the Hokkien and the Teochews.. After all, no visitor to Singapore must leave the island without trying the famous Hainanese Chicken Rice!

We used to stereotype the different races who had migrated to Singapore. The Indians thrived as money changers and textile dwellers in Singapore, the Hokkiens and Teochews ran the staple commodity business e.g. salt, flour, rice, the Hainanese - coffee shop owners, cooked for the ang mohs(expatriates from England, Switzerland etc who were residing in Singapore). I don't know how it came to be like this but ever since I was young I already noted that among my relatives, there were quite a number of good cooks - one was running the kitchen at the local Swiss Club, another was house keeper and cook to a wealthy English man living in a sprawling mansion at Bukit Timah...I hear similar stories from my Hainanese colleague whose mother was a cook and housekeeper to the western expatriates.

As a result of which, we became the 'priviledged' kids who knew what beef stew was,ate pork chop with fried potatoes wedges and frankly speaking, grew up with the best Chinese Curry Chicken.

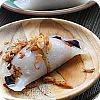
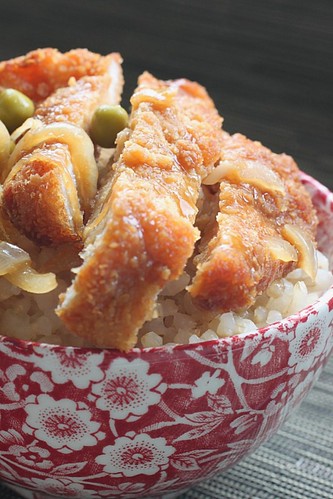
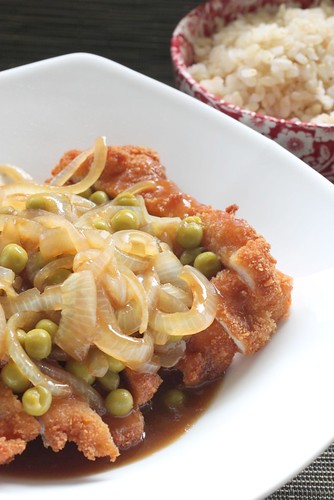
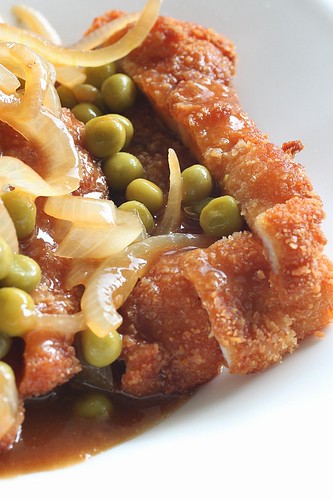
The Hainanese Pork Chop is one of my favourite childhood dishes. I would remember my mum asking me to pound the Cream Crackers (we don't use bread crumbs to coat the pork chop) while she tenderised the pork chops with the back of a cleaver.

Pork Chop 6

I was pleasantly reminded of this dish when I was poring over Madam Neo's cookbook for the Soon Kueh recipe. While my mother used to prepare a tomato ketchup sauce, Madam Neo's version is soya sauce based but looked equally good. I decided to give this a try yesterday for lunch... and no regrets. I am happy and very satisfied.


Pork Chop 7(100)
Recipe (from Madam Neo 梁怡树夫人's 温馨佳肴) :
Pork Chop   314g
Oil               1 tbsp
Butter          1 tbsp
Oil for deep frying
Cinnomon Stick 2.5cm long
Onion         115g
All purpose flour 1 tsp
Jacobs/Kong Guan / Julie cream cracker 140g pound into powder
Green peas 55g

Marinate
Egg 1
Sugar 1/4 tsp
Salt 1 tsp
Pepper To season

Seasoning for Sauce
Chicken stock 225 ml
Chicken seasoning 1/2 tsp (optional)
Sugar 1/2 tsp
Dark Soya sauce 1 tsp
Salt to taste

Method
1. Mix all marinate ingredients together.
2. Flatten and tenderise pork chop with back of cleaver or tenderiser.
3. Place (2) into (1) and let marinate for 30mins.
4. Sauce : heat a wok and add butter and oil. Add cinnamon and onion rings. Fry until onion is fragrant and turn transparent. Add flour and stir fry for another minute. Add the Sauce seasoning and simmer on low heat until thicken.
5. Heat enough oil in the wok to deep fry pork chop.
6. Place cream cracker crumbs on a shallow plate and coat marinated pork chop evenly with cracker crumbs. Deep fry the coated pork chop until golden brown. Remove and place on an oil blotter.

7. Slice deep fried pork chop and top with sauce and green peas.

Sunday, May 30, 2010

Fried Bittergourd With Salted Duck Egg - 咸蛋炒苦瓜

Bittergournd 3

Bittergourd 2

Salted Egg

I do go to Taiwan very frequently for business but as with most business trips, your activities tend be circumcribed within a certain convenient perimeter around the hotel and office. This last vacation in Taipei with my friends has really helped me discover places that I had never been to.  I am already earmarking certain eateries and shops for revisiting when I return again.

I first ate this dish Fried Bittergourd with Salted Egg last year when my distributor took me to his friend's restaurant for lunch. I fell in love with it and had wanted since then to try cooking it at home. This time in Taiwan, I ate this again when we went up to Wulai (乌来) for a bit of hiking. (We had originally wanted to cycle there but the terrain was too steep and demanding for amateur cyclists like us) It was done wetter than  the version I had earlier and was less fragrant. Then, during our cycling trip from Taipei to Danshui (淡水)we passed by GuanDu Temple (关渡宫) where we were told to stop and buy their local specialty - salted eggs and century eggs. For those who wonder what salted eggs are, these are preserved eggs prepared by soaking, usually duck eggs in brine or densely packing the eggs with salted damp charcoal. In Singapore, it is common to find these black mud coated eggs in the market. We would usually then need to remove the black charcaol paste and hardboil the egg for consumption. The salty egg white is a perfect accompaniment to plain porridge and the egg yolk is the jewel that lures with its savory fragrance.

In Taiwan, almost all salted eggs are sold cooked. A little strange for me and to be honest, I didn't find the salted eggs at Guandu Temple impressive. The egg yolk is too dry for my liking. In my opinion, salted egg yolks should have a golden oily sheen to it.... Anyway, each of us bought like 10 salted eggs and a pack of century eggs, chuck them into our backpack and went back to complete our cycling route to Danshui...

Bitter Gourd 1

So at last, I decided to try my hand at cooking this dish at home yesterday. Again, I had no recipe to follow, I just minced up the salted eggs and fry it together with the bittergourd. It tasted different from the ones I had eaten last year - I thought the salted eggs wasn't as fragrant. Perhaps I should try it with local Salted eggs again...

Bittergournd 3(100)
Recipe

1        mid size bittergourd
11/2   cooked salted egg, minced.
1/2     fresh chicken egg, beaten
2        cloves garlic

Method

1. Cut the bittergourd and remove the pith with a spoon. Cut bittergourd into slices. Blanch the bittergourd in boiling water for 2 mins and drain.
2. In a frying pan/ wok, heat 2 tbsp of oil. Add the 2 cloves of garlic and fry for a min until fragrant.
3. Add minced salted egg and fry until 'foamy' and fragrant. Add blanched bittergourd and fry to coat with salted eggs. Add the beaten chicken egg and fry quickly to set.

Friday, May 28, 2010

Soon Kueh - Turnip Dumpling / Bamboo Shoots Dumpling 笋粿

Soon Kueh 4

Soon Kueh 3

Soon Kueh 1

Market Collage

Bamboo shoots 2

One of the highlights of my recent vacation trip in Taiwan was to visit the morning wet market. As we wandered down the single street market at Shuanglian (双莲市场) I felt like a little girl who has just wandered into a candy shop... I could feel my eyes glinting at the wide spread of fresh vegetables, fruits and seafood. At that moment, I honestly wished that I was residing in Taipei so that I could bring back all these fresh goodies and cook up a storm!

Bamboo Shoots


Among the jumbo peanuts, luscious mangoes, giant water melon and arching fish, the one item that fascinated me most was the bamboo shoots. Spring bamboo shoots are in season now and I have never seen so many fresh, plump bamboo shoots in my life. We don't normally get bamboo shoots here in Singapore. Most of the time they come already cooked and packed in vacuum packs. I was lucky that during one of the dinners with my customer (yes, I still met my customer for dinner on sunday), he had insisted that we order the bamboo salad. 90% of fresh bamboo shoot is actually water, hence the crunch is really refreshing and fresh bamboo shoot does not have the unpleasant smell that I am not too fond of in cooked bamboo shoots.

It was after this bamboo shoots siege in Taiwan that I was reminded of a Teochew Style snack which we normally have for breakfast in Singapore. Known as Soon Kueh, they literally mean Bamboo Shoots Dumpling... only irony is, the Soon Kueh we get in Singapore is filled with turnip instead of bamboo shoots. I have asked a few friends why this is so and we've arrived at 2 main conclusions :
1.  Bamboo shoots are more expensive and not readily available ;
2.  Cooked bamboo shoots has a pungent smell which may not agree with most people here.

So, with this spark of inspiration, I decided to embark on this seemingly crazy feat of making Soon Kueh. Crazy because they are readily available in the market - friends and fellow colleagues just cannot understand why I would want to go through the hassle of cooking my own turnip filling and kneading my own dumpling dough. Well, they don't cook and they don't blog -so they will never be able to understand.

Soon Kueh 2

Soon Kueh is a fist sized dumpling filled with shredded turnip cooked with bean paste and dried prawns. The ingredients can be varied by adding mushrooms, bamboo shoots and even fresh prawns. The wrapping of the dumpling can either be made with a blend of Tapioca flour and rice flour or in my case, I have chosen to work with wheat starch (tang flour, 澄面粉) . The wheat starch gives the wrapping a transparent and chewy consistency - not unlike the dim sum Harkow (shrimp dumpling) skin.

I am not very dexterous with my hands and took a while to get a dumpling that resembles the Soon Kueh.
I tried to roll out the dough into the thinnest resilient thickness I could manage and make sure that I don't get too greedy when I pile on the filling. I am happy with the results of this first attempt. The snack is especially tasty when served with fragrant fried shallots oil.

Soon Kueh 7(100)

Recipe :
Wrapping (Adapted from AsianEasyRecipe)

375 g Tang Mein (Wheat Starch)
180 g Tapioca flour
450 ml Boiling water
3 tbsp Shortening/oil
Oil for greasing

Filling (Adapted from Madam Neo's 家常好菜)

455g   Turnip
3 tbsp  Oil
1 tbsp  Minced garlic
1 tbsp  Soybean paste (Tauchio)
1 tsp    Sugar
1 tsp    Salt
115g    Water
55g      Dried shrimps

Method :

Filling
1. Peel turnip and cut into strips and soak in water. Drain and set aside.
2. Add oil to a heated wok. Fry garlic until fragrant and brown. Add bean paste, sugar, salt and fry for a 3 mins.
3. Add dried shrimps and fry for another min. Add water and heat to boil.
4. Add turnip and cook until liquid almost dries up.
5. Cool down and set aside.

Dough
1. Put Tang Mien, tapioca flour into a mixing bowl, pour in boiling water and mix quickly with ladle or big spoon. Cover and leave aside for 15 minutes.

2. Add in shortening/oil and knead into a pliable dough. Roll out in a cylinder 4 cm /1 1/2 in, in diameter. Cut with a sharp knife into 2 cm/3/4 in slices. Dab a little oil on both sides of the slice and roll out gently into thin round shapes.
3. Place 2 teaspoons filling in the centre of each slice of dough and fold in half. Seal the edges by pressing together. Cut the edge with a pair of scissors for a neater edge.

Grease steaming trays with 1 1/2 teaspoons vegetable or cooking oil and steam Soon Kueh for 15-20 minutes. Remove and then brush with oil.

Serve hot with fried shallots oil, sweet soya sauce and chilli .

Notes :
When making the dough/skin, you must use boiling water to mix with "tang mien". this is to ensure "tang mien" is cooked and skin will not crack easily during wrapping.
When wrapping, try to press out all the air so that it is compact.

Tuesday, May 25, 2010

Sesame Oil Mee Sua 麻油面線

Mee Sua 7

Mee Sua 2

Mee Sua Collage

Mee Sua 8

Mee Sua 4

Sometimes, the simple and uninteresting can be deceptively good.

I just came back from my biking and binging vacation in Taipei. Thankfully, we've stayed physically active during the trip otherwise, we would all have grown 1 or 2 dress size bigger. I am not exaggerating for we were eating something or other every hour of the day.

Taiwan, unlike China, does not have its definitive cuisine -e.g. Canton Cuisuine (粤菜), Shanghainese Cuisine (泸菜), Sichuan Cuisine (川菜), Hunan Cuisine (湘菜), Teochew Cuisine (潮菜) etc... Hence, there isn't a distinctive Taiwanese Restaurant per se. Most restaurants in Taiwan serve one of the Main Cuisines from China. For example, the famous Ding Tai Feng is really a Shanghainese restaurant. Taiwan's gastronomic charms lie in their street food culture. Little snacks (小吃) and quick meals that are usually served in less glamourous settings. Simple and unpretentious stir-fry restaurants (小炒) that often do not even have a menu - where the cook will take the freshest ingredients available for the day and whip up a tasty dish without cracking their heads over recipes, flavour pairing or plating finesse...

A dish that I ate repeatedly over the last 4 days in Taipei is the Mee Sua (面線). Mee Sua (literally means thread noodle), most of us would know, is very thin, fine noodle. When cooked in soup, it takes on an almost congee like, smooth & slippery texture. It can be digested easily and hence is another favourite food for the sick, young and old. The most famous Mee Sua dish in Taiwan is undoubtedly the Oyster Mee Sua - cooked in a starchy flavourful broth and served with Pig Instestines and Oyster, this dish could most likely be the representative Taiwanese food.

Mee Sua 1
Apart from the Oyster Mee Sua, I had also tasted 3 other types of Mee Sua when I was in Taiwan. 2 of which were dry noodles tossed in special dressing. The one that I am reproducing here is the Sesame Oil Mee Sua which I ate at a charming 'mud hut'  stir-fry restaurant at Yangming Shan (Yangming mountain).
We were unimpressed by the bland looking noodles when it was placed in front of us but all fell in love with it when we tasted it. We finished the portion in a flash and had to place a second order.
Simple and unpretentious in taste, the wholesomeness of the noodles and fragrance of the sesame oil (use good quality sesame oil) was undescribably satisfying. So when I saw these hand made Mee Sua at the Airport Duty Free shop, I knew immediately that I had to get them.
Unlike the usual dried Mee Sua we find here in Singapore, these hand made versions are amazingly pliable and remind me of bundles of yarn used for weaving cloth. They look more like raw noodle than dried noodle.

I don't have a recipe to follow but simply tried my best to reproduce what I ate at Yangming Shan. Here goes.

Mee Sua 7(100)
Recipe

Water                 1litre
Mee Sua             2 bundle (or enough to serve)
Chicken stock     1 - 2 cup
Salt                     To season
Sesame Oil
2 cloves garlic
White Sesame

Method
1. Heat water in a heavy saucepan until boiling. Reduce heat so that water is not bubbling vigorously.
2. Put in Mee Sua and cook until the noodles is al dente (with a bite in the center of the noodle). Drain noodle.
3. Heat a wok until very hot. Add sesame oil and garlic (do not mince) and fry for a minute until fragrant.
4. Add chicken stock and cooked Mee Sua. Season with salt. Continue to simmer until chicken stock is almost dried up. Add sesame oil to coat noodle.
5. Dish out noodle and sprinkle with ground white sesame seed. Garnish with Parsely / coriander leaves.

Monday, May 24, 2010

Madeleine Medley - Ispahan Madeleine

ispahan1

Ispahan 2

Rose

Ispahan 4

Ispahan 5

" 'Ispahan', also known as 'Pompon des Princes', is a clear pink, half-open kind of Damask rose (an early type, introduced from the Middle east in European breeding during the crusading XIIIth century)." - Wikipedia
I have always associated Ispahan with Pierre Hermes - I am full of admiration for the Picasso of Pastry for dreaming up such wonderful flavour pairing. The merger of Rose, Raspberry and Lychee flavours is so impeccable that I would not hesitate to call it sublime. I feel a little audacious and ambitious trying to implement the Master's flavour pairing in my final instalment of my Madeleine Medley (it has to end... I can't write anymore about Madeleines) . However, the beauty of blogging is such - you are allowed to experiment with anything that strikes your fancy and subsequently choose to either brag, gripe or go on and on with the the most mundane account of it.

It is my constant fear that I should sit in front of my computer one day and have nothing interesting to write. The feeling is not unlike my sense of apprehension for the marriage institution. I have always told L that I fear the prospect of waking up one day in the morning after marriage and have nothing much to talk to each other anymore. I see married couples around me falling into the same rut and as such I have pretty much abhored the institution. L had chided me in a rather stern tone that I am being ridiculous -  that it is almost as if I am refusing to take a bath because I am afraid that I would drown in water.... Well, perhaps I am just not a bath person - I could never stay put in a warm bath tub for more than 5 mins - I would very much prefer the refreshing invigoration of a cool shower!

Back to the Ispahan Madeleine - indeed an overly ambitious attempt. The hump on the Madeleine, for some reason did not turn out as prominent as the previous 2 attempts. I had set out  wanting to create a Red Coloured morsel by brushing the baked Madeleine with a heat reduced portion of Raspberry Puree. However, this just merely turned the madeleine rather soft and soggy.  In the end, I had to settle for just the pink tinge in the cookie. Nobody ought to doubt the beautiful lingering fragrance of Rose/Raspberry/Lychee but the texture could have been a little more 'crusty' on the outside.

To wrap up, among the 3 experiments in this Madeleine series, I am most proud of my Kumquat Madeleines. These had the almost perfect texture and flavour. Well, until my next Proust moment, I will probably give madeleines a rest for now...

Ispahan (100)

Recipe

100g      Unsalted butter
2            Large Eggs
75g        Castor sugar
78g        All purpose flour
37g        Ground almond
3g          Baking powder
25g        Raspberry puree
1g          Rose Extract
10g        Lychee Puree
10g        Frozen Raspberry, broken  into bits and floured

Method
1. Sift flour, ground almond and baking powder together. Add sugar to the sifted powder and mix well.
2. In a mixing bowl, whisk eggs till foamy, add (1) to eggs to blend well. Add Raspberry Puree, Rose extract and Lychee Puree.
3. In the mean time, heat butter until butter boils and brown.
4. Add hot butter slowly into (2) and mix well until mixture is homogenous.
5. Mix in Frozen Raspberry.
6. Spoon batter in a greased and floured madeleine mold. Bake for 7mins at 220C.

Monday, May 17, 2010

Madeleine Medley Episode 2 - Kumquat Madeleine

Kumquat 6

Kumquat 10

Kumquat 8

Kumquat 11

Kumqat Collage 1

Continuing from Madeleine Medley Episode 1...

" And suddenly the memory appeared. That taste was the taste of the little piece of madeleine which on Sunday mornings at Combray (because that day I did not go out before it was time for Mass), when I went to say good morning to her in her bedroom, my aunt Leonie would give me after dipping it in her infusion of tea or lime blossom. The sight of the little madeleine had not reminded me of anything before I tasted it; perhaps because I had often seen them since, without eating them, on the shelves of the pastry shops, and their image had therefore left  those days of Combray and attached itself to others more recent; perhaps because of these recollections abandoned so long outside my memory, nothing survived, everything had come apart; the forms and the form, too, of the little shell made of cake, so fatly sensual within its severe and pious pleating- had been destroyed, or still half asleep, had lost the force of expansion that would have allowed them to rejoin my consciousness. But, when nothing subsists of an old past, after the death of people, after the destruction of things, alone, frailer but more enduring, more immaterial, more persistent, ,more faithful, smell and taste still remain for a long time, like souls, remembering, waiting, hoping, upon the ruins of all the rest, bearing without giving way, on their almost impalpable droplet, the immense edifice of memory." - Swann's Way, In Search Of Lost Time, Translated by Lydia Davis.

Indeed, how often have I argued with L when he would adamantly proclaim that KL food can beat Singaporean food - hands down - anytime. I used to protest to no avail. Finally one day, I stopped protesting and tried,in my most objective disposition, to explain to him how taste often transcends beyond the tastebuds- for very often our taste preference is already molded by childhood habits, lineage and most potent of all, memories. I remember him relenting a little and got a little pensive. He still likes to take a jibe at Singapore food from time to time but I think he is less vehement nowadays (or so I feel).

Indeed, as confirmed by the above passage, Proust's earlier Madeleine epiphany was really a lineage to his forgotten childhood memories. I do really enjoy reading Swann's Way.The book is so fine, so sensitive, so detailed, it is best read on a lazy Sunday afternoon, when you are not in a hurry to get to anywhere, when you have the time to leisurely peruse and re-visit the sentences to savour the nuances in the convoluted prose. He is especially good at nuancing the seemingly insignificant e.g. he spent literally pages describing about the sensation and the awareness of the drifting state of slumber between dream, sleep and wakefulness. He also struggled over a few pages to rationalise, to understand the sensation he felt when he partake of that spoonful of Madeleine with tea... before eventually confronting his childhood memories...he is one fiercely introspective man!

Kumquat5

Coming to the second episode of my Madeleine Medley - I choose to work with the punnet of Kumquats which I had bought from Japan almost a month ago. Suprisingly they kept quite well in the fridge, though I am sure they would have tasted better if I had chosen to eat them earlier. Nevertheless, these Kumquats (the Japanese call the Kin Kan 金柑) are deliciously sweet. I eat them whole with the thin skin. The citrusy flavour is exceptionally refreshing.  The typical Mandeleine uses Lemon zest. I went a little further by pulping the Kumquats and added copious amount of puree into the recipe. This render the Mandeleine moist and tender - and I am sure it is 10X better than Proust's dry, crumbly cookie! hahaha.....and I do prefer this to the Sesame version!

Kumquat5(100)
Recipe

100g                     Unsalted butter
2 large                  Eggs
75g                      Castor sugar
78g                      All purpose flour
37g                      Ground almond
3g                        Baking powder
40g                      Kumquat Puree ( pulped with skin using a blender)

Method

1. Sift flour, ground almond and baking powder together. Add sugar to the sifted powder and mix well.
2. In a mixing bowl, whisk eggs till foamy, add (1) to eggs to blend well. Add Kumquat Puree.
3. In the mean time, heat butter until butter boils and brown.
4. Add hot butter slowly into (2) and mix well until mixture is homogenous.
5. Spoon batter in a greased and floured madeleine mold. Bake for 7mins at 220C.

Saturday, May 15, 2010

Madeleine Medley Episode 1 - Sesame Madeleine

Sesame Madeleines (Sepia1)

Sesame Madeleines 4

Sesame Madeleines 3

Madeleines, the famous magical 'cookies' that gave French author, Marcel Proust that shuddering moment of epiphany. This synopsis from Proust's 'Remembrance of Things Past' - Swann's Way has been so well published and referenced that the Madeleine has practically become Proust's cookie..

"She sent for one of those squat, plump little cakes called "petites madeleines," which look as though they had been moulded in the fluted valve of a scallop shell. And soon, mechanically, dispirited after a dreary day with the prospect of a depressing morrow, I raised to my lips a spoonful of the tea in which I had soaked a morsel of the cake. No sooner had the warm liquid mixed with the crumbs touched my palate than a shudder ran through me and I stopped, intent upon the extraordinary thing that was happening to me. An exquisite pleasure had invaded my senses, something isolated, detached, with no suggestion of its origin. And at once the vicissitudes of life had become indifferent to me, its disasters innocuous, its brevity illusory - this new sensation having had on me the effect which love has of filling me with a precious essence; or rather this essence was not in me it was me. I had ceased now to feel mediocre, contingent, mortal. Whence could it have come to me, this all-powerful joy? I sensed that it was connected with the taste of the tea and the cake, but that it infinitely transcended those savours, could, no, indeed, be of the same nature. Whence did it come? What did it mean? How could I seize and apprehend it?"

The poetic and romantic part in me was immediately sold but the curious part in me was extremely skeptical - I had eaten the madeleine before - the famous little French cookie is pretty in its scallop shape but to me, it is not too different from a genoise sponge. Most recipes use ground almonds with flour but there are also recipes(such as this one) that uses just all purpose flour. Where indeed, did this all-powerful joyous stimulation come from? And it seems, concerted efforts and claims have been dedicated to re-create Proust's Madeleines but I believe that for those who are expecting to be jolted from their pensive moods by elated senses similar to Proust's, they will most likely be disappointed. Proust is a philosopher, a writer with sensibilities that demonstrate strange depth. Intensely introspective and sharply aware of his every fleeting thoughts, he is possibly extremely sensitive to external stimuli that would normally fly over our heads without warranting a second thought from us.

Sesame Madeleines 3(1200)

I enjoy the Madeleine but am not totally crazy over it. In fact, the dry crumbly texture Proust's descriptions alluded to does not get me excited. It is his subsequent verse that had me sighing dreamily... if you ask me, the good old Khong Guan/ Jacob's cream cracker soaked in Milo would probably bring me closer to that joyousness than the Madeleine.  Such is the power of words - long and convoluted as they may be in Proust's style... nevertheless, it has inspired me enough to do 2 things : borrow Swann's Way from the National Library  and start the Madeleine Medley series on my blog... I seek to experiment with different flavours for the madeleine striving for something different . The first in the medley is this Sesame Flavoured Madeleine. Adapted from Pierre Hermes's chocolate Madeleine recipe from Chocolate Desserts, I incorporated sesame powder and a hint of bamboo charcoal for drama... unfortunately the colour turned out more brown than black but overall, the fragrance of the sesame is lovely and with its light crust and tender crumb, it will certainly go well with tea.... without falling apart into crumbly bits, though, I am afraid...

Sesame Madeleines (100)
Recipe

70g                  All purpose flour
31/2 tbsp         Black sesame powder
1/2 tsp             Baking powder
90g                  Sugar
Pinch               Salt
2 large             Eggs
100g                Unsalted butter, softened at room temperature

Method

1. Sift flour, sesame powder, baking powder together and put aside
2. Using a whisk , beat eggs with sugar, salt until mixture is well blended.
3. Add butter and beat until well distributed.
4. At low blending speed, add in flour mixture - stirring enough to blend the flour with the butter mixture.
5. Cover batter with a cling film and refrigerate over night.
6. Set oven to 200C.
7. Bake batter in buttered and floured madeleine mold at 200C x 15mins.
8. Remove from mold and cool down.

Sunday, May 9, 2010

Chwee Kueh - Steamed Rice Cake With Preserved Radish 水粿

Chwee Kueh3

Chwee Kueh 9

Chwee Kueh 4

Chwee Kueh 5

This is my second time postng on Chwee Kueh. The first time was way back in July last year when I first started blogging - when I was struggling with my compact camera and agonising over finding a voice. I don't know if anyone ever read that post but till this day, I have not gotten any comments for it... those were the days.

I decide to revisit this because a 'Chwee Kueh Expert' friend of mine kept asking me if my chai po (preserved radish) has any Heibi Hiam (fried dried shrimps) in it. Unsure if Chwee Kueh is available across the straits in Malaysia but this is a popular breakfast snack in Singapore. Among my friends, there are already a couple of die-hard fans for this and most of them swear by the Chwee Kueh from Tiong Bahru market. That's how this insistence on Heibi Hiam came about - one of them claims that the Tiong Bahru Chwee Kueh has Heibi Hiam in the Chai Po.

Second reason for me to redo this is because I have finally got my DSLR camera. Quite coincidentally, both Ju and myself got the camera at about the same time after playing with a DSLR camera loaned from a friend. After alot of griping about how expensive the DSLR is, we still ended up buying.... almost the same model! But Ju is more fortunate, she got it as a birthday present - I had to dig into my own pocket for it - hence the slightly older model Canon EOS 500D I've had my eyes on this camera for a while, like the way they call it the 'Rebel' in the US. So Trissa, yes, I have finally bought it and like you had adviced earlier, I have no regrets about it - yet. Having a DSLR camera does not automatically guarantee great photos. I still feel that 'the eye' is the most important element in photo taking, the camera is just a medium, a tool to let people see what you see... and there are still many times when I can't see beauty. What the DSLR affords though, is better control over how the photos are captured. I like the fact that I can choose to control what I want to focus on and what I want to de-emphasis. I have been shooting with my new camera for the last three or 4 posts and I must say, the results are starting to become less frustrating compared to the days I was shooting with my compact camera....

Back to Chwee Kueh - for those who have never had this snack before, this is simply a steamed rice cake made from rice flour. The preserved radish is the important accompaniment that gives it flavour and for me, it is the reason to eat Chwee Kueh. For those who have watched the  Chwee Kueh vendor work, you would have noticed how the preserved radish is always kept simmering in a copious pot of oil.  The beauty of preparing such dishes by yourself is that it allows you to make adjustments and for me I had chosen to cut back the amount of oil used to fry the preserved radish and yes, I did add dried shrimp to it this time and in addition to that, I also added toasted sesame seed for extra flavour. I truly feel I have got a winning Chwee Kueh dish this time - the kueh was extremely tender and the Chai Po is bursting with flavours.

The best part of it is, it is actually extremely easy to make. So here's encore to the recipe with a tweak to the Chai Po...


Chwee Kueh 7(100)
Recipe :

Kueh
Rice Flour 150g
Corn Flour 20g
Water 300ml
Oil 2tsp
Salt 1/2 tsp
Water 800ml

Method :
1. Place rice flour, corn flour in a mixing bowl and add 300ml of room temperature water. Stir well until there are no lumps of flour.
2. In a heavy saucepan, add the 800ml water, oil and salt. Heat the content until it just begin to boil.
3. Pour the flour mixture slowly into the saucepan and stir continuously with a wooden spatula to prevent lumping. The mixture will thicken to a gluey consistency. Turn off the heat and continue to stir.
4. Spoon the gluey paste into individual Chwee Kueh molds (available from Phoon Huat). Steam over boiling water for 15mins.

Chai Po (Dried Radish)
Oil 200g
Garlic(chopped) 50g
Chai Po 300g
Dried Shrimps 30g (pounded or flossed in food processer)
Sugar 3tbsp
Salt 1tsp
Dark Soya Sauce 1tsp
Toasted white sesame  1 tbsp (grounded coarsely)

Method :
1. Heat oil in a heavy sauce pan. Fry Chai Po, dried shrimp and minced garlic until fragrant. Add sugar, salt and dark soya sauce for seasoning.
2. Add toasted white sesame.

Thursday, May 6, 2010

Cream Crackers - Back To The Basics

Cream Crackers 4

Cream Crackers 6

Cream Crackers 3

There is a myriad of emotions and memories associated with the trusted Jacob's / Khong Guan cream crackers and here are a few of them...

1.Milo dipping, Coffee dipping - do we all remember how we would dip the square crackers into our hot beverage and munch away at the soggy biscuit.
2.The image of the signature retangular tin is indelible. They also used to be our trusted secret safe boxes where we would stash away rolled up cash, precious gold trinkets and not forgetting dusty old love letters.
3. Donations to Orphanage and Old Folks Home - Practical food for the under previledged.
4. Poor man's food - the last moldy piece of cream cracker in the tin is often featured as the ultimate symbol of destitution in movies and dramas.
5. To the kids, this was the most boring biscuit we've ever grown up with - how we would always long for the lemon cream sandwich biscuits, the wafer bars and for the more affluent families,Danish butter cookies....

Fads come and go. For a while, everyone was crazy over cupcakes, macarons and what not but at the end of the day,it is the simple and good that prevails. I bet for most of us, the trusted pack of Kong Guan cream cracker is a standard item in our larder ... next to the instant noodles. There is something wonderfully comforting and reassuring about the cream cracker. When the hunger pang strikes in the afternoon or in the middle of the night, this would be the healthy and trusted option we reach out for. That explains why, most office pantries would stock these boring but cheap snacks. The last time I went for my annual health check- up at a posh downtown health screening center,  these humble snacks were served at the coffee  table together with cereal and sandwiches after the blood test.

Obviously more varieties are now available in the market. My favourite would be the Khong Guan wheat cream crackers and the butter cream crackers. Retaining the original crispy outside and slightly softer center texture, cream crackers today are more fragrant and flavourful. They come  in smaller 3 slices handy packs now which makes it easier to carry around for a quick pick-me-up and are 'enriched' with calcium, vitamins and what not... And honestly, when I start, I can't stop at one slice - such a far cry from the old days where I would honestly say that this was my least favourite biscuit!

I did a quick search on Tastespotting and Foodgawker for a cream cracker recipe and couldn't find one. I guess this is one those humble accessible snack which no one has bothered to make. I eventually found Mercy's cream cracker recipe on Recipezzar and decided to give it a try.

I was a little concerned by the simplicity of the recipe and worried that it would be tasteless. Suprisingly, it was pretty tasty and my neighbour's kid liked it. However, I do have to say that the texture is far from the Kong Guan/ Jacob's texture. I remember reading somewhere that this cracker which originated from Dublin, is made with wheat flour and yeast. I suppose the yeast is responsible for the definitive light puff-like outer layer and the softer center.

Picnik collage
I shall keep searching and hopefully I will be able to get closer to the Khong Guan or now Julie's crackers :).

Cream Crackers 1(100)

Recipe :
2 cups cake flour
1 teaspoon salt
1 1/2 teaspoons sugar
1 teaspoon baking powder
2/3 cup heavy cream

Method:
1.Preheat the oven to 350°F.
2.Use an ungreased cookie sheet.
3.Combine the flour, salt, sugar and baking powder in a bowl, stirring with a fork.
4.Slowly add the cream while continuing to stir; mix well until the dough holds together in a ball (if the dough is still too crumbly, add another tablespoon of cream).
5.Turn the dough onto a lightly floured surface and.
6.Roll it out to a thickness of about 1/8 inch.
7.Using a cookie cutter or a large drinking glass, cut the crackers into 3 inch rounds.
8.Place the crackers on the cookie sheet, and prick the center of each cracker twice with the tines of a fork.
9.Bake on one side for 8 minutes, turn the crackers over with a metal spatula, and bake for 6 to 8 minutes more, or until the crackers have several golden spots and are slightly colored on the edges.
10.Remove and place on a rack to cool.

LinkWithin

Related Posts with Thumbnails