Announcement

This site will be migrating to a new address.
Please visit me at @Køkken and change your subscription to this blog to my RSS Feed

You Will Be Redirected!

Please do not leave any more messages on this blog. I will not be publishing or responding to any more comments left here. You will be automatically redirected to http://www.atkokken.com All posts have been migrated. You will be able to locate any posts by performing a quick search at my new site. Thank you.

Sunday, November 27, 2011

Martha Stewart's Peanut Butter Jelly Cupcake


PBJ Cupcake4

PBJ Cupcake8

PBJ Cupcake7

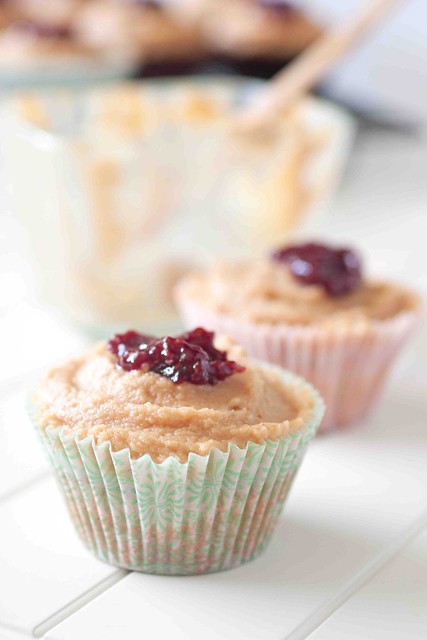
If you've always loved a good peanut butter jelly sandwich and if you are not averse to a luxuriously rich buttery cake, I suggest you bookmark this and bake it at the first opportunity you have. This cupcake is gloriously addictive and beats Magnolia Bakery's Cupcake hands down effortlessly!

So far, I've had pretty good results with the recipes from Martha Stewart's Cupcakes. I only wish I have the time to bake every single one of them. (See here , here and here for the recipes I have tried...)
The recipes are in general not too sweet though I normally still try to tune down the amount of sugar used. I like it that Martha Stewart's book features a good collection of more adult and classic cupcake flavours and design.

PBJ Cupcake1
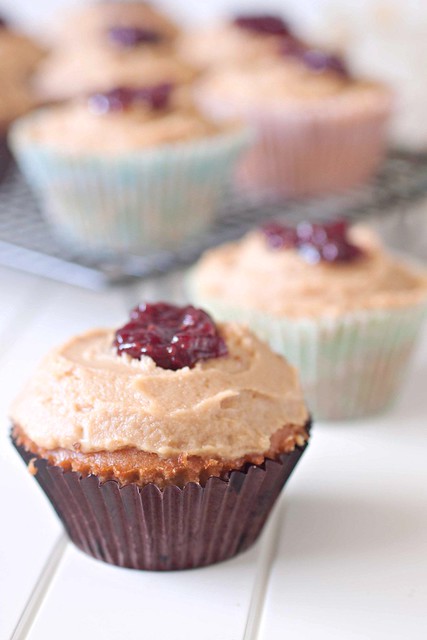
This cupcake is moist and delicious enough to eat on its own. The incorporation of coarsely chopped roasted salted peanuts adds lovely texture to every bite but the creamy peanut butter frosting is one icing on the cake that takes you to the realm of cake-bliss. I would gladly lick the frosting from a spoon.

However, be warned, the deliciousness is the result of copious use of sour cream, thick cream,cream cheese and of course, creamy peanut butter! However, your inhibition gets lost at first bite. So enjoy and worry later!

I am  submitting this post to Aspiring Bakers #13: Enjoy Cupcakes! (November 2011) hosted by Min of Min's Blog. Please do take time to check out the event here


PBJ Cupcake2(250)
Recipe : (Adapted from Martha Stewart's Cupcake with minor adjustment)

1 3/4 cups              all purpose flour
1/4 tsp                    baking soda
3/4 tsp                    baking powder
1/2 tsp                    salt
3/4 cup /136g         unsalted butter
1 cup                      sugar
2/3 cup                   creamy peanut butter (I used 100g)
3                             large eggs
1/2 tsp                    vanilla extract
1/2 cup                   sour cream
3/4 cup                   coarsely chopped roasted salted peanuts
Creamy Peanut Butter Frosting
1/2 cup                    strawberry jelly or jam

Creamy Peanut Butter Frosting
6oz (170g)              Cream cheese @ room temperature
1/3 cup (40g)          Confectioner's / icing sugar
1 cup (200g)           Creamy peanut butter
1/2 tsp                     Vanilla extract
1/2 cup                    Heavy cream (whipping type)

Method :
Cupcake 
1. Preheat oven to 190C (375C). Line standard muffin tin with paper liners. Sift flour, baking soda, baking powder and salt.

2. In a mixing bowl, cream butter and sugar until pale and fluffy. Reduce speed to low. Mix in peanut butter, add eggs one at a time, beating until each is incorporated, scraping down sides of bowl as needed.
Mix in vanilla extract. Add flour mixture gradually and mix well to incorporate. Mix in sour cream and peanuts.

3. Divide batter evenly among lined cups, filling each 3/4 full. Bake at 190C for 20 min until a cake tester inserted in centers comes out clean.

4. Cool down cupcake completely and frost with creamy peanut butter frosting. Leave a small well in the middle of the cupcake. Add a dollop of strawberry jam into each well.

Creamy Peanut Butter Frosting

1. Cream cream cheese and sugar together until pale and fluffy.

2. Add peanut butter and vanilla extract and mix until well blended.

3. In a separate bowl, whip heavy cream until medium / stiff peaks are formed.

4. Fold the whipped cream into the cream cheese mixture.


Friday, November 25, 2011

Cranberry Cream Cheese Buns - More Experiments


Cranberry3

Cranberry1

Cranberry6

This is a very quick post to report back on my experiment on the Cranberry Cream Cheese Buns.

The last time I made these, I did not succeed in getting sufficient cream cheese filling into the buns. I repeated the last recipe and went for a simpler cream cheese filling formula. Chilled to get a firmer texture, I was able to portion a generous amount of cream cheese filling with an ice cream scoop. However, after baking, what started out to be a silky smooth cream cheese, took on a split and curdled appearance.

The buns were tasty though, especially when it is still warm from the oven. However, in terms of replicating Barcook's creamy cheese filling, this is not a success. It is baffling how Barcook's filling remains so smooth and silky even after baking... it is almost as if they injected the filling after the bread was baked. Most dairy products, may it be cream cheese or butter tend to curdle a little after baking. I tried a few different combinations of cream cheese / cream cheese spread/ mascarpone - all did not retain the silky creamy texture. After the last trial , I simply decided that the bakery must have used some form of processed cheese which is not available to us.

If you choose to use my last recipe for the sweet buns, the result of the buns will be similar to the bakery's - very soft, very easily squashed to yield a wrinkly appearance. (above photos)
If you prefer a bread with more structure, you can try the following sweet buns recipe and it will give you more structure. (See photo below)

Cheesebun1

Anyway, I think I've had enough of cream cheese buns for now and am satisfied enough as far as a home baked cream cheese bun is concerned.
For those who love this enough to experiment further, please keep me posted... :)

Cheesebun2(250)
Recipe : (adapted from 65C Tangzhong Bread)

A. Water Roux
Bread flour           100g
Water                    500g

B.
Bread flour            228g
Plain flour             60g
Dried Yeast          6g
Castor sugar         30g
Salt                       3g

C.
Milk                     120g
Egg                      30g
A (Water Roux)   72g

D.
Unsalted butter     30g

E.
Dried Cranberry   50g ( I ran out of this so I omitted the berries for this exercise)

Method :
A. Water Roux
1. Mix flour and water in a saucepan and stir well with a whisk. Heat up the mixture in the saucepan gradually until temperature reaches 65 C , stirring all the time.
2. Remove the mixture from heat and continue stirring until water roux thicken. Stirring lines should be visible in the water roux.

Bread :
1. In a mixing bowl, mix B (except for salt) and C (except for water roux) and mix with a dough hook until the dough gathers to form a ball.

2. Add Water Roux from C. Continue mixing until dough gathers together. Add the salt from B.

3. Add butter and continue kneading for 15-20 mins on medium speed. The dough should no longer stick onto the wall of the mixing bowl. It should not be tacky when you tap on it with your fingers. Window pane test can be performed now by stretching the dough to form a thin pane. The stretched pane should not break. Add in cranberries at this stage.

4. Gather the dough and roll it into a ball and let it proof in a lightly oiled bowl for 40mins at room temperature.

5. Knead the dough slightly on a lightly floured board. Portion the dough into 40g portions. Roll each portion into a small ball and let it proof for 10mins.

6. Flatten each dough and scoop about 20-25g of cream cheese filling and seal the dough to form a round bun.

7. Place (6) on a lined baking pan and place another baking sheet over it. Proof the dough for 30mins.

8. Bake (6) together with baking sheet on top at 170C for 20mins. Cool down.

Cream Cheese Filling :

1. Cream 200g  of cream cheese with 50g of powdered sugar, 18g whipped cream and 1 tsp of vanilla extract until smooth.
2. Chill until firm before use.


Sunday, November 20, 2011

XO Sauce Stir Fried Loh Shu Fun / Mee Tai Mak

MeeTaiMak9

MeeTaiMak2

MeeTaiMak6

MeeTaiMak10

Mee Tai Mak/ Bee Tai Mak is one of the many forms of rice noodles that we eat in Asia. Very much like a shorter and more wriggly cousin of the Japanese Udon, the cantonese name of this noodle (Loh Shu Fun) literally translates to mean Rat's Noodle. Not too difficult to understand for the tapering shape of the noodle does somewhat reminds one of the wriggly tip of a rat's tail...

Interestingly though, I had always referred to the noodle as Mee Tai Mak/ Bee Tai Mak when I was growing up. It was only until when I was much older , a widely reported outbreak of food poisoning in Malaysia exposed me to the more colourful ratty term. The food poisoning was traced back to a batch of contaminated Mee Tai Mak. The papers were rife with reports and stories of how people would fall sick after they ate Lou Shu Fun..( the pronounciation of the term can also be interpreted as  rat's powder / rat's poison). I was dumbfounded when I read the reports and started to ask my friends why on earth would those people in Malaysia want to eat Rat Poison??  Only then, did I learn that the Rat Poison was actually Mee Tai Mak...

I was invited to join a bloggers' gathering last weekend. Initiated by ZY of Baking Library, it was a small gathering among some of the Singapore food bloggers whom I have come to know over the last 2 years. I knew I had to bring a savoury dish for the event (I brought Mee Rebus for our first gathering last year) as most of the others I knew would be bringing sweet treats.

MeeTaiMak7
Fried with XO sauce and prawns, this is a relatively easy dish to prepare. However, dishes like these (as is true for most Chinese dishes) would taste best when cooked over strong heat. The Mee Tai Mak especially needs to be tossed very quickly over high heat to prevent it from turning soggy and mushy over prolong stir frying. Hence what I did was, I first poached the noodles in boiling water for 5 seconds before frying them quickly in small batches over very high heat in my wok. As a result, I had to divide and fry my potluck portion into 3 lots.
If you are only cooking for a small family at home, this is definitely more manageable - just make sure the wok is very hot.

Overall, I think my efforts were met with reasonable success... good enough to open shop? Maybe but I am still not consistent from batch to batch and I wouldn't want to stand in front of a blasting hot wok the whole day... :)

MeeTaiMak9(250)
Recipe :

Mee Tai Mak               200g  (enough for 2)

Prawns                        6 -8 medium to large size prawns, shelled and deveined.
Spring Onion              4 stalks, chopped
Chili Padi                    Chopped finely. (you can also replace with sambal chili paste)
Bean Sprouts              50g (poached for 10 seconds in boiling water. For this post, I ran out of bean
                                   sprouts, so I omitted them)

Eggs                           2, beaten
Oil                              1 tbsp

Seasoning
XO Sauce                   1 tbsp
Oyster Sauce              1 tbsp
Sugar                          1/2 tbsp
Light Soya Sauce       1 tbsp
Dark Soya Sauce        1/2 tsp
Sesame Oil                  1/2 tsp
White Pepper               Dash
(For those who prefer a stronger taste, the seasoning portion can be increased in proportion)

Method :

1. Poach Mee Tai Mak in boiling water for 5 seconds, remove from water with a slotted spoon and set aside. (do not over cook Mee Tai Mak)

2. Heat up the wok until smoking. Add 1 tbsp oil and add beaten eggs. When eggs just begin to set, scramble with frying ladle and add Mee Tai Mak, Prawns, Spring Onion, Bean sprouts and seasoning.

3. Fry until prawns are cooked. (turns pink)

4. Dish out the noodles and garnish with more chopped spring onions and sesame seed (optional). Serve immediately while hot.

Tuesday, November 15, 2011

Strawberry Jelly Cheesecake - Strawberry Jelly Heart

Jelly1

Jelly5

As much as I enjoy eating these Jelly Cheesecake, photographing them proved to be an extremely frustrating and uninspiring experience - quite possibly because all the imperfection rendered during cutting and slicing them (e.g. jagged edges) were magnified in ghastly detail through the camera's lens.

A very popular non-bake cheese cake in Singapore, this recipe has been blogged over and over again by food bloggers in Singapore. More well known as Strawberry Jelly Heart, this was possibly the brain child of a local home bakery who had first encapsulated a heart-shaped strawberry in jelly over cheese cake.

Jelly Heart5
The pleasing combination of digestive biscuit base, cheese cake and jello is extremely easy to make-if there was ever a Cheesecake for Dummies, this would easily qualify as one. The only thing that one needs to focus on is to make it look pretty... which wasn't difficult until I started slicing it.

This is an overall crowd pleaser, everyone loved it when I served them - the cheesecake is not overpowering while the digestive biscuit base is fragrant and buttery. The Jello?... brings back childhood memories...

For those who are interested, Valerie Kong conducts a very good and meticulous class for this and other cheesecake recipes. However, the recipe has become well tested in many blogs, an example is Happy Home Baker's blog.

Jelly1(250)

Recipe ( from HHB)

base:110g digestive biscuits(about 8 pieces), chopped into fine crumbs
40g melted butter

filling:
250g cream cheese, soften at room temperature
50g icing sugar
1 tablespoon gelatin powder
40ml boiling water
1 teaspoon vanilla essence

1 box Jelly crystal (strawberry flavour)
1 cup boiling water
1 cup cold water

Some strawberries, cut into heart shapes

Method:
1. Mix biscuit crumbs & melted butter together and press firmly with the help of a spoon onto the base of a 18cm cake tin. Chill for 30 minutes.

2. Place gelatin powder and boiling water in a bowl. Heat a pot filled with some water until just simmering and place the bowl inside the pot. Dissolve gelatin and boiling water in the bowl. Keep warm.

3. With an electric mixer, beat cream cheese , icing sugar and vanilla essence until smooth & creamy. Blend in gelatin solution and mix well.

4. Pour the cheese mixture into the cake tin. Layer the strawberries on the cheese mixture. Chill for at least 3 to 4 hours.

5. Dissolve the jelly crystal in the cup of boiling water, followed by the cold water. Pour the jelly on the cheese mixture. Let it set before removing from the cake tin.


Thursday, November 10, 2011

Cranberry Cream Cheese Bun - Barcook? Not Quite Yet

Cranberry3

Cranberry2

I have never quite intended to bake this, definitely had not planned on putting up another bread post so soon after my recent Hokkaido Milk Bread post. Alan of TravelingFoodies had contacted me and asked me if I have a working recipe for the Cranberry Cream Cheese flat bun. He is a big fan of Barcook's popular out-of-the-oven-this-minute-gone-next Raisin/Cranberry Cream Cheese bun.

I have come across recipes for this in 65C Bread by Yvonne C and have also seen this at one of the classes conducted by Valerie Kong. So I was quick to respond to Alan, telling him that this is not so uncommon. And honestly, if you are already familiar with the Tangzhong/Water Roux/Sponged dough  method of baking bread, the mystery factor of this bread evaporates.... or so I thought.

So, I told Alan that I will take this up as an assignment and try to post it soon.
I chose to work with this basic sweet soft bun recipe and tried to hunt around for a cream cheese recipe. I could have easily turned to Valerie Kong's recipe but I don't think I should publish it as she is still running classes.

The sweet soft bun delivered as it always did. In fact I thought it turned out even softer than before - could this be the result of deliberately suppressing the rising dough with a baking sheet weighing down on it during proofing? I have no proof... :)

The challenge of making this was filling the buns with the cream cheese. The dough, interspersed with cranberries, was more difficult to shape and seal. I tried to introduce a more generous amount of cream cheese filling to my first few buns but they promptly start to leak as I shaped them. As a result of which, I was intimidated into just piping a small dollop of cream cheese filling. They bake well without the filling bursting out of the dough in the oven but the end result was a far cry from the creamy lava-like ooze that makes Barcook's bread so addictive.  My bread tasted more like just a plain cranberry bun with a hint of cheese... my dollop of cream cheese filling practically disappeared!

Cranberry1

I am going to repeat this again with less cranberries and see if I will be able to get more filling into the dough. Also, I suspect that my cream cheese filling could be too fluid - it would probably wrap better if I chill it more to thicken it.

So anyway, my colleagues helped me to clean them up. The buns had the 'looks' but not the substance... :( Check back later for updates for my second attempt....

Cranberry2(250)
Recipe :

1 portion of Sweet Soft Buns - See here.
50g          Cranberries, soaked in water for 30mins to soften

1. Follow the method as stated in the sweet soft buns. Add in drained and dried Cranberries just before first proofing.

2.After first proofing, divide dough into 40g portion and shape them into balls. Let these proof for 10mins.

3. Flatten dough with a rolling pin and pipe a generous portion of Cream Cheese filling onto the flattened dough. Seal and shape into a ball.

4. Space out filled dough on a baking tray. Press down on the dough with a second baking sheet. Let it proof like this 60mins.

5. Transfer the baking tray with pressing tray into oven and bake at 210C for 12 mins.

6. Remove from oven, remove the pressing baking sheet and allow to cool.


Cream Cheese Filling (Adapted from Alex Goh's The World Of Bread)
(A)
50g             Butter
80g             Icing Sugar
(B)
250g           Cream Cheese
Pinch of salt
(C)
2                Egg Yolks
(D)
20g            Corn flour

Method for Cream Cheese Filling :

1. Cream (A) until well combined.
2. Add (B) and cream till well blended
3. Add (C), cream till smooth
4. Add (D) then (E) and mix till well blended
5. Refrigerate till firm.

(The portion above will yield more than you need, the excess can be stored in an air tight container in the fridge for 3 days.


Saturday, November 5, 2011

Hokkaido Milk Loaf (Hokkaido Milk Bread) - My First Bread Loaf....

Milk Loaf2

Loaf3

Milk Loaf 5

I jumped onto the Bread Bandwagon rather late in life...:)  My first bread were the sweet soft buns-individual soft butter rolls made using the Japanese Water Roux (Tangzhong) method. Encouraged by the positive outcome, I added Yvoone C's 65C Tang Zhong Bread to my cookbook collection. Poring over the different permutations of butter to flour and liquid to flour ratio, the book demonstrated the countless possibilities the Water Roux method is capable of delivering.

The buns were individually portioned and were relatively easy to handle. Variations can be introduced rather easily with different types of sweet and savoury fillings. Next in the category are the sandwich loaves. Stately and substantial, these normally require a little more kneading and rolling.
The recipe featured here is denser and richer. The incorporation of Hokkaido milk (I do happen to have Hokkaido milk which I had bought from Hong Kong, but normal full cream milk will do just as well) and fresh cream yields a fine crumbed, moist texture. I had my first slice with canned chili Tuna and it felt very satisfying. I do suspect, however, that I had not proofed it enough as the instructions did not specify the duration for the last proofing stage but merely stated that the loaf should proof until it has risen to 80% of the baking pan.

Overall, a worthy experiment and I can't wait to work my way through the book....

Milk Loaf2(250)
Recipe : (from Yvonne C's 65C Tangzhong Bread)

Bread flour          270g
Castor sugar        43g
Salt                      4g
Instant Dried Yeast  6g

Egg                      43g
Fresh Cream        29g
Milk                     27g
Tang Zhong         92g

Butter                   24g (cubed)


Method :

1. Place Bread flour, sugar, dried yeast, egg, fresh cream, milk in a mixing bowl. Mix with kneading hook at low speed until liquid is well blended and dough starts to come together.
2. Add Tang Zhong and salt. Knead until the dough comes to together to form a ball.
3. Add butter slowly, allowing butter to be incorporated with dough before adding more.
4. Continue to knead at medium speed for 15 minutes until window pane stage is obtained. (this is a test done by stretching the dough. The dough will thin out when stretched but will not break. If the stretched dough breaks, kneading is insufficient)
5. Gather the dough into a ball and place in a lightly oiled bowl and cover with plastic wrap. Allow dough to proof for 40mins. (28C/ 75% relative humidity)
6. Separate dough into 4 smaller portions. Roll each small portion into a round ball. Proof at room temperature for another 15mins. (room temperature)
7. Flatten each small ball and using a rolling pin, flatten and roll dough into an oval shape to remove trapped air. Fold the 1/3 of longer side of the oval flat dough inwards towards the center of the dough and press the folding line to seal. Fold the other longer side of the dough inwards towards the first folding line and press to seal.
8. Flip the folded dough over so that the seal lines are now facing downwards.
9. Using a rolling pin, roll the dough along the length such that it stretches to about 30cm. Flip the dough over and from one of the stretched dough, roll up the dough like a towel. Place the seal line into a baking loaf pan.
10. Repeat the same for the other 3 balls and line all 4 rolled up dough side by side in the loaf pan.
11. Let doughs proof in pan until it fills up 80% of the pan.
12. Brush with egg wash. Bake in an oven preheated to 170C for 35mins.
13. Remove from oven and let the loaf cool down before demoulding.

LinkWithin

Related Posts with Thumbnails