Announcement

This site will be migrating to a new address.
Please visit me at @Køkken and change your subscription to this blog to my RSS Feed

You Will Be Redirected!

Please do not leave any more messages on this blog. I will not be publishing or responding to any more comments left here. You will be automatically redirected to http://www.atkokken.com All posts have been migrated. You will be able to locate any posts by performing a quick search at my new site. Thank you.

Saturday, October 24, 2009

Buddha Mango Pudding...Sweet Ohmmm....

Buddha Mango Pudding

Buddha Mango Pudding2

Buddha Mold Collage

Buddha Panna Cotta

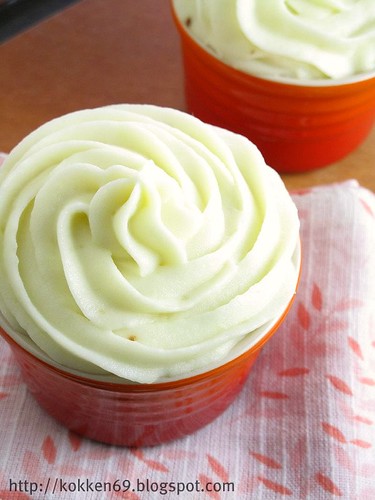
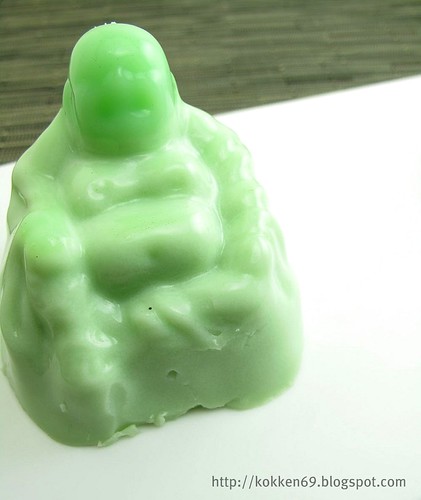
Cooking is fun and I admit very often, I don't cook to eat but to play in the kitchen. This dessert will elicit boisterous guffaws - even when it does not turn out right as demonstrated by my first attempt to use the mold with a Pandan Pana Cotta recipe. The green Pandan juice gives the Pana Cotta a nice tender jade green appearance but as this was set with gelatine, it was too soft to give definition to the facial details. I was disappointed with the photo and had sent it to L to see if he could still recognise this green glob. 'Looks like a laughing Buddha to me' - he had messaged back. I felt a little better and told him what I was doing. He messaged back a Rolling On The Floor Laughing emoticon followed by, 'I thought you want to buy a Jade Buddha!'....

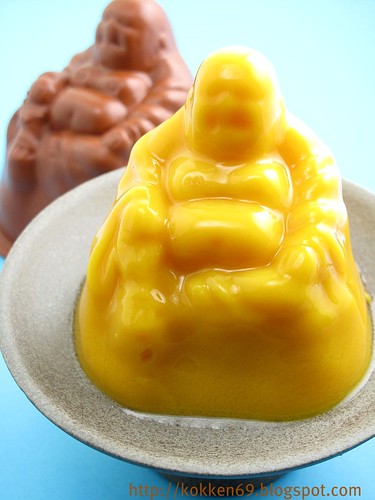
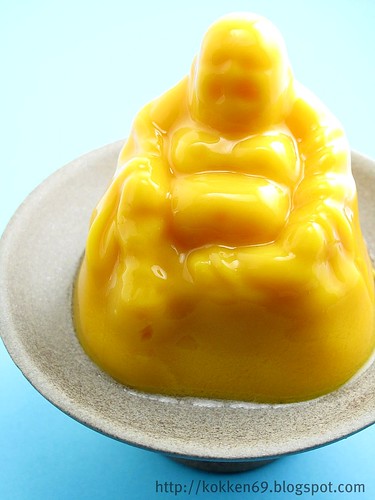
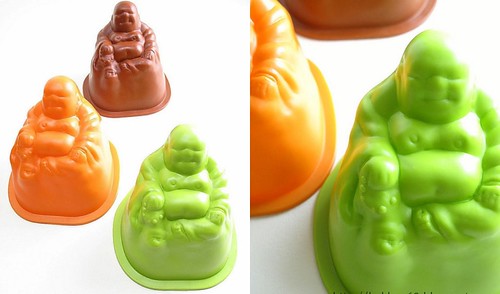
I had bought these molds at the beginning of this year from my favourite quintessential curio lifestyle store, Charles & Marie. These Il Buddhino pudding molds are shaped like a laughing Buddha. I am a Buddhist and have always loved the Buddha motif. The Buddha is possibly one of the most embraced religious figure/motif in the world by Buddhists and non-buddhists alike. I don't know how and when it started but the Buddha figure seems to have become a favourite element in interior design and lifestyle products. It could have started with  The Buddha Bar Restaurant in Paris - the opulent interior design, the tragically cool music... the soothing sense of chill (out).

While I had looked forward to receive these molds, I had let them sit in my over-flowing kitchen drawer for more than 6 months after I received them. The Pandan Panna Cotta was what I really wanted to make with them - for, exactly as L had commented, it would have looked like a Jade sculpture. But alas, it did not turn out well. Also it will not photograph well because the faint facial imprints on the smooth reflective pudding would have been almost indiscernible on a light coloured finish. Hence my decision to work with a pudding with a darker colour. For my second attempt, I made a Mango Pudding with dark orange Pakistani Mangoes and set it with Agar powder instead of gelatine - to give it more structure and form.

I am quite pleased with the way the Mango Pudding turned out but am still partial towards the Jade Green finish. As for eating it....I have so far always started from the base and still feel wierd about digging my spoon into the head... अमिताभ,Amitābhaḥ.

Recipe for Mango Pudding:

Mango Puree     125g
Fresh Cream      1 Tbsp
Milk                   1/4 cup

Water                1/2 cup
Agar Powder     1/4 tsp
Sugar                 1 tbsp ( can be adjusted depending on Mango's sweetness)

Method:

1. Gradually add Fresh Cream into Mango Puree, stirring constantly to ensure good mixing.
2. Add Milk gradually to (1) with constant stirring.
3. Boild water with Agar Powder and Sugar until dissolved. Reduce heat and simmer mixture for 3 mins. Cool to luke warm and add gradually to (2).
4. Pour (3) into Buddha mold and set in the fridge.

Monday, October 19, 2009

Caneles, Canneles? - French Pastry


Custardy Canele3

Canele Closeup


Caneles

One of the things I like about traditional French Pastry is that every pastry seem to have a legend or story behind it. Some of these legends are mysterious and have been handed down from generation to generation... giving the pastry chefs who are still working with these recipes a sense of mission and making them guardians of these traditions.

I did not know what a Cannele was until some 2 years ago when I saw them at one of the fine patisserie in Singapore who calls themselves.. what else, but Canele. That was about the time when Singapore became infected by the Macaron fever. Like every avid baker I knew, I learnt to make macarons and was on a constant quest to seek out macarons from different patisseries to understand and compare. Together with Bakerzin, Canele has one of the best macarons I can find in Singapore. It was during my first trip to Canele that I spotted the cannele- dark crusty little knobs that were going at $1.50 a pop. Out of curiosity, I bought one piece. It was an intriguing little cake - hard, crusty on the outside and soft custardy on the inside. I didn't go ga-ga over it but I was fascinated. It wasn't until much later that I googled about this mysterious cake and discovered the magic behind it.

Originated from Bordeaux about 300 years ago, legend has it that these cakes were made by nuns using flour spilled over the dock by some cargo ships. These sweets were made using copper fluted molds buried in embers and distributed to poor children - Other tales exist about the origin of this cake but what fascinated me was that this almost charcoal black morsel had risen and lost its popularity over the centuries and it was not until about 20 years ago, they started to re-surface with a vengeance. In order to maintain the integrity of the cake, 88 patissiers in Bordeaux formed a brotherhood to safeguard the recipe. To differentiate their devotion to the original recipe, the Bordeaux chefs had spelt their cake as Caneles (with a single n, vs Canneles) and as such, the Canele de Bordeaux is the official cake of the City while elsewhere, the cake is known as Canneles... Such is the intensity of their devotion and commitment to their craft.

For the benefit of those who have not had the chance to partake of this magical cake, this is a egg and milk based recipe baked in traditional copper molds at high temperature for a long time. The end result is a dark caramelised crusty shell with a soft custard like center. The generous use of vanilla and rum gives it a refined yet robust flavour. Best served with coffee. I first learnt to make this using Bakerzin's Daniel Tay's recipe but have grown to prefer another recipe found in one of my favourite cook book Egg by Lyndsay Mikanowski. I don't make Caneles often as it tends to get tedious - not because it is difficult but because I ONLY HAVE 6 MOLDS to work with!!! Each batch needs to be baked at high temperature for an hour... so yes, after 1 hour, I only get 6 little Canneles! Why, you will ask - because the copper molds are so damn expensive! They cost me $30 each! I suppose I can buy a silicone mold but the caramelising effect is quite different from the copper mold.
Caneles Molds
Until I am willing to splurge over more molds, I probably will not make enough to distribute among friends...


Picnik collage
Recipe :
2             whole eggs plus 1 yolk
500ml      milk
225g        sugar
50g          butter
2 tsp        Vanilla Paste
4 tbsp      Rum
100g        plain flour

Method:
One day before :
1. Boil milk with 100g sugar in a heavy saucepan. Once boiling, remove milk from heat and add butter and vanilla paste. (or vanilla pod)
2. Whisk eggs with remaining sugar until mixture whitens.Add flour and mix well. Add in boiled milk mixture.
Sieve and refrigerate for at least 24hours.

Next day:
1. Coat cooled copper Cannele mold in fridge. Coat molds with melted beewax/butter (1:1).
2. Add rum to the refrigerated batter - sieve again if necessary. Fill the molds with batter and bake at 180C for 60 minutes.
3. Unmold when still hot and leave to cool. Once unmolded, the cake is soft and spongy. The crust will harden as it cools. Ideally, the cake should be almost charcoal black.

Sunday, October 11, 2009

Creamy Mashed Potato - Eat Kentang

Mashed Potato 2

Mashed Potato1


Eat Kentang! All of you fellow bloggers from the West, you probably are scoffing at my audacity of putting up a post on mashed potatoes...does she not have anything better to share? It's almost akin to writing a post on cooking white rice. Simple as it may seem, not everyone here in Asia can make a good mashed potato. Potato is not our staple food and you may find it amusing that for most of us in Singapore who are 35 years old and above, our first exposure to mashed potato was actually through Kentucky Fried Chicken (KFC) and our first sight of French Fries was at Mac Donald's , when they opened  shop here some 30 years ago.

Potatoes are available in Asia, but we tend to cook it differently. My favourite are the softened potatoes in the spicy curry chicken broth. In fact, I remember whenever my mother cooked curry chicken, the potatoes in the one pot dish would be the first to be wiped out - leaving behind chunks of chicken meat in dried up curry gravy... The types of potatoes we have here in Asia also tend to be very limited. Most of what we get are smaller potatoes of the waxy variety. The floury Russet, Yukon or Maris Piper are not readily available and tend to be more expensive.
Russet Potato

When we were younger we also tended to associate potato dishes with the Westerners. Western food like pork chops and steaks were commonly served with fried potato wedges and used to be favoured by 'English speaking' families. Hence, for classmates who came from 'English Speaking' families, we commonly refer to them as kids who fed on Kentang (the malay word for potato). Looking back, those memories are so incronguent with our lifestyle today but they've taken on a retro charm of its own and I am glad to be part of the generation that had been charmed by them.

Well, having said that, I must admit the mashed potato at KFC was one of my favourite side dish back then. However, as one gains experience and a more refined palate, one gains the ability to discern the good from the bad... Hence, when I saw that guest chef ,Tim Ross-Watson's Old School Sunday Roast class at Shermay's Cooking School included a 'Michelin-Star' Mash Potatoes, I signed up in a heart beat.

Mashed Potato with Luncheon Bits


The recipe is easy to follow and the end result is a smooth and creamy yet fluffy mashed potatoes that had me stealing mouthfuls of  it as I whisked. I am not going to publish the recipe as the Chef is still running classes at the school. However, I can share what I have picked up as pertinent points to a good mashed potato :

1. Choose the right potato. Floury species are best suited for mashing.
2. The technique used to mash the potato makes a difference to the final texture. I have added a new toy to my ever expanding collection of kitchen gadgets : the Mouli grater.
3. Using a smoked salt to season the potato gives it a subtle enhanced taste. ( I got the Fleur de Sel with Smoked Jalapena at a fine food store in New York last year. Possibly expired but hey, salt is salt.)
4. Last but not least  - lots and lots of good butter!

Smoked Salt
Other than that, the process is simple and any cookbook will be able to provide good instructions on how to prepare the mashed potato.

For now, this recipe is for keeps - everyone whom I had fed it to, had been impressed and loved it!
Mashed Potato 4

Tuesday, October 6, 2009

Cheese Puff (Petits Choux Au Fromage) - Choux Pastry Part 2

Cheese Puff2

Cheese Puff 4


Continuing with my experimentation with choux pastry.Pared down to its most basic, the choux pastry is made by melting fat in liquid over heat. Flour is then added to the fatty liquid and cooked. The cooked dough is subsquently softened to the right texture with beaten eggs. Taking it from the basic recipe, so many permutations of variations can be derived - the fat can be changed from butter to liquid fat. The water can be replaced with milk or a combination of milk and water... and I wonder if anyone has worked with fruit juice. Wouldn't coconut milk make an interesting puff - I can sprinkle dessicated coconut over it and fill it with kaya cream... ooh...so many possibilities and so little time... 

For this post, I am still working with a savoury puff. A basic choux pastry made with water and butter blended with grated parmesan cheese and seasoned with pepper and nutmeg. I chose to bake this at a lower temperature for a shorter time. As a result of which, I get a rounded puff without the splitting. (Normally I prefer my puffs to split especially if I intend to fill it with cream) For this recipe, the puff is meant to be a bite-sized snack, hence a round ball would be ideal. With the lower baking temperature, the puff also turns out softer and less crusty. The Beard Papa crusty split puff is generally achieved with a higher baking temperature and longer baking time.

Geez... now the Coconut Kaya Cream Puff is beginning to feel like a really great idea...


Recipe :

Choux Pastry

All purpose flour             35g
Bread flour(high protein) 40g
Butter                            50g
Water                            125ml
Salt                                1g
Eggs                               2 beaten
Grated Parmesan Cheese 70g
Pepper & Nutmeg            to season        
Method
1.In a heavy saucepan, please water,salt, butter and bring to boil.
2.Remove the saucepan from heat and add all the flour and stir briskly with a spatula.
3.The flour will 'soak' up the the liquid and fat to form a dough. Return the saucepan with the sticky dough onto the heat source. Over gentle heat, continue to stir and cook the dough until dough develops a tackiness and leaves a thin sticky film at the bottom of the saucepan.
4. Remove dough into a blending bowl.Add beaten egg a little at a time and stir well. You will know the right consistency is achieved when the scooped batter, falls off the spatula gradually and leaves a triangle trail drooping from the spatula. (To take the guessing out of this, I used 2 60g eggs(with shell) and get what I feel is the right consistency)
5. Blend in grated parmesan cheese. Season with pepper and grated nutmeg.
6. Pipe the dough to 2cm rounds onto a baking tray laid with baking paper, leaving a 3cm gap in between each round of piped batter.
7. Bake the pastry in a 180C preheated oven for 20mins.
8. Cool the choux puffs completely.

LinkWithin

Related Posts with Thumbnails