Announcement

This site will be migrating to a new address.
Please visit me at @Køkken and change your subscription to this blog to my RSS Feed

You Will Be Redirected!

Please do not leave any more messages on this blog. I will not be publishing or responding to any more comments left here. You will be automatically redirected to http://www.atkokken.com All posts have been migrated. You will be able to locate any posts by performing a quick search at my new site. Thank you.

Monday, May 30, 2011

Pate de Fruits Cassis - Cassis Fruit Jelly Candy

Pate 9

Pates 3

Pate 2

My parents were strict with us when we were growing up. I don't recall ever vehemently demanding for anything when we were young. We would gladly take whatever my parents would give us, be it sweet treats, stationery, books or clothes. If anything we set our eyes on were deemed expensive by our parents, we learnt to let go and make do with cheaper alternatives. We did not whine or throw tantrums, we just learnt to enjoy and made the best out of what we had... When it came to candies and sweet treats, Cadbury chocolates were not heard of within our households. The best we would see were Van Houten almond chocolate ovals that came in oval shaped tin cans or long rectangular tin boxes.
For Candies, my mother would always get us Polo mints - possibly the most unpopular and the most boring candy for a kid. Second to the Polo mints, our other favourite would be the Rowntree Fruit Gums.
They were fruity and sweet and for a long time, these were my favourite. The only cons about this candy were possibly that they were hard (which made them last forever to chew) and had the tendency to stick on to the teeth. Following the Rowntree fruit gum came something which has remained my firm favourite till today - the Rowntree Blackcurrant / Tropical Fruits pastilles. These were soft, tangy and had a more natural fruity taste compared to the gums. These were a little more expensive compared to the fruit gums and the polo mints (polo mints were the cheapest) but whenever we went grocery shopping at the supermarket then, we would always look out for the typical special offers that would come as 3 tubes in a pack.

My love for fruit pastilles continues till today - I can at any time, finish up a whole tube of Rowntree (now owned by Nestle) Blackcurrant Fruit pastilles faster than you can finish sucking your Polo Mint!
Hence, it comes as no suprise that I have always been tempted to make Pate de Fruits - a little sweet treat often served as petit fours with other sweet treats.
This is not the first time I have attempted a Pate de Fruit. I recall trying to make these with Mango puree but for some reason, it just would not gel... it could have been the fact that I had tried to reduce the amount of sugar in the recipe or it could have been due to the pectin I was using at the time....

Pate 5
The recipe I am using today is taken from Le Cordon Bleu "De la Cueillette, a la Recette"  - an illustrative Le Cordon Bleu French Pastry Training Manual  which I find rather useful. The recipe combines the mildness of pear puree with Casis to soften the tartness. The amount of sugar used in the recipe is still maddeningly huge but I refrained from tweaking the recipe for fear that it will not gel again. In addition to pectin, this recipe also calls for the addition of citric acid. ( the recipe I tried before used lemon juice) The citric acid was added at the end of the cooking process and was the critical component that ensured problem-free gelling of the cooked jam.

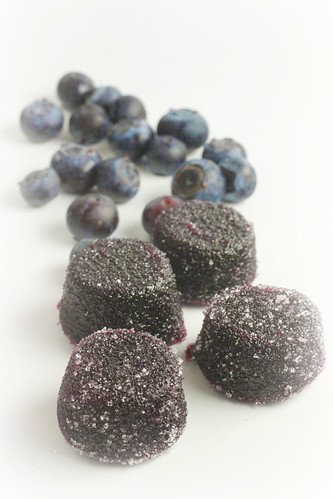
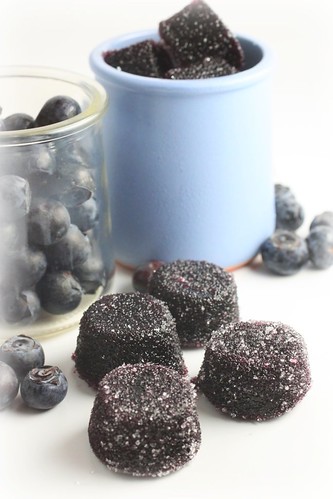
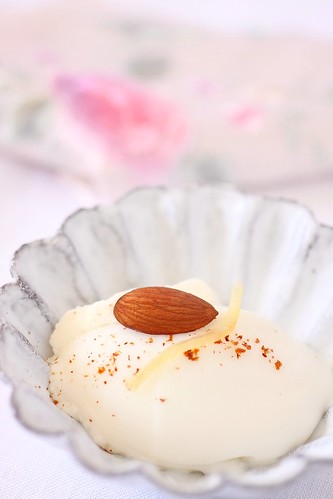
Verdict- the fruit jelly was bursting with rich fruity flavours - The tartness and sweetness were so intense that I could not really decide if it was more tart or more sweet. I definitely feel more encouraged this time and am looking forward to work with other fruits and ... yes, I am still adamant on tweaking the sugar level !

Pate 2(250)
Recipe :

Cassis Puree                   200g
Pear Puree                      150g
Pectin                              8g
Castor sugar  A               38g (mix pectin and sugar A together)
Castor sugar  B               375g
Glucose                           75g
Citric Acid                       8g
Coarse Sugar                  For coating

Method :
1. In a copper pot, heat Casis Puree and Pear Puree until 40-45C. Add  Pectin and sugar A mixture slowly into the puree mixture.
2. Add glucose and continue to stir and heat until puree starts to bubble.
3. Add the rest of the castor sugar in 3 additions. Stirring well to dissolve after each addition.
4. Continue to stir and heat until temperature reaches 107C.
5. Remove from heat. Add in citric acid and stir well to dissolve.
6. Pour jam into an 18x18cm square ring. (place square ring on a tray lined with silpat mat/ baking sheet.
7. Leave to cool and set at room temperature for 12 hours. (note, once citric acid is added, puree will gel quite quickly, so work quickly to pour into mold)
8. Dust with coarse sugar and cut to size.

Thursday, May 26, 2011

Bread Talk - Yukone Method Sweet Soft Buns With Hei Bee Hiam Filling

HBH Buns 8

HBH Buns 6

HBH Buns 2

Bread making is an artistry that requires alot of devotion to technique and respect for the bubbling chemistry that forms the basis of this age old staple food. I have until now, only looked on with envy at others who had churned out loaves after loaves with seemingly effortless perfection. I have been encouraged by others to give this a go but I guess bread-making is a little like going-to-the-dentist for some or my fear of cats... unfounded but nevertheless...

Late last year, I had openly commented that I shall make bread baking one of my resolution for the coming year. This is my way of forcing myself to get something done. It was the same at work, when I knew I had to force myself to get something done by a certain timeline, I make myself declare my commitment to a big group of people at a meeting. When you do that, you have nowhere to hide but to forge ahead.

My first baby step was attending Valerie Kong's Sweet Soft Buns class a couple of weeks ago. First introduced by the Japanese and later made wildly popular in Singapore by local bread shop , BreadTalk - the Yukone(Water Roux, 汤种) method is a brilliantly simple technique to make very soft and springy buns that will retain its softness for days! I am still baffled by how the addition of just a small lump of flour mixed with hot water can have such an amazing effect. I intend to find out more.

The class was clear and easy to follow but I think the real value I got out of the class was that it had piqued my interest and started me thinking and wondering.... It prompted me to search for similar recipes, made comparisons and explore options.

HBH Buns 3

The most classic way of water roux method requires one to 'cook' a small portion of flour with water from room temperature to 65C. Once the temperature of the roux reaches 65C, heating is stopped.
Then variations started to emerge where boiling hot water is poured directly into a small portion of the flour. (well, I guess, by the time the flour is mixed with the water, the mixture will probably cool very quickly to around the same temperature) This is mixed well and let to 'proof' over night.

The method I use is the latter method - perfect for a lazy bum like me. A variety of dried materials can be used - from just purely bread flour, to a mixture of bread flour/ plain/cake flour/ milk powder/ whole wheat flour... the possibility is endless.

The recipe I am using here is a combination of Valerie's formula with Alex Goh's recipes. For the filling, I am using the Spicy Fried Dried Shrimps from my last post - but there is really a whole range of variation that one can play with.

Looking at these soft sweet buns, I am happy with the results but I am still trying to figure out how the wrinkles appear overnight.... if anyone has insight to this, please do enlighten :)

HBH Buns 7(250)

Recipe : (Soft Buns)
Water Roux
Bread Flour                 50g
Boiling water                75g

Bread Dough
Active Dry East           6gm
Bread Flour                160gm
Plain Flour                  40gm
Sugar                          50gm
Salt                             2gm
Water                         50gm
Egg                             1
Butter                          40gm

Method :
1. Mix water roux ingredients together in a bowl. Cover bowl with cling wrap and store in fridge for 12 hours.
2. In a mixer fitted with a bread hook, add flour, yeast, sugar, egg and water. Start mixing at slow speed for  2 mins. Add salt and continue to knead until dough lifts from the wall of the mixing bowl.
3. Add (1) and continue to knead for 3 mins. (I am using Kitchenaide speed 2)
4. Add butter and increasing kneading speed to speed 4.
5. Continue kneading for 15 mins on speed 4 until dough is no longer sticky and does not break when pulled to perform window test.
6. Place dough in a slightly oiled bowl. Cover with cling wrap and leave to proof in a warm area for 45mins.
7. With lightly floured hands and table top, knead (6) to form a smooth round ball. Divide dough into 12 balls - about 40g each.
8. Roll each small ball into a round ball and leave to proof for 10mins.
9. Flatten each ball and roll out to a circle with a rolling pin. Place 18g of Hei Bee Hiam filling in the center of the dough and wrap and seal the edges of the dough to form a ball.
10. Leave to proof for 1 hour.
11. Brush with egg white and decorate.(I used a Sakura ebi shrimp)
12. Bake at 185C for 8-10mins until brown.
13. Leave to cool.

Tuesday, May 24, 2011

Hei Bee Hiam - Sambal Udang Kering

HBH 6

HBH 6

HBH 3

I did it! For the longest time, I have been telling everyone that one of my culinary resolution for the year is to bake bread. I have finally succeeded baking a very soft sweet bun and the reason I am cooking this dish today is to use it as a filling for the sweet buns a little later.

This is another Nyonya/Peranakan dish that features dried shrimps fried with an assortment of spices. This recipe which is found in Shermay Lee's The New Mrs Lee's Cookbook Vol. 1, uses Tamarind juice to lend moistness and vibrancy to the traditional versatile dish.
As with most Nyonya dishes, the cooking part is easy but the prep work calls for alot of chopping, slicing and pounding. As such, to make all the effort worthwhile, this dish is normally prepared in a bigger batch and kept in the fridge to be enjoyed over a week.

HBH 1

This is delicious when served with steamed white rice. With the dumpling festival just round the corner, this can also be used as a filling for the rice dumpling. A more common snack food would be the Lemper Udang which is a sweet glutinious rice roll filled with this Hei Bee Hiam.

So, what is your favourite way of enjoying the Hei Bee Hiam?

HBH 4(250)

Recipe 300g Dried shrimps
Garlic 6 cloves
Shallots 10
Lemon grass 2 stalks
Red chilli 2
Green chilli 2
Tamarind paste 1 round tbsp. (assam paste)
Water 6 tbsp

Oil 120ml (I used 100ml hence my hei bee hiam is a little dry)
Sugar 1 1/2 tbsp
Salt 1 tsp

Rempah
Tumeric 1/4 thumb size
Belachan 1/2 tsp

Method :

1. Wash dried shrimps and soak it in hot water for 10 mins. Drain and pound/process to get minced shrimp paste.

2. Prepare garlic, shallots and lemon grass by slicing them thinly.
3. Cut red and green chilli into fine slices.
4. Peel tumeric and pound with belachan to get a paste.
5. Prepare Tamarind juice by mixing paste with 6 tbsp of water. Rub the tamarind paste in water. Drain juice through a strainer.
6. Heat up a wok until smokingh hot.
7. Add oil. Reduce heat. Add in shallots and garlic. Fry quickly for 1 min. Add chilli and lemon grass and fry for another minute. Use a strainer, remove and drain oil into wok.
8. In the remaining oil in the wok, fry the rempah over high heat. Sprinkle some water and fry for about 2 mins. Reduce heat and add in dried shrimps. Fry for 2 minutes and add in the drained shallots from (7).
9. Add in Tamarind juice, sugar and salt.
10. Continue to fry over low heat until the shrimps become dry.
11. Cool down and store in air tight container.

Saturday, May 21, 2011

Pierre Herme's Sable Viennois - Danish Butter Cookies?

Sable 3-1

Sable 1

Sable 7

Still reeling from the light and airy texture of  the Viennese Chocolate Sable I had made last week, I found another Sable Viennois recipe in another Pierre Herme pastry cookbook which I had just bought at Page One in Hong Kong last week. Published in Chinese  Le Livre des fours sees et melleux de Pierre Herme, cost me less than SGD 20 - a steal for the Pastry Master's recipes! That's the beauty of translated cookbook - the price drops to a fraction of the original version - and that is why I always make it a point to prowl the biggest bookshops when I am in Hong Kong, Taiwan or Japan.  So if you read Chinese or Japanese, these are perfect options to add to your library of cookbooks.

This is another easy peasy recipe that can be whipped up in 30mins. Truthful in its original plain vanilla buttery goodness, there is nothing plain about the flavour of these cookies. In fact, when I first tasted these they reminded me so much of the Danish Butter Cookies we used to devour from those famous blue tins... and are still devouring.

I remember my mother's enthusiastic attempts at replicating those famous Danish Butter cookies after taking some lessons at the community centre. Her versions were prepared by rolling the dough into little balls and flattened into a medallion with a fork. They were popular within the household but was no where near the butter cookies that came in the blue tins. It lacked the lightness and crispness.
The Sable Viennois solved that problem completely and possibly too excessively as they were so crisp and light that they border on being over delicate... they crumble at the slightest knock and impact. Hence when I repeated a second batch for this post, I had deliberately inched up the amount of flour added. It got a little sturdier but is still no where near the 'robustness' of the cookies in the blue tins. I am keen to incorporate some egg yolk in the recipe for my next attempt.

Nevertheless, the taste is again wonderful. You won't be able to stop eating this, be warned... watch out for those calories!

Sable 3 (250)

Recipe :

95g               Unsalted Butter
1g                 Fleur de Sel
1/8 tsp          Vanilla paste (the recipe originally asked for 2-3 pinches of Vanilla powder)
40g               Powdered Sugar
15g               Egg White
115g             All purpose flour (I bumped this up to 125g for this post)

Method :
1. Preheat oven to 180C.
2. In a mixing bowl, whisk unsalte butter with Fleur de Sel until creamy.
3. Add in powdered sugar and whisk until homogenous and creamy.
4. Add in egg white. ( The mixture may curdle a little but it will smoothen out after flour is added.
5. Add in flour and mix until well combined.
6. Scoop batter into a piping bag fitted with a star tip. Pipe circles/wreaths on a lined baking tray.
7. Bake at 180C for 10 -12 mins or until golden brown.
8. Cool down and store in air tight container.

Tuesday, May 17, 2011

Pierre Herme's Vienesse Chocolate Sables - Chocolate Cookies Simple & Sophisticated

Chocolate Sable 9

Chocolate Sable 2

Chocolate Sable 8

I first started to read about Pierre Herme when I went  through my macaron obsession phase many years ago. That was the time when macarons were still not readily available in Singapore - before Bakerzinn and Canele Patisserie became the rave of the town. It was a time when very few would attempt to bake macarons at home and the secrets/techniques of baking macarons were more elusive. How a few short years have changed everything. Now, it seems like everyone I know can make a macaron - even my order fulfillment colleague who does not bake!

We undoubtedly have to thank Pierre Herme for the Macaron Revolution. Dubbed as 'The Picasso of Pastry' , PH leads the new trends in the pastry world. May it be unusual flavour combinations in macarons or brilliant flavour pairings such as the Rose/Lychee/Raspberry in the Ispahan, Pierre Herme never fails to awe and inspire.

IMG_8110
I was flipping through his Chocolate Desserts (a collaboration with Dorie Greenspan) to find something to bake when this simple recipe caught my eyes. Contrary to what many think, a pastry guru's recipes need not  necessarily be difficult and tedious. The Vienesse Chocolate Sable must be the most easy cookie recipe I have come across and till now, 24 hours after I have finished baking and tasting it, I still find it hard to believe that such a simple recipe could have yielded something so sophisticated and so good!

Light as air to the core, the cookie grazes the palate like delicate lace before spreading out like sand. The texture is sensational, the rich chocolatey airiness - addictive.

You most likely would have all the ingredients in the pantry. I urge you to whip this up and experience it for yourself.

IMG_8110(250)
Recipe : (From Chocolate Desserts by Pierre Herme, written by Dorie Greenpan)
Ingredients
260g           All purpose flour
30g             Dutch processed cocoa powder
250g           Butter
100g           Powder sugar, sifted
Pinch          Salt
3 tbsp         Egg white

Method:
1. Preheat oven to 180C.
2. Whisk together, flour and cocoa powder and set aside.
3. In a mixing bowl, whisk butter until creamy. To ensure that the recipe succeeds, the butter needs to be very soft. (not a difficult thing for us in Singapore)
4. Add in powder sugar and salt to butter and continue to whisk until light and creamy.
5. Whisk in egg white until it is well combined with butter cream.
6. Add in (2) and mix until well combined.
7. Spoon dough into a piping bag fitted with a star tip. Pipe dough into W shaped cookies. (mine are still not as pretty - needs practice!)
8. Bake cookies at 180C for 10-12 mins - no more. The cookies will be delicate - transfer carefully into cookie jar after cooled.

Saturday, May 14, 2011

Steamed Minced Pork With Salted Egg Yolk

Minced Meat 3

Minced Meat 1

I am still mildly amused when people in the other parts of the world ask me about the winter weather in Singapore. So I guess, as well known as we would think this little red dot on the world map is, there is still very little understanding about the country... at least nobody will wonder about winter in Hawaii, for example. (however, we do have many proud attributes that have been associated with us... I can roll out the list in a heartbeat but that's for another occassion.)

We do not have the priviledge to experience the wonders of changing seasons. Day in day out, we are bathed in warm summery humidity with spurts of showers and rain storm thrown in for a good tropical measure. Compared to our friends living in temperate zones with distinct seasonal weather changes, we really ought to have less wardrobe woes. However, most of us will still have a section in our wardrobe where we have our fair share of sweaters, throw-overs, shawls and jackets...technically irrelevant garment pieces for our weather where temperature averages around 30 degrees celsius and rarely dips below 25 degrees celsius. Ironically, these apparently irrelevant pieces of warm clothing have become indispensable in our tropical climate- not to protect us against natural weather conditions but against air-conditioned interiors such as offices, department stores, cars, trains and of course our own bedrooms - (where I use a down feather quilt blanket... whatever for? you may ask... well....) where temperature can be a chilly 17 degrees celsius.
The weather in Singapore has been scorchingly hot for the last 2 weeks. Interspersing this with sudden quick showers and running in and out of chilly air-conditioned rooms, I fell ill with a stubborn cough and sore throat that just refused to heal.

It is during these times, that I yearn for something comforting and warm for my meals. For 3 consecutive nights, I had white rice porridge for dinner. The soft soupy rice is easy to swallow and easy to digest. Paired with slightly salty savoury dishes, this has traditionally been the most economical and homely way to serve a meal. The dishes that are served with white rice porridge are traditionally very humble food like preserved salted eggs, pickled vegetables, fried tofu with bean sprouts and fried omelette with pickled radish.
Minced Meat 4
The steamed minced pork patty is possibly one of the more luxurious accompaniments to white rice porridge in my parents' time. I believe every family has their own steamed minced pork patty recipe. This recipe featured in Singapore celebrity chef, Sam Leong's  A Taste Of Home, is titled 'My Grandmother's Steamed Minced Pork Petites with Salted Egg Yolk'. Compared to my mother's version, Sam Leong's Grandmother's patty has more depth and dimension - thanks to the addition of minced coriander stems which gives the dish a subtle punch. The chopped water chestnuts also gave this otherwise meaty patty a refreshing crunch. Served with the homemade soy sauce, this becomes an addictive dish perfect with rice or porridge.

Minced Meat 1(250)
Recipe (From Sam Leong's A Taste Of Home)
Minced Pork
Minced Pork shoulder           400g ( do not use lean minced pork as this would yield a tough and dry patty)
Minced Pork fat                    1 tbsp
Coriander stems                    30g minced
Water chestnuts                    3 peeled and minced
Salt                                      1 tsp
Sugar                                   1 tsp
Light soya sauce                   2 tsp
Egg white                             1
Ground pepper                     Pinch
Sesame oil                           dash
Corn oil                               to coat cups/bowl
Salted egg yolk                    4
Homemade soya sauce        200ml
Spring onion                        1 minced

Method :
1. Combine all ingredietns except for corn oil and salted egg yolks, homemade soya sauce and spring onions, in a mixing bowl and mix well.
2. Apply some corn oil on the inside of 4 small ramekins or pudding molds. Put a salted egg yolk inside each mold/ramekin. Fill the mold with minced meat mixture from (1).
3. Steam the minced meat in a steammer for 40mins or until minced pork is cooked.
4. Turn molds over into a serving plate and the meat will slide out. Serve with homemade soya sauce and garnish with chopped spring onion.
Homemade Soya Sauce
Cooking oil                          1/2 tbsp
Ginger                                  2 slices
Spring Onion                        1 cut into short lengths
Coriander leaves                   2 sprigs
Chicken stock                       100ml
Light soya sauce                    1 tbsp
Dark soya sauce                    dash
Rock sugar                            10g

Method:
1. Heat the cooking oil in a hot wok.
2. Fry ginger and spring onion until fragrant.
3. Add the rest of the ingredient and cook until sugar is all melted and mixture just begins to boil.
4. Cool down and store in fridge.

Monday, May 9, 2011

Chickpeas, Garbanzo Beans... Kacang Puteh


Kacang Puteh 4

Kacang Puteh 7

Kacang Puteh

This is an extremely lazy and easy post. There is really no recipe involved but you would wonder why we don't make this more often since it is such a delicious and healthy snack... I couldn't stop gobbling them up as I was watched The Mentalist last night. (Love the twinkle in Simon Baker's eyes every time he smiles.)

To oldies like us, chickpeas are Kacang Puteh. I did not learn about the term Chickpeas until when I got much much older. As for Garbanzo beans? I only started seeing the term a few years back when Organic grocery stores started to offer the organic version of these humble beans....

Kacang Puteh, in the old days were sold by Kacang Puteh Men - usually cart venders from South India. They would normally park their carts / stalls outside a cinema. Those were the days before we saw the influx of Caramel Popcorns, Nachos and Cheese and possibly the ubiquitous potato chips.

Kacang is 'nut' in Malay and Puteh means 'white'. One would find a variety of chickpeas, peanuts, sugar coated tapioca chips and muruku at the stall. Most of the nuts are either deep fried or roasted. This Kacang Puteh shown here today is boiled and has a soft and slightly powdery texture. This has always been my favourite at the stall where we would pick and choose what we wanted and the Kacang Puteh man would then unscrew the cap of the glass bottles and scoop the nuts into a cone fashioned out of torn out pages from magazines. Depending on the type of nuts one chose, each cone would cost about 20cents to 50cents.Today? Not only has the Kacang Puteh man become a rare sight, the kancang puteh cone now costs about $2 - so I have been told.

I got these chickpeas for 95 cents at the supermarket and they boil up to pack a pot big enough to fill up many many paper cones to be enjoyed with nostalgia over a DVD screening....

Kacang Puteh 2(250)

Recipe :
Dried Chickpeas         
Salt
Tumeric powder ( Adding tumeric power will make it more yellow. I did not add this for this preparation)
Baking soda (this will help to soften the peas)

Method :

1. Wash the chickpeas and place them in a pot. Cover with water. Add a little baking soda (roughly 1/8 tsp for 100g of chickpeas)  and let chickpeas soak overnight.

2. Drain away water. Rinse with fresh water and soak chickpeas in fresh water for another 10mins to remove the alkalinity. Drain.
3. Fill pot with enough water to cover the chickpeas. Add tumeric powder if you wish. Boil for about 25mins until softened. (alternatively, you can boil this in a pressure cooker - it will cut down cooking time.)

4. Drain and season with a little salt.

Saturday, May 7, 2011

Easy Dessert - Almond Milk Pudding

Pudding 2

Almond Pudding 6

Almond PUdding 5

My very first childhood exposure to the Almond flavour was in the form of the Almond Jelly dessert served unfailingly at the end of a 10 course wedding dinner. I couldn't understand then, why all the adults seemed to love the flavour - to me then, it smelt and tasted very medicinal. My mother who went through a cooking class phase at the local community centre, eventually learnt how to make the Almond Jelly and from then onwards, the only type of jelly she would make at home would be the Almond Jelly. In those days, my mum would prepare the jelly with Agar strips, condensed milk and I believe, artificial Almond essence. As a result of this constant exposure, I gradually grew to like the flavour of Almond. When I eventually started baking myself, I was lucky enough to find pure Almond Extract and that was definitely 100 folds better than the artificial essence.

While I have grown to embrace the flavour and scent in everything from Desserts to Almond Drinks to body lotion, I still know of friends who cannot tolerate the scent of the nut. I am not sure if it is due to the unpleasant after taste of artificial essence that still lingers in their memory or if it is because the scent reminded them of cockroaches... (yes, it is widely known that cockroach eggs smell like almond essence)

Anyway, Almond is definitely my favourite power food. I always have a tin of pure almond meal in my pantry which I will dissolve in hot water for a delicious breakfast drink. When I saw this easy Almond Milk Pudding recipe in Le Creuset's Mini-Cocotte cookbook, I knew I had have to make this. Delicately flavoured with Rose water and Cinnamon, the recipe builds on the exotic almond flavour and lulls one into the world of henna and harem... 

Almond Pudding 3(250)

Recipe : (From Le Creutset's Mini Cocotte Cookbook)
700ml                 Almond milk
15g                     Gelatine ( or 1 tsp agar agar)
100ml                 Single cream
30g                     Sugar
2 tsps                  Rose Water
Pinch                   Salt
Garnish                Lemon zest ( I used candied lemon peel)
Pinch                   Cinnamon powder

Method:
1. Soften gelatin in 80ml of almond milk.
2. Heat until boiling , stirring constantly until gelatin dissolves completely.
3. Add the remaining almond milk and sugar and bring it again to a boil. Remove from heat.
4. Add in cream, rose water and salt.
5. Let it cool to room temperature. Fill 4 mini cocottes or dessert bowls. Cover and let it set in the refrigerator for at least 4 hours.
6. Before serving add a pinch of cinnamon powder and lemon peel.

Wednesday, May 4, 2011

Trying To Create The Lana Chocolate Cake

Lana Cake 3

Lana Cake 1

Lana Cake 5

Lana Cake 2

First and foremost, my apologies for the uninspiring photos. We had a flash flood inducing downpour this afternoon complete with menacingly dark sky and heart stopping thunderous sound effects...Dismal lighting conditions kill all traces of enthusiasm.

Those who have grown up in Singapore would probably know about the famous Lana Chocolate Fudge cake. For the longest time, the Lana Chocolate Cake has been considered THE ULTIMATE chocolate cake in Singapore. This was before more modern and popular chocolate cake outlets like Awfully Chocolate started their business. Both establishments sell their signature chocolate cakes only in the big formats. You can't get just a slice - you will have to buy the whole 6" or 8" cake. These are simple no frill chocolate cakes drenched in dark chocolate fudge. I was attending Joycelyn's Ultimate Chocolate Fudge Cake class last weekend when I was reminded of  the old time favourite Lana Cake. ( For those who are curious about the Lana Cake, please see this write up by Indulgence after Workout)
The hands on class provided us with a recipe pack with different fudge frosting options for the cake. However, as we had to frost our cake almost immediately after baking it, we were not able to work with a butter cream or chocolate ganache frosting. (the cake would have been too warm and the frosting would have runneth over) The hands on exercise had us working with a Chocolate icing sugar cream frosting. I chose to skip that as I knew it would have been too sweet for my palate. Instead, I lugged back the plain chocolate cake and decided that I would try to prepare my own frosting at home.

It was then, that I started wondering about Lana's mysterious chocolate frosting. A little springy with a jello like texture, this had become its signature. After a quick search on line, I found an interesting lead for the recipe here. Thickened with corn flour and solidified with gelatine, the formula looks promising. The recipe had called for some strange chocolate coating. I simply replaced that with melted dark chocolate.

I made the mistake of not cooling the fudge enough before frosting and hence had a difficult time applying it over the cake. Joycelyn's chocolate cake was definitely more moist and fluffy compared to Lana's. The frosting was delicious but I am still not too sure if it has quite the same jello-like texture. 

I will probably continue to search for a gelatine based fudge and experiment again with different flavours such as banana or raspberry jelly....

I shall not publish Joycelyn's recipes but if you are interested, I would suggest that you use this recipe as a starting point.

Lana Cake 7(250)

For recipe please refer to this site.

LinkWithin

Related Posts with Thumbnails