Announcement

This site will be migrating to a new address.
Please visit me at @Køkken and change your subscription to this blog to my RSS Feed

You Will Be Redirected!

Please do not leave any more messages on this blog. I will not be publishing or responding to any more comments left here. You will be automatically redirected to http://www.atkokken.com All posts have been migrated. You will be able to locate any posts by performing a quick search at my new site. Thank you.

Saturday, April 30, 2011

Blood Orange Chiffon Cake With Blood Orange Jelly

BloodOrange Chiffon 1

BloodORange Chiffon 4

BloodOrange Chiffon 3

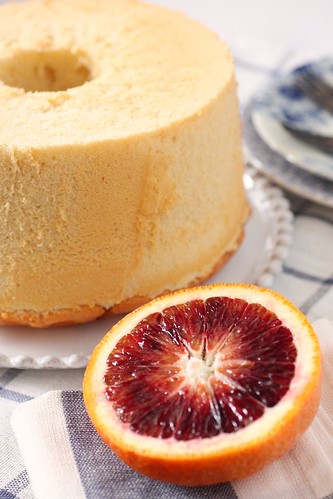
I was feeling ambitious when I finally managed to find some Blood Orange in Singapore. I dreamt about making one of those glorious Blood Orange desserts featured in Justin North's Becasse. Something gourmet enough to be served in a (dare I dream) hatted restaurant. Then, I dithered, procrastinated, went on to Korea for a business trip and by the time I got back, relented completely.
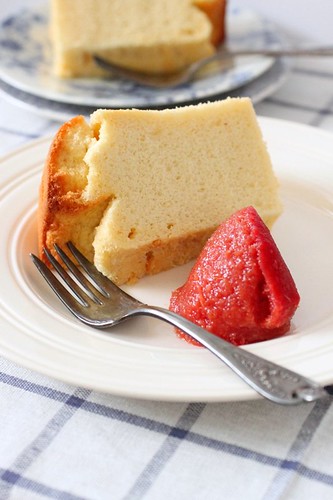
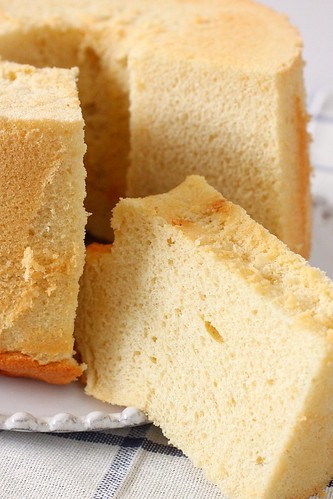
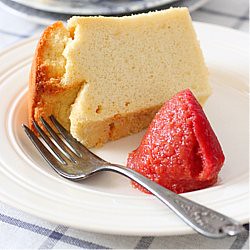
Not wanting to waste the hard to come by Blood Orange, I decided to revisit the Chiffon -my favourite cake genre. Chiffon, because it is light so I can dabble and serve it with a side accompaniment like a blood orange flavoured fresh cream or ice cream. In the end, I experimented with a Blood Orange Jelly.

BloodOrange Chiffon 2
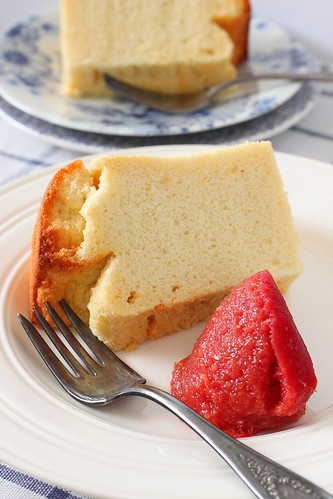
The Blood Orange did not do much for the chiffon, not for the colour nor for the flavour. Although the juice is a dark bloody ruby red, it doesn't stain well (unlike the blueberries or the raspberries). The flavour is less vibrant than the normal orange, the zesty sprite very much mellowed by the slight bitterness of the blood orange. Hence I was glad that I had chosen to make a jelly with it - that at least allowed the true character of the fruit to manifest.

BloodOrange Chiffon 6
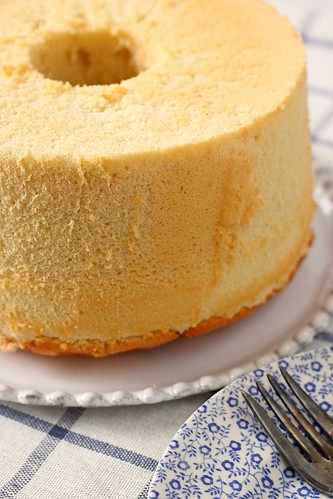
A couple more words about the Chiffon - I had said it before here and I will remain stubborn and maintain that I like my chiffon recipes, pure and simple - relying solely on a well beaten meringue sans leavening agents or stabilisers like cream of tartar. I went through the crazy phase of baking 1-2 chiffons every day just to practice and make sure that I get familiar with the right 'end point' for the meringue. A meringue that is a tad too stiff makes it difficult to fold evenly into the cake batter (symptoms include clumps of egg white spotting the cake) . On the other hand, a meringue that is too runny, would result in a sunken cake. The right consistency meringue (with a droopy peak) will deliver a cake that is fine, light and most important of all MOIST!
I am glad this cake turn out right and I have just reminded myself that I will have to do this often before I lose touch with it.
BloodOrange Chiffon 1(250)
Recipe :
Chiffon
                                           17cm Pan         20cm Pan
Egg Yolk                             40g                  80g
Castor Sugar A                   40g                   80g
Salad Oil                             40ml                 80ml    (I use Canola Oil but corn oil, grapeseed oil are fine)
Top flour / All purpose         80g                  160g
Salt                                      1/8 tsp             1/4 tsp
Bld Orange Juice                  80ml                160ml  (you can replace with normal orange juice)
Grated orange peel               1/3 tsp             2/3 tsp
Contreau                              1 tbsp              2 tbsp
Egg white                             160g                280g
Sugar B                                30g                  60g

Method :
1. Preheat oven to 170C.
2. Using a hand whisk, beat egg yolk with 1/3 of Sugar A until sugar completely dissolves. Add the remaining sugar in 2 portions and whisk until dissolved and egg yolk mixture becomes smooth.
3. Add oil and beat well with hand whisk. Add orange juice, contreau and orange peel. Mix well to combine.
4. Add sifted flour and salt and mix well to get a smooth batter.
5. In a clean mixing bowl, beat egg white until slightly foamy. Add sugar B in 3 additions. Beat until meringue forms a soft peak. The peak should be droopy and not stiff and pointy.
6. Fold 1/4 of (5) into (4) and mix thoroughly to combine.
7. Fold the rest of the egg white gently into (6) until batter is well incorporated. Take care not to deflate meringue too much.
8. Pour (7) into a chiffon cake mold and bake at 170C for 35mins.
9. Remove cake from oven and invert the cake pan to cool. (i normally slot the chimney through the neck of a long slender wine bottle.)
10. Leave to cool over night before unmolding.

Blood Orange Jelly
1. Mix 8g of gelatine with 50ml of water.
2. Pulp blood orange fruit in a blender to get 250ml of liquid pulp.
3. Place (2) in a saucepan. Add 25g of sugar and 1 tsp of lemon juice. Heat until just before boiling. Add (1) and stir until fully dissolved.
4. Cool down and refrigerate to set.

Wednesday, April 27, 2011

Tauhu Goreng - Deep Fried Tofu With Peanut Sauce

Tauhu 3

Tauhu 2

Tauhu 7

Tauhu 4
If  I ever have to pick a favourite food, I would choose Tofu (bean curd) without even the slightest momentary hesitation. My colleagues have all come to know that whenever we choose to eat at an Asian restaurant during our travels, I have to have a Tofu dish. It is fortunate that Tofu is a common and popular ingredient in most Chinese, Thai, Malaysian, Indonesian, Japanese and Korean restaurants. It is even more fortunate that so far, none of my travel companions, are averse to Tofu dishes in Asia. Tofu has to be the most neutral and comforting ingredient one can work with. On its own, its taste is so neutral that it is impossible for it to offend any palate.

However, I do realise that the nutritious protein component has acquired a somewhat irksome reputation in the west as a tasteless, uninteresting health freak food. Here in Asia, we use Tofu in more interesting and creative ways. There are countless recipes out there that feature the humble ingredient. Off the top of my head, I can already recall posting at least 4 or 5 Tofu dishes in this space.

Peanut Sauce
The recipe I feature today is a popular tofu snack in SE Asia.  This can be served as an appetizer or a tofu salad dish. For myself, a larger Tofu square would be enough to be my meal. The slightly spicy peanut sauce is the integral element that lends an exotic appeal to this otherwise plain and simple dish.

Totally easy to prepare and great to be served at parties. I used the recipe featured in Shermay Lee's The New Mrs Lee's Cookbook Vol. 2. The instructions are simple and easy to follow but the peanut sauce turns out a tad too thick. I could possibly thin it down a little more with water and add a dash of lime juice to it the next time I prepare this again.

Tauhu 3(250)

Recipe :

Bean Sprouts          100g
Cucumber               1
Firm Tofu                400g (2 pieces) (If you purchase this from an Asian grocery store, look for Taukua)
Oil for deep frying

Peanut Sauce
Garlic                     4 cloves
Red Chilli               2
Palm Sugar             2 tbsp (can be replaced with brown sugar)
Salt                        1/4 tsp
Rice Vinegar          1 tbsp (those used for sushi is fine)
Dark soya sauce     2 tbsp (try to use the darker version. This is different from the light soya sauce commonly
                              used for flavouring)
Water                     8 tbsp (I would suggest to add more water to adjust the flow of the sauce)
Roasted ground peanut 160g

Method:

1. Blanch bean sprouts in boiling water for 1 minute. Drain and keep aside.
2. Wash cucumber and slice it.
3. Place garlic and chilli in a food processer and grind it to a paste.
4. Place (3) in a saucepan with the rest of the peanut sauce ingredient. Heat up and cook until sugar dissolves completely. (if you like your sauce to be smoother and less chunky, you can process the cooled down sauce in the food processor again)
5. Heat up,in a wok, enough oil to at least half immerse the tofu. The oil needs to be very hot. Normally, we insert the tip of a wooden chopstick to check for small bubbles before we put in the tofu.
(before deep frying, sandwich the tofu between 4 pieces of kitchen towel and lay a heavy tray on the the tofu. This will dry out the excess moisture in the tofu and prevent too much splattering when you deep fry it)
6. Deep fry tofu until golden brown. Be patient and do not try to turn the tofu before it has formed a crust - otherwise the tofu will crumble.
7. Lay a plate with sliced cucumber. Lay fried tofu on top (pre-cut) , top with bean sprouts and peanut sauce.

Tuesday, April 19, 2011

Easy Cake Pops - From Scratch

Cake Pops 6

Cake Pops 2

Cake Popos 6

Cake pops are not common in this part of the world. I may be wrong, but from what I have come to understand from my limited surfing experience in the blogosphere, it was Angie of Bakerella who had almost single handedly created the trend around these portable, pretty little treats. Bakerella's creation are adorable and delightful - they evoke sweet childhood lollipop memories and have the power to make the most apathetic adult squeal 'So CUUUTE!!'. These clever little sweets have become so popular that even Starbucks in the US are selling them now. Perhaps, soon, very soon... we will get to see them here at our local Starbucks stores too..

When I learnt that Jeroxie's theme for the International Incident Party Event this month is Cake Pops, I thought it would be a perfect excuse to try my hand at making them. (Only, I have just found out that I have missed the dateline.. I never seem to be good at this. Last month, I failed to read the instructions carefully and published my article too early. This month, assuming the dateline is the same, I have only now discovered that the event was closed yesterday.... sigh)

Most of the recipes published in food blogs seem to use Cake premixes and canned frosting. I prefer to attempt this from scratch. The recipe I have chosen is the very easy Martha Stewart One Bowl Chocolate cupcake. Reason being, it is simple, moist and fine crumbed. Cream cheese frosting is not difficult to make as demonstrated in my Peter Rabbit Carrot Cupcake. I took the easy approach towards dressing up the pops. Not one to fiddle with cartoon characters or other cutesy shapes, I chose a very safe and adult approach - coating them with Valhorna Bittersweet chocolate - which was easier than I had expected.

Cake Pops 1
The biggest challenge, to my chagrin, was photographing these cake pops. I was trying to figure out some way to get them to stand up stylishly for the photos and had been exhausting all the bric bracs in my cabinet... I have never had such a messy photo shooting session ever and had to spend a good hour cleaning up afterwards.

So here, I am, late for the party but as Xiaolu of 6 Bittersweets had quite sweetly put it - I can just be fashionably late for the party... I only hope these are fashionable enough!

Please hop on over to Jeroxie's website to check out the other cake pop ideas at the party!

Cake Pops 7 (250)

Recipe : (From Martha Stewart's Cupcake Cookbook)

1 1/2 cups              all-purpose flour
3/4 cups                 unsweetened cocoa powder
1 1/2 cup               sugar
1 1/2 tsp                baking soda
3/4 tsp                   baking powder
3/4 tsp                   salt
2                           large eggs
3/4 cup                 butter milk
3 tbsp                   vegetable oil
1tsp                      vanilla extract
3/4 cups               warm water

Cream Cheese Frosting (refer to here)

Embellishment : melted semi sweet chocolate, chopped roastd peanuts, cocoa powder, tinted melted white chocolate

Method :
1. Preheat oven to 170C.
2. Line a cake pan with parchment paper.
3. In a mixing bowl, whisk together flour, cocao, sugar, baking soda, baking powder and salt. Reduce speed to low. Add eggs, milk, oil, extract and water.
4. Mix well until smooth. Pour into cake pan and bake for 20-30mins or until an inserted testing skewer comes out clean.
5. Cool down the cake completely.

Assembly & Embellishment :
1. Crumble the cake into a mixing bowl. Add cream cheese frosting to the cake crumbs and mix well. ( I use 80g of frosting to bind 300g of cake crumbs)
2. Bind the cake crumbs into little balls. Each of my ball weighs about 30g.
3. Place the balls in the freezer for about 15 mins. (important! This will make it easy when you coat the balls with chocolate)
4. First dip the tip of a lollipop stick into the melted chocolate.(see tutorial here)
5. Push the lollipop stick into the cake balls. Dip the cake pop into the melted chocolate to coat the cake ball. Tap off excess coating.
6. Let it dry a little before coating it with peanuts or cocoa powder. Stand the pops in a styrofoam slab and leave it in the fridge.

Saturday, April 16, 2011

Nyonya Egg Sambal With Steamed Nasi Lemak

Sambal Egg 6

Sambal Egg 1

Nasi Lemak

Egg Collage

Sambal egg 4

Can you remember the first serious dishes you cooked in your new kitchen? I can... it was some 7-8 years ago when I excitedly cooked my first house warming dishes in my then shiny new kitchen. Among the dishes were 2 Nyonya dishes which I had learnt earlier from Shermay's Nyonya Cooking Class - Tempeh Goreng and Sambal Egg. The Tempeh Goreng, in particular was exotic and had a spritely appetising flavour which never failed to wow and I had repeated that for 3 separate house warming sessions... I didn't repeat this sambal egg dish as often because the vanity in me had felt that it was too easy and was not impressive enough.... Sigh.. I was much younger then and was more full of hot air! As age catches up,the character mellows and starts to appreciate the value of simplicity and functionality.

I have quite a few cookbooks on Nyonya Cuisine but the one that I refer to when I need reliability and authenticity is usually Shermay Lee's double volume 'The New Mrs Lee's Cook Book : Nyonya Cuisine'.  I have bookmarked the Traditional Nasi Lemak(Coconut Rice) recipe in the book for quite some time and have finally decided I would try this to go with the Egg Sambal which is also featured in the book. 

Forgoing the convenience of the modern rice cooker, the Nasi Lemak is cooked by gently steaming rice in 2 stages.For those who have tasted steamed rice, you will be able to appreciate the soft fluffy texture of the rice grain. The rice grains also tend to stay separated and not stick together in clumps as is sometimes seen in rice cooked in boiling water. Steaming the rice takes a longer time and requires one to 'watch and control the fire' more carefully. In addition, fluffing the rice with a pair of chopsticks also needs to be done to ensure that the rice is cooked evenly.

In Shermay's cookbook, apart from the tedious method, she had also published a simplified method. This calls for cooking the rice briskly in boiling water for 5 minutes before draining it out and steaming it for another 5-10mins.
Sambal Egg 2

I truly enjoy the rice with the Sambal Egg - which is a little sweeter and a little more tangy than the versions cooked with sambal belachan chilli paste. Hence for those who are less accustomed to flavours with more heat, this would be a delicious alternative. It has just occurred to me that this could be an interesting recipe for those who are looking to cook something a little more exotic for Easter :) 

Sambal Egg 6(250)
Recipe : (Adapted from Shermay Lee's 'The New Mrs Lee Cookbook' )

Nasi Lemak (Simplified method)
Pandan Leaf           2 pieces
Water                    2.3 liter
Jasimine Rice         600g
Coconut milk         220g
Salt                        1 tsp

Egg Sambal
Quails Eggs            30 (or 10 small hens eggs) (Hardboiled and peeled)
Coconut Milk         80g
Oil                         4 tbsp
Tomato Ketchup    5 tbsp
Lime Juice              1 tsp
Sugar                      to taste
Salt                        1 tsp

Rempah for Egg Sambal
Ginger                   1 thumb size piece
Shallots                  12 bulbs
Garlic                    2 cloves
Chilli powder        1 tsp (I added more)

Method :
Rice
1. Wash rice. Boil water in a heavy saucepan and add washed rice and cook for 5 minutes.
2. Drain the water from the rice and quickly add coconut milk and salt. Stir well to combine. Cover to infuse for 10mins.
3, Transfer rice to a steamer. ( I place the rice on a shallow bowl and place this in a steamer) Add pandan leave and steam for 10mins.

Egg Sambal
1. Pound / grind the rempah ingredients to form a paste.
2. Heat up a wok until smoking hot. Add oil and (1). Fry for about 1minute. Add tomato ketchup and fry for another 1 minute.
3. Add eggs and fry for 1 minute. Add coconut milk stir well and simmer over medium low heat for a few minutes. Add lime juice and salt & sugar seasoning. Simmer for another 3-5 minutes until gravy turns thicker.


Tuesday, April 12, 2011

Martha Stewart's Easy Easter Cupcakes - A Peter Rabbit Treat

Peter Rabbit 7

Peter Rabbit 1

Peter Rabbit 2

When I went to the National Library to search for these Peter Rabbit books for the photos, the librarian had told me to look under 'books for babies'. Lucky babies! How fortunate to be growing up with beautiful wholesome illustrations like these. I didn't get to know about the Peter Rabbit series until I was in my twenties. The only books I can remember growing up with during my pre-school years were a couple of big paper back picture books with titles like : Three Little Pigs and Puss In Boots.

When I eventually went to primary school, my reading material were 50cents weekly monochromatic periodicals. My parents would take us to the bookshops during school holidays where we stock up on story books and stationery... Even then, we would only be allowed to buy books that were 'cheap and good'. Hence, I ended up reading the whole collection of Oxford Classic series because they only cost $1 each... while my friends would be showing off their $5 Enid Blytons and Nancy Drews...The good thing that came out of this 'crunch' was that by the time I moved on to Secondary One (equivalent to junior high?), I had already finished reading titles like Oliver Twist, David Copperfield, Little Women, Wuthering Heights and The Hound of Baskervilles. Hence when we were assigned to read Little Women for our literature class, I had already known the book inside out...:)
I have never griped about not having what my classmates had. In fact, in retrospect, I am really thankful for the foundation those experiences from the early years had provided me.

Today? Books are still a big part of my life. I still have a full wall of bookshelf...albeit the cookbooks are quickly edging all other books out of the shelves..but no worries, I have just bought myself my first Kindle E-reader last month when I was in US and am thrilled to bits with it.

Apart from the E-reader, I also managed to get my hands on these Peter Rabbit Cupcake Kit from Williams Sonoma. Very appropriate for the Easter Holiday. Sigh, why are pretty things like these never available in this part of the world?

To celebrate Easter, I have chosen to make Martha Stewart's Carrot Cupcake with a Tangy Cream Cheese frosting. I am beginning to really enjoy Martha Stewart's Cupcake cookbook. The last time I worked with a recipe from the book was for the Ginger Bread Cupcake  - the texture and flavours of which I had totally enjoyed.
This Carrot Cupcake is equally wonderful. Totally easy to make, the recipe contains loads of shredded carrot which gives it a very moist and fine crumbed finish. Perfect for children (and adults, like myself) who do not like carrots! The addition of yellow raisins lends another delightful burst of natural sweetness and sunshine to every mouthful.

If you are considering to bake something for Easter, I would strongly recommend this!

Peter Rabbit 1(250)
Recipe (Adapted from Martha Stewart's Cupcake Book)
Cupcake
1 pound               carrots, peeled and finely grated
3                          large eggs
1/3 cup                buttermilk (I used full cream milk)
2 cups                 sugar (I used 1.5 cups)
1.5 tsp                vanilla extract
1/2 cup               golden raisins
3 cups                all purpose flour
1 tsp                   baking soda
2 tsp                   baking powder
1tsp                    salt
1 tsp                   ground cinnamon
1 tsp                   ground ginger (I omitted the ginger and cloves because I am concerned about how the
1/8 tsp                ground cloves   my neighbour's 4 year old kid would take to the spices)

Cream Cheese Frosting
225g                  Butter
340g                  Cream Cheese
4 cups                Confectioner's sugar (sifted)
3/4 tsp               Vanilla extract

Method :
1. Preheat oven to 160C.  Line standard muffin tins with paper liners.
2. Whisk together carrot, eggs, buttermilk, sugar,oil, vanilla extract and raisins.
3. In a separate bowl, whisk together flour,baking soda, baking powder, salt and cinnamon. Stir flour mixture into accort mixture until well combined.
4. Divide batter among lined cups. Fill each liner to 3/4 full.
5. Bake at 160C for 25mins until an inserted skewer comes out clean.

Frosting
1. Cream butter and cream cheese together until smooth. Lower mixing speed and add in powder suger.
2. Add vanilla extract and mix well. Refrigerate if frosting becomes too soft to pipe.

Assembly
1. Place frosting in a piping bag fittled with a large round tip. Pipe swirl onto cupcake and decorate with Peter Rabbit pick.

Saturday, April 9, 2011

Caramel Tiger Almond Cookies

Caramel Cookie 3

Cookies 1

Caramel 1

It all started with the bottle of Dulce de Leche which Gertrude of My Kitchen Snippets gave me in New York. I tweeted that I was looking for something to bake with the Caramel and that led to a tweeting marathone debating if Dulce de Leche and Caramel (cream based) are the same thing.

I have always made my Caramel by adding cream and butter to a boiling sugar syrup and when I started to see many fellow bloggers raving about the process of making Dulce de Leche with sweetened condensed milk in a can, I recall simply dismissing it as just another novel way of making caramel.

When Gertrude gave me the bottle, she had told me that she was a little amused that so many bloggers in Malaysia and Singapore are crazy about making Dulce de Leche and that I should try this original one from Argentina. I recall feeling a little confused at that point - not understanding why she had said that the original version is from Argentina. Later as I pondered, it started to make a little more sense. Dulce de Leche, is after all, the Spanish term for Milk Candy and it is completely probable that the term should have originated from a Spanish speaking/ influenced region. In fact, the first Dulce de Leche I tasted was from Mexico - made with goat's milk, it had a goaty smell which I have not learnt to appreciate.

Many years later, when I learnt to make my own cream based caramel, I started to use the terms Caramel and Dulce de Leche interchangeably.... though I have to admit that Dulce de Leche does sound so much more exotic, myseterious and... gourmet. The process of making Dulce de Leche, which involves cooking and reducing a mixture of sugar and milk until the sugar caramelises, is basic and straight forward.  Caramel cream, on the other hand calls for caramelising the sugar in water first before the milk component is added. To give it more body and smoothness, butter is often also added.  To me both methods have the same essential components. Milk, after all is more than 80% water and less than 20% milk solids while cream, is just a version of milk that is higher in butter fat content. What differs is the process and my personal preference is the second method which gives me more control over how the sugar caramelises and absolves me from having to deal with curdling boiling milk.

Back to the bottle of Dulce de Leche from Argentina. Truly sensational in its balance of sweetness and body. It conjured up images of  happy children.... and Quality Street's old-world-cellophane wrapped fudgy toffees....

Caramel Cookies 11

I found this cookie recipe in Tish Boyle's The Good Cookie (yes, again!). A very short almond based cookie, this is another keeper. I would be most content eating the cookie by itself with tea or coffee. Sandwiching and drizzling it with the silky smooth Dulce de Leche just elevated the indulgence to an even more gratifying level.

So thank you, Gert, for the sweet gift. I am looking forward to making more delicious treats with it!

Caramel Cookies 11(250)
Recipe : (Adapted from Tish Boyle's The Good Cookie)

Almond Cookies
1/2 cup            Almond meal
1.5 cups          All purpose flour
1/2 cup           Corn starch
1/8 tsp            Salt
225g               Butter softened
1/4 cup           Castor sugar
1/4 cup           Powdered sugar
1/4 tsp            Almond extract

Caramel Filling
3/4 cup           Granulated sugar
3 tbsp             water
1/3 cup           Heavy cream
2 tbsp             Unsalted butter
Pinch of salt

Method :
1. Mix almond meal, corn starch, salt and flour together in a bowl.
2. In a cake mixer fitted with a paddle attachment, cream butter and sugar together until light in texture. (about 2 mins)
3. Add in almond extract. Lower mixing speed to low and add in flour mixture.
4. Scrape the dough onto a plastic food wrap. Flatten to form a disk and refrigerate for 2 hours.
5. Preheat oven to 175C.
6. Roll out dough to 1/8" thick and cut out cookie using a 1.5 inch fluted round cookie cutter. Using a 3/4" round cookie cutter, cut out the center of half of the cookies. Refrigerate for 5-15 mins if dough becomes too soft.  ( I used a Linzer cookie cutter which makes it easier)
7. Bake cookies at 175C for 12 minutes. Transfer cookies to a wire rack and cool completely.

Assemble :
1. Spread Dulce de Leche / Caramel on to cookie and sandwich with another piece of cookie with the cut out center.
2. Placing some Dulce de Leche/ Caramel into a piping bag, cut a small hole at the tip of the bag and pipe drizzles of the caramel over the cookie.

Caramel

1. In a small heavy saucepan, place sugar and water and cook over medium heat, stirring constantly until sugar dissolves.  Increase heat to high and cook without stirring and occasionally brushing down the sides of the pan with a wet pastry brush until the syrup caramelizes and turn into a golden amber colour (about 4 minutes).

2. REmove the pan from the heat and carefully add in the heavy cream. Stir the bubbling mixture until smooth. Stir in butter and salt until the butter is melted. Cool caramel down until it is thick enough to spread.

Thursday, April 7, 2011

Ginger Scallion Beef With Noodles 姜葱牛肉捞面

Beef Noodle 8

Beef Noodle 7

Beef Noodle 4

Beef Noodle 9

If a woman's eternal woe is having a closet full of clothes with nothing wear, I think a home cook's eternal woe is having a fridge full of food and not knowing what to eat....
I visit food blogs for many reasons but 2 of the fundamental ones are to search for recipes and for inspiration and reminders on what to eat and where to eat. Ellie's post on Ginger Scallion Beef 2 days ago was a timely reminder of what a great tasting dish this is. The craving set in instantly and as luck had it, I actually had all the ingredients in my fridge.

I used to cook this dish quite regularly and I don't follow any recipe for it. I had always taken a Chinese Cooking 101 approach when I made this. Seasoning was standard with soya sauce(both dark and light soya sauce), a pinch of sugar and a dash of pepper. The basic approach is always to season with the components that give colour and taste first, leave it to marinate and infuse before adding corn flour and oil... followed by a little water to keep it moist during cooking.

This beef dish is perfect with steaming white rice but I decided to serve this with tossed egg noodles. I simply cooked dried egg noodles (if you can get your hands on fresh wonton noodles, that would even be better) in water, drained off the water and toss it in a little oyster sauce, light soya sauce, pepper and sesame oil.

Fast, easy, nutritious and totally tasty. Who needs instant noodles or Mac Donalds?

Beef Noodle 3(250)
Recipe :

I don't follow a recipe but for those who needs some guideline, please hop over to Almost Bourdain. :)

Monday, April 4, 2011

Prawn Mousse Ravioli with Meyer Lemon Butter

Ravioli 2

Ravioli 1

Ravioli 6

When my first experiment with the Meyer Lemons turned sour (no punt intended), I promised myself that I would not lose heart. With the remaining 3 precious fruits sitting in my refrigerator, I tried my best to lock in the taste of the sweet tartness and the scent of the mild floral zest in my memory...refluxing the phantom flavours over and over on my palate... wondering, imagining, fantasising about how the floral citrusy flavours would work with different ingredients.

I was sure of one thing and that is, I had wanted to abandon desserts and work with something that is more savoury. Picking the brains of ZenCanCook over Twitter last weekend, I found new direction. Stephane had shared that the unique floral aroma of the Meyer Lemons would go well with fish and crudo. This immediately reminded me of the memorable Fluke Sashimi With Yuzu dressing I had at Nobu.... it was simply sublime.

Armed with these new inspirations, the 1/2 kg fresh sea prawns I had bought in the morning and my new Kitchen aid pasta roller attachment, I set my mind on making a Ravioli dish,filled with a prawn mousse which I had seen in one of the Junior Masterchef tag challenges with Justin North and Matt Moran.
The recipe in the challenge dresses the Tortellini with prawn oil which I felt could over power the flavours of the Meyer Lemon. I opted instead for a simple Lemon Butter sauce.

Ravioli 5
The verdict? Almost sensational.... ;) . The mild tartness of the Meyer Lemon was perfect as a dressing for the Ravioli and the floral aroma of the zest in the dressing and the prawn mousse was simply delightful. The flavour was refined and very elegant. What I can improve on, though, is my pasta. I wish I could get it thinner and more pliable. I am guessing that I did not knead and rest the dough enough to get the right silky and soft texture.

Two Meyer Lemons used up and one more left. I would be happy to simply juice it and enjoy it as a tall cold  lemonade :)

Recipe :
Pasta & Prawn Mousse (Adapted from Junior Masterchef)
Pasta Dough

200g type ‘00’ flour (I used plain flour)
2 eggs
1 tablespoon olive oil
Pinch sea salt

Prawn Mousse

600 g green prawns, whole (about 300 g prawn meat).
¼ teaspoon flaked salt
1 egg white
120 ml cream
zest of ½ a lemon

Lemon Butter Sauce
112g   Unsalted butter
Pinch of salt
2 tsp   Lemon zest
1 tbsp Meyer Lemon Juice
Method :
1. Pasta Dough

Combine flour, eggs, olive oil and salt in food processor. Process until mixture forms a ball.
Remove dough from processor and knead briefly on a lightly floured bench until smooth. Wrap in plastic wrap and rest at room temperature.

2. Prawn Mousse

Remove the heads from the prawns then peel the tails to remove all of their shells.
Take the prawn meat and remove the intestinal line by running a small knife along the back of the prawn tail, then scrape out the intestinal track then discard.

Process prawn meat, salt and white pepper in a food processor until a coarsely chopped. Add egg white and blend until mixture is smooth. Add cream and lemon zest and process until just combined. Avoid over mixing. Place into a piping bag and refrigerate

3. RavioliDivide dough into three balls. Flatten each ball into a disk and pass through the pasta machine on the widest setting. Fold pasta in half, lengthways and repeat without changing the roller settings. Cut pasta if it gets too long. Gradually narrowing the pasta machine settings 1 notch at a time. Roll the pasta through until the finest setting. Run through 3 times then cut out 3 rounds with a 10cm round cutter.

To make the Ravioli, brush one half of each circle with egg place a little of the prawn mousse in the center of each circle (about the size of a 20cent piece) and top each with another wrapper, pressing it around the edges to seal in filling.

Bring a large pot of water to a boil. Add 1 tsp of salt into the water. Working in 2 batches, cook ravioli until they rise to the top, 2-3 mins.
4. Sauce Meanwhile, make the sauce. In a frying pan, add 1/2 the amount of  butter and heat until just bubbling and frothy. Transfer first batch of Ravioli into pan using a slotted spoon along with 2 tbsp of pasta cooking liquid. Add 1 tsp of lemon zest and add half of the lemon juice. Swirl to combine. Transfer to plate.

5. Repeat with the next batch of Ravioli.

LinkWithin

Related Posts with Thumbnails