Announcement

This site will be migrating to a new address.
Please visit me at @Køkken and change your subscription to this blog to my RSS Feed

You Will Be Redirected!

Please do not leave any more messages on this blog. I will not be publishing or responding to any more comments left here. You will be automatically redirected to http://www.atkokken.com All posts have been migrated. You will be able to locate any posts by performing a quick search at my new site. Thank you.

Saturday, January 28, 2012

Baby Doughnuts/Donuts With Chocolate Honey Glaze

Donut10

Donut4

Donut8

As much as I love to play with flour and butter in the kitchen, there are still a couple of very simple and basic items which I have not yet tried. Among them are scones and donuts and one of the more trivial resolutions I have actually set myself in December is to try both this year.

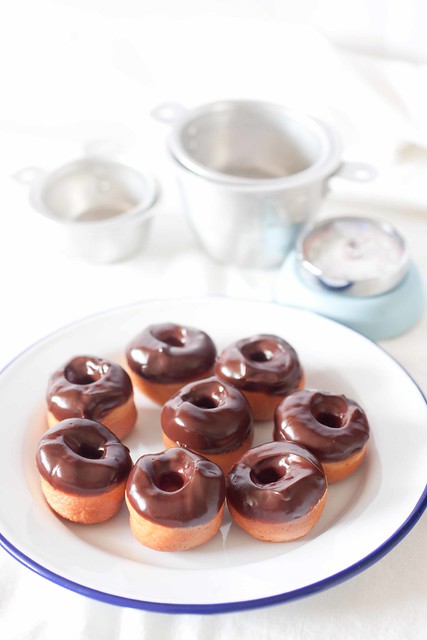
This donut recipe is from an earlier issue of the Donna Hay Magazine. I had bookmarked this for the longest time but like many other little flags that are peeping out from the many cookbooks on my bookshelf, most of them continue to stay... shelved.  My bookmarked recipes kind of remind me of the 1000 concubines old Chinese Emperors used to house in the back quarters of the palace... beauties wistfully hoping to be picked by the emperor to pleasure him...  2 reasons made the sighting of this recipe memorable - the glossy chocolate honey glaze and the fact that these are made into bite sized. (I used a pineapple tart cutter, so you can imagine how small they are...)

Both the dough and the glaze were easy to make. Actual hands on time was less than 20mins and the rest was really leaving the the dough to proof and frying it in oil.

Donut2
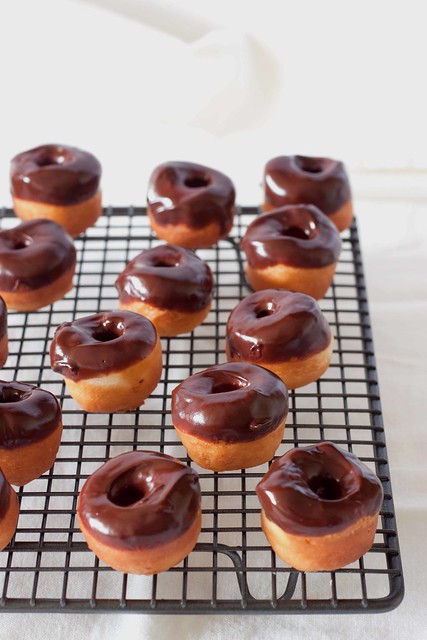
As much as I adore Donna Hay Magazine, I seldom cook or bake from it. I spend more time ogling at the photos than cooking from them... hence I wasn't sure how this recipe would turn out.  The results are pretty good, as far as my limited exposure to donuts can tell. The dough is fluffy and suprisingly, not too greasy. The glaze, as expected, took the whole limelight. I liked it  that you can just pop this into the mouth and not have to munch through a whole full sized donut.

Definitely a great option for kid's parties! So one trivial resolution completed and one more to go!

Pin It   

Donut10(250)
Recipe :
Baby Donuts With Chocolate Honey Glaze (From Donna Hay Magazine) 

1 tsp active dry yeast
1/2 tbsp lukewarm water
1/4 cup lukewarm milk
1 tbsp caster sugar
25g butter, melted
1 1/4 cups (185g) all purpose flour
1 egg

Vegetable oil for deep frying

chocolate honey glaze
30g butter
1/4 cup (90g) honey ( I used only 30g)
1 tsp vanilla extract
110g dark chocolate

Method :
1. Place yeast, milk, water and sugar in a large bowl and set aside in a warm place for 10mins or until bubbles appear on the surface.
2. Add the butter, flour and egg to the yeast mixture and using a spatula, mix until a sticky dough forms.
3. Turn out into a lightly floured surface and knead until smooth.
4. Place in a lightly oiled bowl and cover with a clean, damp cloth and set aside to proof for 45 mins.
5. Knead the dough on a lightly floured surface for 5 mins or until smooth and elastic . Roll out to 1 cm thickness and using a 3.5cm round cutter , cut 25 rounds from the dough.  Using a 1 cm round cutter, cut a small hole in the center of the donuts.
6. Place the rings on a baking tray lined with non-stick baking paper and set aside for 10 mins or until risen slightly.

7. While the donuts are proving ( I did this during the 45 mins proofing) , melt and mix chocolate , honey and butter in a bain marie (water bath) until smooth and glossy. Set aside.

8. Heat up oil in a deep saucepan until temperature of oil is 180C.  Fry the donuts in batches, giving roughly 3 mins on each side of the donut. Remove donuts from oil and place on oil absorbant paper.

9. While the donuts are still warm, dip them in the chocolate haze and place on a wire rack until set.


Wednesday, January 25, 2012

Seafood Rice Congee

Seafood Congee2

Seafood Congee1

SEafood Congee8

When I was younger, Chinese New Year holidays was exceptional, quite unlike the other festivals or public holidays that we knew. For one thing, we got to wear new clothes (yes, it was a big deal. We never used to buy new clothes all the time like the way we do now) , feast on goodies like barbequed minced meat, love letters and pineapple tarts which would only be available during Chinese New Year.  Of greater impact was the fact that all shops would be closed for almost 2 weeks. The whole city came to a standstill - roads were deserted, shop fronts were shut. Competent housewives, gripped by a sense of urgency and panic,  would have stocked up their fridge with enough food ingredients to feed the family for almost 2 weeks.

Things are markedly different now. Business earnings take precedence over traditional observation. Major supermarkets now remain opened throughout the holiday period. Hence there is less need to hoard over food stuff.... the disappearing sense of panic to some extent, diluted the buzzing excitement that we used to feel during the festival.

Despite today's convenience, food still remains abundant in households. In my family, we find ourselves staring at gargantuan portion of white rice, chicken, roast duck and various types of seafood like prawns, crab meat, fish maw and scallops.

Last year, I cooked this fish maw soup with the left overs in the fridge.  This year, I choose to throw these ingredients into a light and comforting rice soup.

Soupy and easily digested, this is a perfect one dish meal to atone for the gluttony we have been indulging in over the past few days.

Simple to make but still big on flavours.

Pin It   

Seafood Congee6(250)

Seafood Rice Congee
Recipe :

4                   Diced scallops
4                   Prawns, shelled and deveined
1 tbsp           Oil
500ml           Chicken stock
200g             Cooked rice
Dash             Salt
Dash             Sugar
Dash             Sesame oil
Dash             Huatiao chinese cooking wine

100g             Cooked Crab meat
2 tsp             Chopped coriander stems
1                  Piece of fish maw, soaked and cut into strips
10                Thin slices of abalone

Marinade
1                   Egg white
1/4 tsp          Salt
1/4 tsp          Sugar
Dash            Sesame oil
3 tsp             Corn flour

Garnish
Chopped spring onion
Crisp fried shallots

Method :

1. Combine scallops, prawns together with Marinade and marinate for 1 hour.
2. In a pot, heat up some water and poach (1) for 20 seconds. Set aside.
3. Heat up a wok and add oil. Fry cooked rice for 1 minute and add chicken stock. Add seasoning.
4. Continue to heat rice and stock until soup starts to boil. Add coriander stem. Add (2) and heat until boiling.
5. Ladle rice soup into serving bowl and garnish with spring onion and fried shallots. 

Saturday, January 21, 2012

Prune Kueh Lapis - Spekkoek

Lapis15

Lapis11

Lapis4

I do not remember eating this during Chinese New Year when I was young. In fact, I do not remember ever eating this during my early schooling days.... Then one day, it found its way into our household, and we've never been without it during Chinese New Year ever since... Initially, this (as with many other rare treats like,Bakwa, barbecued minced meat) was regarded as a special once a year Chinese New Year only treat. We would normally purchase this from the neighbourhood bakery which would only offer this during the CNY festival. Then, bakeries like Bengawan Solo which specialises in local kuehs and tarts started to expand aggressively and the kueh lapis became more accessible.

The cake which evolved from the Dutch Butter cake in Indonesia during the Dutch colonisation days,was given a well-spiced twist. Better known as Spekkoek in Indonesia, it literally means 'bacon cake', so named for its semblance to streaky bacon. This is possibly the most expensive cake that is served during Chinese New Year. Rich,buttery and moist, this is also the most decadent unfrosted cake I have ever come across. An 8x8 inch cake uses 17 eggs and almost 2 blocks of butter. If not for the way this cake is meticulously built by grilling layer upon impossibly thin layers of batter, I cannot imagine how something so rich and dense can even be palatable.

Indisputably the King of all spice cakes, this is best enjoyed in thin slivers (as shown in the photos above) with a cup of aromatic coffee. Heaven forbid that anyone should hoard a wedge of it like the way butter or pound cakes are usually served!

This is the first time I am baking this cholesterol choked treat. Thanks again, to Valerie Kong's class, the process became less intimidating and I have to admit, is less tedious than making pineapple tarts! Baking the Kueh Lapis is not tedious, it just needs a lot of patience to build layer by layer.

Valerie spiked her recipe with dark rum while others, I know like to add cognac for depth and flavour.

The traditional plain Spekkoek is modernised here with the addition of pitted prunes, the honeyed acidity of which pairs really well with the richness of the cake.

Last but not least, I would like to wish everyone celebrating CNY, A Very Happy And Prosperous Chinese New Year!

I am not publishing Valerie's Recipe here but I have found a very similar recipe at Swee San's Blog. This is the recipe from her blog...


 Pin It
Lapis8(250)
Prune Kueh Lapis
Recipe :

(makes a 9″ square)

450g butter
120g sugar
1 vanilla pod
2 tsp vanilla extract
6 whole eggs
12 yolks
1 can of 510g condensed milk
240g cake flour
1/2 tsp salt
prunes, snipped half, flattened

Method

1. Preheat oven to 230 C using the normal top and bottom heat to heat up the entire oven. If your oven has grill function with temperature control, use that. If yours’ is like mine, I heat the oven, then before I put the batter in, I turn on the grill function (which only need less than 2 minutes to warm up)

2. Line the bottom of a 9″ square pan. Prepare a water bath and put the empty pan into the oven to warm it up for more even batter distribution later.

3.Cream butter, sugar till light and fluffy. Scrape seeds off vanilla pod and add into butter. DO NOT discard vanilla pod. Put them into your sugar jar or rum. It makes everything smell nicer.

4. Crack eggs, add in vanilla extract. Mix in eggs one at a time, making sure the batter is well mixed before adding the next egg.

5. Mix in condensed milk (this stage, you can have 1 eye closed and forget about the fact that IT IS a whole can of condensed milk lol)

6. Sift flour and salt. Fold into the batter.

7. You can use a scoop / ladle to pour the batter in, making sure each time, it’s the same amount. Or separate them into 10 bowls. I used the 1st method, and ended up with 9 layers. But you can adjust it up to your liking or the size of the ladle.

8. Remove pan and water bath from oven. Turn on grill function. I transfered the water into a smaller cake tin and left it in the oven, this way my oven stays at a nice temperature without being too dry or hot.

9. Spread a portion of batter into the pan. Level batter with a spatula or tilt left and right to level the batter. Grill for 5-7 minutes or till golden.
10. Remove from oven, press cake layer to remove excess air. Spread another portion of batter, level it and arrange prunes onto the batter. Grill for 5-7 minutes or till golden.
11. Repeat step 9 and 10 till batter is finished. After that, I turned off the grill function, turn down the temperature to 180, and let the cake bake for 10-15 minutes to let it dry a little.

Thursday, January 19, 2012

Pineapple Tarts 2012

Pineapple17

Pineapple Tart3

Pineapple Tart9

I first attempted to bake pineapple tarts last year. This is decidedly the most popular Chinese New Year cookie among my family members and friends. I have a friend who would order his $1.50/piece pineapple tart every year without fail and it is not uncommon to pay $1/ piece for home-made pineapple tarts nowadays.

In case, you are reading this in the hope to pick up a recipe so that you can make your own tarts and save a few quid, I need to be upfront and urge you to abandon your wishful thinking. The ingredients which include primarily pineapples(lots of them) , good butter, some flour and eggs are not going to be cheap. Then when you factor in the tediousness of grating your own pineapple, stirring the jam cauldron for 2-3 hours and fiddling with the pastry to shape them into pretty little morsels, you just want to give up.

I kind of did...give up. Not wanting to repeat the same old same old as last year, I decided to work with 2 different recipes, one for the open tart and another for a closed tart. Thanks to Valerie Kong's Traditional Chinese New Year Goodies class, I think I have truly found a melt-in-the mouth pineapple tart recipe. Contrary to what most food bloggers believe, you don't need corn flour to achieve the tender melt-in-the-mouth texture. Her recipe appears to be simple enough, with flour, butter, egg yolk and milk powder. I am uncertain if it is the golden ratio of her recipe or if it is the technique of incorporating the flour with the butter that delivered the melt-in-the-mouth end result.

The cookie turned out to be one of the most tender and delicious pineapple tart I have eaten. My dad couldn't stop eating them and at one point, was stuffing 2 cookies at one time into his mouth! Kind of funny to see the old man behaving like a kid.

I was feeling ambitious and attempted one of the most traditional closed tart design. This entails wrapping the jam with the dough and shaping it into an acorn shape before making little snips around the  tart to achieve the semblance of a little pineapple. The whole process of shaping and snipping was so laborious that I only managed to get some 20 tarts in close to an hour. I gave up and chose a simpler shaping method which only required me to roll the round dough across a little ribbed plastic panel.

Pineapple Tart 11
I have just finished cooking my second batch of Pineapple Jam and can't wait to bake another batch of closed tarts.

I shall not publish the recipes of the pineapple tarts here as I know Valerie conducts the classes every year.  If you are interested, please check in with Shermay's Cooking School or contact Valerie for class schedules.

In the meantime, if you do not already have your own 'heirloom' pineapple tart recipe, I welcome you to start here.

Pin It 

Sunday, January 15, 2012

Crispy Golden Prawns With Lemon Mayonnaise

Prawns1

Prawn10

Prawn3

The Chinese culture is most particular about celebrating auspiciousness. For a happy occasion like the Chinese New Year that celebrates a new beginning, we are even more mindful about surrounding ourselves with auspicious symbols. When I was young, we were not allowed to sweep the floor on New Year's Day, for fear that we would be sweeping all the good luck away. Almost all the dishes and food we serve during the festival have been given a clever twist to evoke an aura of good luck and prosperity.
Fish, for example is a favourite dish to serve during Chinese New Year meals because to have fish can also be interpreted to be as having surplus.We are generally not allowed to finish all the food served during our reunion dinner on New Year's Eve... it is bad luck to have an empty rice pot on New Year's Day. The pineapple tart, due to the way it is pronounced in Chinese is made to sound like the arrival of prosperity and success, hence its popularity.

Prawn dishes are also popular during Chinese New Year because these little crustaceans are pronounced as 'Har' in cantonese which can be construed to sound like laughter (hahaha) symbolising happiness in abundance....

Battered fried prawns may be deep fried and laden with calories and cholesterol but they are still popular among young and old. I am giving this a little Spanish tapas twist by pairing it with a tangy homemade Lemon Mayonnaise. Served wrapped with lettuce, it makes this a little less guilty to indulge... This is an egg white,beer laden batter which is crispy and light. If you are looking for a interesting way to serve your Happy Prawns this year, I encourage you to give this a try.

Pin It  

Prawn6(250)
Crispy Golden Prawns With Lemon Mayonnaise
Recipe :

1.0kg               Medium sized prawns (Grey tiger prawns is fine)
Oil for deep frying

Seasoning (A):
1 tsp                 Chicken Powder
2/3 tsp              Salt
2/3 tsp              Sugar
Dash                Sesame Oil
1 tbsp               Potato Starch

Batter:
85g                   Plain flour
125ml               Light beer
2 tbsp                Olive oil
2                        Egg white

Mayonnise:

4                        Garlic cloves
2                        Egg yolks
1tbsp                  Lemon juice
1tbsp                  Finely grated lemon zest
300ml                 Sunflower / Canola or grapseed oil (neutral oil)
Pinch                  Sea salt & pepper

Method :

Mayonnaise
1. Transfer garlic to food processor and add the egg yolks, lemon juice and lemon zest. Process briefly until just blended. With the motor still running, gradually add the sunflower oil through the feeder tube until it is emulsified.

You can either serve the mayonnaise in a dipping bowl or drizzle over the prawns like the way I did for mine.

Battered Prawns
1. Wash and devein prawns and marinate in Seasoning (A) for 5-10mins.
2. Mix all the ingredients for the batter together and let set it aside for 5- 10mins.
3. Heat frying oil until hot.
4. Coat the marinated prawns in the batter and deep fry until the prawn turns golden yellow.
5. With a slotted spoon, remove prawns from oil and let it blot on oil absorbant paper to remove excess oil.
6. Serve with mayonnaise and lettuce.

Tuesday, January 10, 2012

Tish Boyle's Plainly Perfect Pound Cake

Pound Cake3

Pound Cake2

Pound Cake8

As you can see, I am continuing my celebration of simplicity. The inspiration to go back to Tish Boyle came about when one of the readers here tried out the Luxe Pound Cake recently and was raving about how good it was. I had baked it once and eaten it once. I remember I did a little dance when I took my first test bite.... the rest was a distant memory among the many recipes I had played with last year....  Going back to Tish Boyle's The Cake Book, I contemplated among a few different pound cake recipe. In the end, I decided to go with the most basic and the aptly named, Plainly Perfect Pound Cake. No one can have one too many basic pound cake recipe. A good pound cake is like the Vanilla ice cream of the butter cake world. Rich and buttery, this can become the basis of more lavish and tasty embellishments that take the partaking of it to new levels of savouring joy.

Pound Cake 1

I love the fine crumb texture of this cake and the fact that I can smell it from a mile away when I was baking it. Instead of the traditional pound cake mould, I had deliberately chosen to bake it in a slim rectangular baking tin so that I can cut them up in tiny slices to be nibbled on like a snack - a perfect presentation for the upcoming Chinese New Year where treats are best served in small finger food sizes. If you find the Kueh Lapis too challenging and time consuming to make for the coming festival, I suggest you consider this recipe as it is easy to whip up and is ... as the name claims, Plainly Perfect!
Pin It 


Pound Cake2(250)

Plainly Perfect Pound Cake (From Tish Boyle's The Cake Book)Receipe :
200g/2 cups           Plain flour
1/4 tsp                    Baking powder
1/4 tsp                    Salt
227g/2 sticks          Unsalted butter (softened)
250g/ 1 1/4cup       Castor sugar (I reduced this to 200g)
4                             Large eggs
1 tsp                       finely grated lemon zest
1 tsp                       grated orange zest
1 tsp                       vanilla extract
80ml                      Heavy cream

Method :
1. Preheat oven to 170C.
2. Sift flour with baking powder and salt and set aside.
3. Cream butter in a mixer at medium high speed until creamy (about 2 mins). Add sugar gradually and continue beating for 4 mins until light and fluffy.
4. Reduce the mixing speed of the mixer to low and add eggs one at a time mixing until well mixed.
5. Add the citrus zest and vanilla extract.
6. Add flour mixture in 3 additions, alternating it with cream (added in 2 additions).
7. Pour into 2 lined 3"x 7" pound cake mold and bake for 60-70 mins or until the cake turns brown and a testing skewer comes out clean. (Trish Boyle had baked this at 162C but I had to use a slightly higher oven temperature to ensure that the cake is cooked through without dense uncooked spots)

Saturday, January 7, 2012

Bill Granger's Spaghettini With Crab, Lime And Chilli

Crab Spaghetti1

Crab Spaghetti8

I am currently in love with Bill Granger's recipes. This is possibly the fourth time I have cooked from his cookbook. Previous attempts included the poached peach in Rose Water, crumpets and more recently the souffle pancake.. I bought his cookbooks after my third trip to Sydney last year and after my third visit to his restaurant Bills at Darlinghurst. I recall an avid recipe book collector friend once told me that somehow, she did not feel compelled to own his books because the recipes were so simple.
I totally agree with her on the simplicity part but boy, simple as they may be, they do work so beautifully.

Take this spaghettini number for example, as the forward to the recipe claims, it is an Asian-European fusion recipe that really works. It literally takes less than 10mins to put together and the flavours are so refreshingly addictive!  The zestiness of the citrus juices married beautifully with the chopped spring onion,coriander (the recipe called for parsley which I did not have) and crab meat. I went a little bit further by throwing in some chopped coriander roots and a dash of Old Bay seasoning and the end result, I swear, is totally restaurant worthy!
Crab Spaghetti7

I wish I had tried out this recipe earlier then I would most definitely have cooked it for the last party I hosted... with a dish so easy to put together, I would have more time to mingle with the guests than slogging over the stove!

Pin It

Crab Spaghetti4(250)
Spaghettini With Crab, Lime And Chilli (adapted from Bil's Sydney Food)
Recipe :

150g               Crab Meat
Juice & zest    2 limes
Juice               1 lemon
1 clove           Garlic, crushed
1/4 cup           Chopped coriander
1/4 cup           Chopped green spring onions
1 small            red chilli, finely chopped
1 stock            Coriander root, finely chopped
1 tsp                Sea Salt
Freshly ground black pepper
Dash               Old Bay seasoning
1/4 cup            Extra Virgin Olive oil
200g               Spaghettini

Method :

1. Place crab, lime and lemon juices, lime zest, garlic, cordiander, coriander root, spring onions , chilli, sea salt and pepper , Old Bay in a bowl and stir in olvie oil to combine. Taste to adjust the seasoning.

2. Cook Spaghettini in rapidly boiling salted water in a large saucepan, according to manufacturer's instructions. Drain well.

3. Toss pasta into crab mixture and serve in individual bowls.

Wednesday, January 4, 2012

Ox Tongue Cookies - 宜兰牛舌饼

OxTail1

Oxtail5

Oxtail9

My first encounter with this cookie was in Taiwan. Named after the shape it resembles, it is literally called  Ox Tongue Cookies and is the local specialty of Yilan Province in Taiwan.
The commercial grade I had tried, came in many different flavours including, cheese, coconut, black sesame etc...  The cookie was whisper thin and gloriously brittle. Packed with the wonderful flavours of butter and maltose, the fragrance was delightfully distracting as I was shooting the photos of these cookies.
Oxtail6

My reference recipe worked with a soft oily dough (butter rich) which had to be proofed to relax the gluten structure. This was then used to wrap a sugary dough filling before it was rolled out carefully to form the thin tongue like shape. Obviously, made by hand, I can never attain the whisper thin thickness of the commercial product - most likely rolled out in large batches through machine press - but I am more than delighted with the results. Thin and brittle enough to break at the slightest snap, I am feeling very accomplished. I can't wait to show these off to my Taiwanese colleagues.  These are again, traditional treats that very few would be bothered to make at home nowadays.

I can't wait to modify the recipe for Chinese New Year. Continue to watch this space for further adaptation.

Pin It 
Oxtail5(250)

YiLan Ox Tongue Cookies (宜兰牛舌饼, 原味)

Recipe : (adapted from 来做古早味零食) 
Oil Dough
120g                     All purpose flour
55g                       Water
12g                       Powder sugar
40g                       Unsalted butter

Sugar Dough
30g                       Powder sugar
20g                       Maltose syrup
20g                       Unsalted butter
5g                         Water
30g                       Condensed Milk
50g                       Cooked flour ( Cook flour in a pot over medium heat for about 15 to 20 minutes until
                             flour turns light brown. Sift and store)

Method :
1. Prepare oil dough by mixing water, sugar, butter together. Add all purpose flour and knead until a smooth dough is formed. Cover with plastic wrap and let the dough proof for 30 mins.

2. Divide the proofed oil dough (1) into 10g portion and roll them into balls.

3. Prepare sugar dough by mixing sifted powder sugar,maltose syrup, butter and water. Add in condensed milk and cooked flour until a dough is formed. Refrigerate the dough for 30 mins to firm up the dough.

4. Divide the sugar dough into  7g portion and roll into a ball.

5. Flatten a oil dough ball and wrap one portion of the sugar dough with the oil dough.

6. Flatten (5) slightly on a lightly floured silpat / baking sheet. Carefully roll out the dough with a floured rolling pin (use a smaller pin - those typically used for making Dim Sum would be good) .

7. Repeat (5) and lay the 2nd dough next to (6) and roll out the dough as instructed in (6)...

Oxtail10

8. Make a slit down the center of the dough as shown above. (failing to do so, the cookie will balloon up in the oven) Bake at 170C for 15mins until the cookie is golden brown.


LinkWithin

Related Posts with Thumbnails