Announcement

This site will be migrating to a new address.
Please visit me at @Køkken and change your subscription to this blog to my RSS Feed

You Will Be Redirected!

Please do not leave any more messages on this blog. I will not be publishing or responding to any more comments left here. You will be automatically redirected to http://www.atkokken.com All posts have been migrated. You will be able to locate any posts by performing a quick search at my new site. Thank you.

Tuesday, August 25, 2009

Orange Tartlets... My First Pierre Herme Recipe

IMG_0548

IMG_0536


I believe most avid cooks/bakers share the same insatiable impulse to possess every glossy and delicious looking cookbook that crosses their path.Before we know it, the book shelf is spilling over with the 4th cookbook dedicated solely to chiffon cake, the 6th cookbook on chocolate desserts....
I have not dared to count the number of cook books I own but I grimace whenever I look at my book shelf nowadays. I am running out of space. The shelves are looking more cluttered and I am guilt ridden when I know that most of them had not been put to good use. I have this constant reminder to myself, that, for all the money I have spent on these recipes, I have to cook at least one dish from each book. So it is with this dogged determination that I pulled down 'Desserts By Pierre Herme' from the shelf.
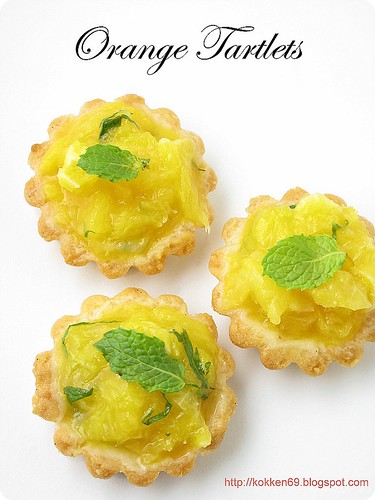
I had bought this very successful and popular cookbook by the Dessert Demigod some 2 years ago. It was scarce then, with very few availability on Amazon and it was the only cookbook which appeared to appreciate in value with time. (The used book was more expensive than the new one and I couldn't find any new books anywhere...) Doris Greenspan, with whom Dessert Demigod collaborated, wrote the book. Her instructions were clear and comprehensive. Actually, most of the recipes in this book are quite doable. I chose to experiment with the Orange Tartlet because it looked easy and also because I have never made any tarts or pies.

This tart is really meant for petit fours hence I can finally use my petit four moulds which I bought at Williams & Sonoma a couple of years back in the US.

I really love the filling of this tartlet.It is so simple and yet startling. The chopped oranges bind with marmalade, tossed with slivers of mint is refreshing, spritely and juicy. Since these are made into bite-size, every pop in the mouth yields a breezy burst of cool flavours.

I am overall quite pleased with the results of this first attempt. However, if I were to repeat this, I will choose to work with a more viscous orange marmalade.The marmalade I used this time was more liquid - I should have tried to evaporate off the liquid over a saucepan to thicken it. Free of any pastry cream filling, I could pop 4 tarts in a row without feeling guilty or heavy.
IMG_0547

Recipe
the orange
2 2/3cups water
4 large oranges
2tbsp sugar
1/2 cup Sweet Marmalade
20 Fresh mint leaves, very finely sliced.

the shells
142g unsalted butter
75g icing sugar
50g Almond powder
1/4tsp salt
1/4tsp vanilla bean pulp
1 large egg, lightly beaten
245g all-purpose flour

Method1. Orange : Peel orange and remove all pith. Slice oranges crosswise into thin rounds and place in a stainless steel bowl. In a heavy saucepan, boil sugar with water. Immediately pour sugar solution over orange slices,cover with cling film and cool to room temperature. Transfer to refrigerator. Allow orange to marinate for at least 24hours.

2. Tart shell: Beat butter using a mixer fitted with paddle attachment at lowest speed until butter is creamy. Add powdered sugar,almond powder, vanilla essence salt and egg. Continue to mix at low speed until well combined. With setting on low speed add flour in 3 or 4 additions and mix until flour is well combined. Form the dough into a ball and refrigerate.

3. Roll out dough into 0.4-0.5cm thickness. Cut rolled out dough with disk cutter and fit into tart mould. Trim edges.
Chill the unbaked shells for 30mins. Bake at 180C for 15mins. Cool and demould.

4. Assemble: Drain orange and pat dry with kitchen towel. Chop the orange into irregular pieces. Mix with 1/2 cup sweet orange marmalade. Toss mint slices with orange/marmalade. Fill tart shells with orange filling and garnish with mint leaf.

Saturday, August 22, 2009

Raspberry Guimauves / Marshmallows

Raspberry Guimauves 3

Raspberry Guimauves 4

Guimauve, as those who are familiar with confectionaries and bon bon will know, is actually French marshmallow. They can be enjoyed on their own and are also often used as decoration to adorn other pastries. I am not a 'candy girl' and don't like overly sweet stuff. The only candy I take are Fruit Gums... sweets that are chewy and springy in texture. Marshmallows tend to be a tad too sweet for my liking but the texture is incomparable.

For those of you who diligently check the costing of every recipe - this is one candy that is cheaper to buy from the Supermarket than to make it by yourself. So why bother? Well, first of all, I get to work with the flavours I like, then I also get to make something with a softer and more tender texture and last but not least, I get the thrill of seeing sugar transform from a bubbling syrup into a spongy foam.... the molecular wonders of food unfolding in front of your eyes.

The recipe I have chosen to work with does not involve egg white. It is pure sugar foam with fruit puree. Hence, the fruitiness of the candy can be enjoyed at its most intense.

There are many ways to present this sweet. One can choose to set it in an oiled square pan and cut them into strips or cubes. I chose to pipe them with a plain round tip. My piping skill is still amateurish and I won't argue with anyone who thinks my Guimauves look like pink dog poop.


Raspberry Guimauves 1

But still, they are deliciously fruity. I probably will try to make another batch with Lychee puree, spiked with a little Rose essence. Or I could try to coat my Raspberry Guimauves with dark chocolate... so many things to do but so little time...

Recipe
White Castor Sugar 200g
Raspberry Puree 200g
Corn Syrup 100g

Corn Syrup 125g
Gelatine Leaves 15g

Corn Starch 150g
Icing Sugar 150g

Method
1. In a heavy saucepan, place Raspberry Puree, Corn Syrup (100g) and Castor Sugar. Heat to cook mexiture to 109C. (Check with candy thermometer)
2. Soak geltaine leaves in cold water to soften. Squeeze dry gelatine leaves and mix with Corn Syrup (125g).
3. When Sugar syrup reaches 109C, remove from heat and add in (2).
4. Steadily, pour sugar syrup into a mixing bowl fitted with a whip mixer. Whip continuously while pouring in sugar syrup. Continue to whip until mixture cools, the sugar syrup will start to turn into a spongy foam as it cools during whipping.
5. Pipe the spongy foam using a plain piping tip onto parchment laid tray or silpat mat. Leave marshmallow to set at room temperature for 24hours.
Alternatively, marshmallow can be poured into an oiled square tin and leave to set for 24 hours. These can then be cut into strips and cubes.
6. Sift corn flour and icing sugar together. Sift the powder mixture over the set marshmallow to prevent them from sticking to each other.

Note: Plan your work carefully, make sure the timing managed in such a way that you are ready to pour the syrup into the mixer when temperature is reached. If Syrup cools down without adequate whipping, sugar whiskers will be formed instead of foam.

Tuesday, August 18, 2009

Coffee Swissroll

I am new to blogging and am having a new found respect for successful bloggers who draw in readers for all corners of the world to their postings. I am beginning to realise that alot of hardwork goes into the maintenance of a blog - finding time to cook/bake something interesting, coming up with an interesting angle to write about the 9999th posting on chiffon cake and struggling to take a pretty picture to showcase your ware....
I often linger longingly over Kuidaore's and Tartellete's photo spreads, soaking in their flair for food styling - wondering what it takes to get such perfect exposure, such well balanced composition. I struggle to get the right lighting on my food, perplexed by my own lack of creativity as I stand in front of my cabinet of white crockery, not knowing how to display my food.
As a result of which, my first shot of this swiss roll looks more like a rolled face towel than a cake. Surely, there must be a more interesting way to take the picture but as I looked at the display on my compact camera, I could only manage to frame the towel. I will have to continue with more experimentation....
Anyway, the swissroll tasted good. This recipe whips the egg yolk and egg white separately. (rather similar to the chiffon) The result is a souffle like texture - softer and finer in texture than the usual sponge base.
The filling is a coffee flavoured Creme Mousseline which is a Creme Patisserie softened with butter. I did not prepare the Creme well because I forgot to add the flour during the prepartion of the Creme Patisserie. By the time I realised this, the custard was already starting to thicken. I took the easy way out and added the flour at that point. As a result of which the Creme Patisserie was not very smooth. It still tasted flavourful though.
Hopefully, the next time I make the roll again, I will be able to frost it - that would make a prettier picture.


Recipe :
Chiffon Sponge
Egg Yolk 5
Egg White 4
Sugar 90g
Coffee Essence 1 tbsp
All purpose flour 40g
Butter 40g (melted) Butter 130g

Coffee Essence 1tsp
Creme Mousseline
Milk 200ml
Egg Yolk 2
Vanilla Paste 1 tsp
Flour 10g
Corn Starch 20g
Method
Chiffon Sponge
1. Line a 27cm x 27cm square pan with parchment paper. Preheat oven to 200C.
2. Chiffon Sponge : Whip Egg Yolk with 20g Sugar until a figure 8 can be 'ribboned' out without fading quickly into the mixture. Add Coffee Essence and mix well.
In a separate clean bowl, whip egg white with 70g sugar until soft firm peaks are obtained. The meringue should still droop when the whip is inverted. (whipping the egg white too stiff will result in the sponge to rise excessively)
3. Chiffon Sponge : Pour Egg Yolk mixture into egg white and fold carefully to blend. Sift flour into the combined egg mixture. Fold carefully to ensure that flour is well combined. Pour in melted butter and fold to combine.
4. Pour batter into the lined square pan. Spread batter evenly. Bake cake in oven at 200C for 10 -12 mins.
5. After baking, remove cake from baking pan and leave to cool completely in parchment paper. Peel off parchment paper. The top face (brown side) will be creamed.
Creme Mousseline
1. Place egg yolk, sugar and vanilla paste in a bowl and beat until sugar dissolves. Add in Flour and corn starch and mix to a homogenous mixture.
2. In a heavy saucepan, heat milk until just boiling. Slowly pour in half of the heated milk into the egg yolk mixture, stirring the egg yolk mixture continuously with a whip.
3. Pour the egg & milk mixture into the saucepan (containing the other half of the heated milk) and continue to cook custard over low heat until custard thickens and turns shiny - all the while stirring continuously with the whip. This is Creme Patisserie or Custard.
4. Cool down the Creme Patisserie to room temperature.
5. Add in softened butter to the Creme Patisserie and blend with whip until a smooth cream is achieved.
Assembly
1. Using a flat piping tip, pipe ribbons of Creme Mousseline onto the browned face of the chiffon sponge to cover the the whole cake with cream.
2. Roll cake with the aid of a towel or parchment paper. (a little like rolling a sushi roll, with the towel / parchment paper acting like the sushi mat)
3. Chill the roll in the fridge further (1hour or more) to set the shape of the roll before slicing.


Monday, August 17, 2009

Blueberry Chiffon Cake : Analysing The Science Behind Baking With Egg White


The chiffon cake is one of my favourite cake simply because the texture is so light and divine. In addition, if one were to scrutinise the recipe, you will find that it is primarily made up of egg whites, very little flour, very little oil(not butter) and very little sugar. Overall, a healthier cake that can be enjoyed with less guilt.


However, any recipe that hinges heavily on the way egg white behaves usually appears to be shrouded in a cloak of mystery. Examples include Souffles and Macarons. To get successful results in making these dishes, the right Meringue stability is imperative.

When baking the Chiffon Cake, I insist on being a purist. I refuse to use baking powder to inflate the cake- I stubbornly feel that that is cheating. I am fine with using natural ingredients to stabilise the egg white and there are a couple of ways to do so.

The egg white is comprised of protein chains and water. It's behaviour is very similar to a soap solution - which is made up of organic chains and water.
Whipping the egg white introduces air into the system. The foam that forms is similar the foam one gets from agitating soap with water. What is happening at the molecular level is that the protein chain in the egg white will form a 'membrane' that traps air. Part of the protein chain bonds with water and part of it repels water. Hence the 'membrane' is essentially the water-air border in the system. The stability of the foam depends on how resilient this 'membrane' is. Smaller bubbles form more stable foam. However, if the membrane is disturbed, small bubbles will merge to form big bubbles and this eventually will lead to bubbles bursting.

When Are Egg Whites Whipped Enough?
For chiffon cake, I like to whip the egg whites to firm but not spiky stiff peaks. When I overturn my bubble whip, the tail of the meringue will still droop a little. However, the meringue should be firm enough to support the weight of the whip. I check by sinking my whip into the bed of meringue, it should stand firm on its own without falling over. Whipping it to short stiff spikes may also work but you will find that the texture of the cake to be drier. What About Salt or Acid? Adding a little salt (added with sugar during whipping process) or adding a little acid helps to stabilise the egg white foam. The positive ions ( hydrogen ions in acid) prevent the protein molecules from folding up. When the protein molecules folds up into a ball, it will not be able to spread out and stabilise the 'membrane'. Most people like to use cream of tartar, I prefer to use a little lemon juice. But overall, the value of adding these are not that great. It is more crucial to whip the egg white correctly.
Moisture In The Egg White
Too much moisture in the egg white can also destablise the foam. Water has a high density and will have the natural tendency to drain down the air-water border. As water begins to drain way, the 'membrane' will start to thin leading to the merging of bubbles or bubbles bursting. When making macarons, there are some recipes that calls for leaving the egg white to stand overnight in order to 'dry' the egg white. For chiffon cake, moisture from the egg white may not be that critical but some recipes do add a dash of corn-flour to help absorb the moisture.
Baking Temperature

The Chiffon Cake rises because the air bubbles swell under the action of heating.(air expands) In addition, as water content in the cake evaporates, the vapour also enlarges the bubbles. If the bubbles are not stable at this stage, they will break resulting in deflation. Hence the right baking temperature is vital. Heating the cake too fast will generate a rush of vapour that may stress out the air-water border.

Enough said - this is beginning to sound like a Science Lesson - but then, Baking Is Science.

Below is the recipe for the Blueberry Chiffon Cake. Overall a good recipe. Just watch out for the moisture content in the blueberries.
10. After baking, remove pan from oven, invert and cool completely. (preferably for 12 hours) before demolding.

Recipe :
MeringueEgg White 110g
Sugar 55g
Corn Starch 5g
Egg Yolk BaseEgg Yolk 40g
Water 12g
Grapeseed Oil 36g (or any other neutral oil e.g. canola oil)
Blueberry puree 50g
Lemon juice 6g
All purpose flour55g
Sugar 10g
Blueberry 30g (blueberry should be cut into very small pieces and dried with a kitchen towel. Best option would be dried Blueberry)
Method :
1. Heat oven using convection mode to 160C.
2. In a mixing bowl place egg yolk, blueberry puree, water, oil, lemon juice and sugar. Beat the mixture under well mixed and sugar is completely dissolved. (I do this by using a hand whip)
3. Sift flour into egg yolk mixture and mix well.
4. In a separate clean dry mixing bowl, whip egg white until foamy. Add sugar/corn starch mixture in 3 additions during whipping. Whip egg white until meringue is firm peaks.
5. Add 1/3 portion of the meringue into the egg yolk base. Use a spatula to blend egg white with egg yolk.
6.Add another 1/3 portion of the remaining meringue and blueberries into (5). Use spatula to fold egg white evenly with (5).
7. Add the remaining meringue into (6). Fold the egg white evenly with (6).
8. Pour (7) into a 17cm chiffon pan (do not oil the pan otherwise the batter will not rise).
9. Bake the cake at 160C for 30mins.

Wednesday, August 12, 2009

Chwee Kuey


Cooking is really not too different from say, synthesising a polymer in a chemical laboratory. Very often starting formulations or formulation guidelines provided by raw material suppliers yield results that are far from exciting. One would still need to continue to tweak the formulation until the right performance is achieved. Similarly, in cooking, recipes from most off the shelf cookbooks, sometimes even expensive cooking classes will fail to deliver the right taste. Off course, I do not discount the fact that my cooking skills are far from being professional but I do believe that most chefs will tend to reserve a few little secrets that set them apart from others. Or it could be that I I have fussy tastebuds and am not willing to compromise when something does not turn out right. As a result of which, I find myself throwing away quite alot of (edible) food when I start out with new recipes. It's sinful and I pray fervently that I will not have to go to hell for wasting food like this.

I first found this recipe in a cookbook that features Nonya Kueh. The first trial yielded a Kueh that was hard and tastes chalky in the mouth. It was depressing but it did not stop me from poring over a few other cookbooks to compare recipes. I eventually found an interesting recipe from the internet from which I adapted the process. The 2nd trial yielded a more reasonable Kueh that has an attractive pearly white translucence - in contrast to the chalky white cake from my first trial. However, I was still not quite pleased with the texture. It was not soft enough for me though friends were telling me this was good enough.

I carried out 2 more trials by tweaking the solid content and the liquid in the recipe to finally achieve a texture and a taste that I am satisfied with. Luckily, I didn't have to do too many trials with the Chai Po. All in all, given the right recipe, this is an amazingly simple dish to make.


Recipe :
Kueh
Rice Flour 150g
Corn Flour 20g
Water 300ml

Oil 2tsp
Salt 1/2 tsp
Water 800ml

Method :

1. Place rice flour, corn flour in a mixing bowl and add 300ml of room temperature water. Stir well until there are no lumps of flour.
2. In a heavy saucepan, add the 800ml water, oil and salt. Heat the content until it just begin to boil.
3. Pour the flour mixture slowly into the saucepan and stir continuously with a wooden spatula to prevent lumping. The mixture will thicken to a gluey consistency. Turn off the heat and continue to stir.
4. Spoon the gluey paste into individual Chwee Kueh molds (available from Phoon Huat). Steam over boiling water for 15mins.


Recipe :
Chai Po (Dried Radish)

Oil 200g
Garlic(chopped) 50g
Chai Po 300g
Sugar 3tbsp
Salt 1tsp
Dark Soya Sauce 1tsp

Method :
1. Heat oil in a heavy sauce pan. Fry Chai Po and minced garlic until fragrant. Add sugar, salt and dark soya sauce for seasoning.


LinkWithin

Related Posts with Thumbnails