Announcement

This site will be migrating to a new address.
Please visit me at @Køkken and change your subscription to this blog to my RSS Feed

You Will Be Redirected!

Please do not leave any more messages on this blog. I will not be publishing or responding to any more comments left here. You will be automatically redirected to http://www.atkokken.com All posts have been migrated. You will be able to locate any posts by performing a quick search at my new site. Thank you.

Wednesday, July 27, 2011

Raspberry White Chocolate Macarons

Macarons 11

Macarons 10

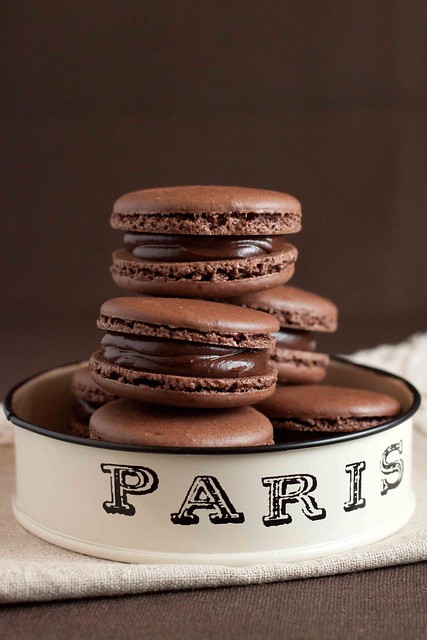
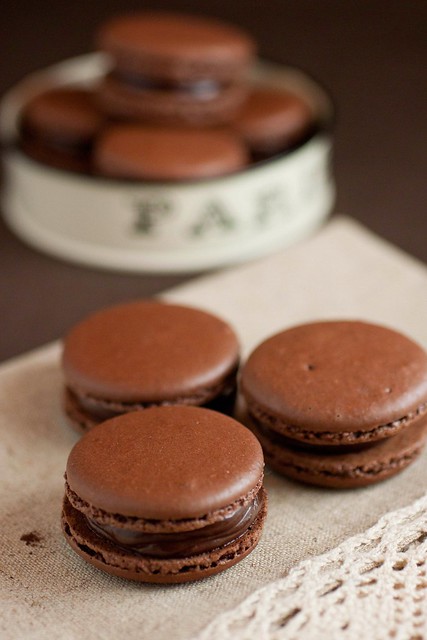
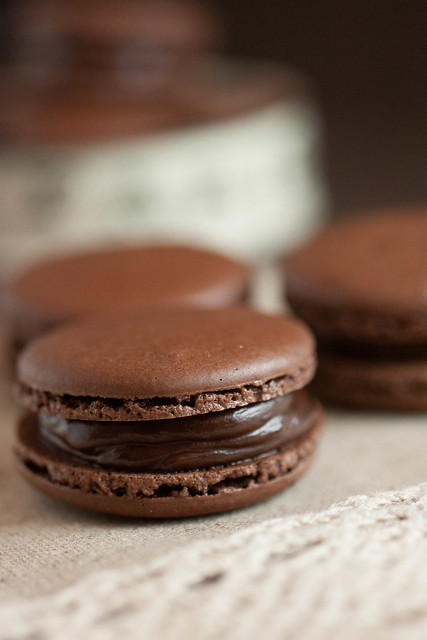
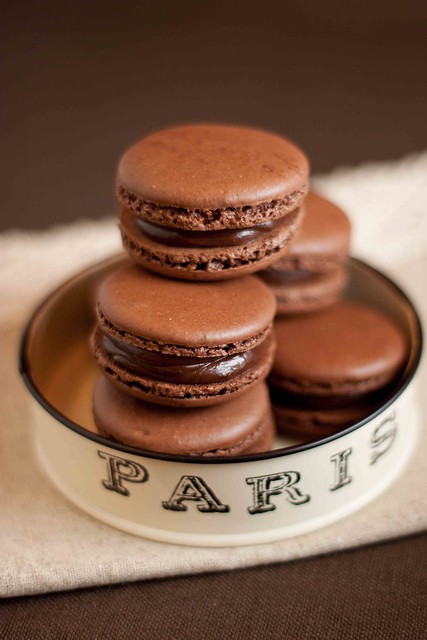
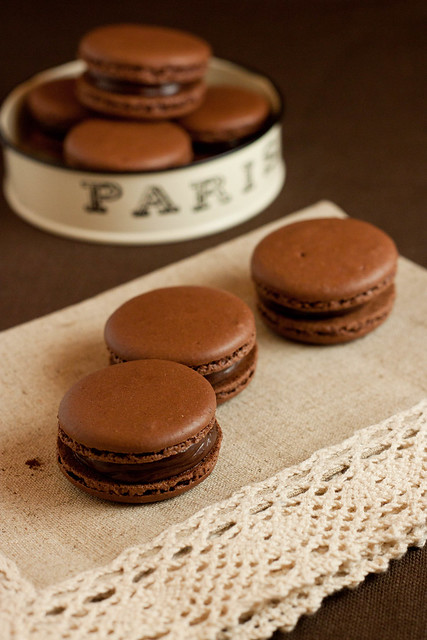
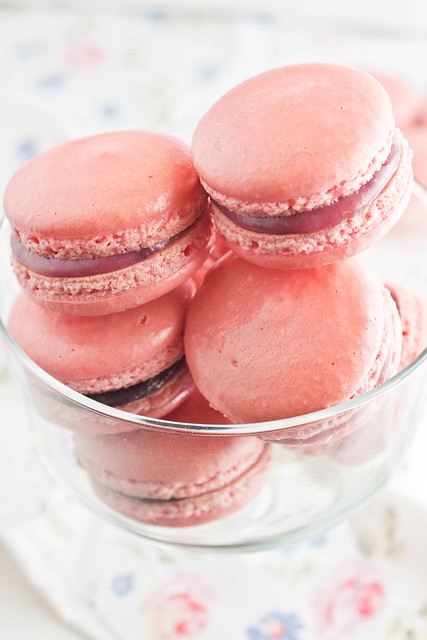
Here's one for the Sweet Tooth Fairy. Without cocoa powder to neutralize the sweetness of the macaron shell, this biscuit is sweeter than the Chocolate Macarons I had made earlier. (Actually strangely enough, I found that as you let the macarons age for a few days, they became less sweet, so the chocolate macarons were really quite perfect after they have sat out 3-4 days in the fridge. )  With the Raspberry White Chocolate filling, the sweetness level was propelled to astronomical level. In the spirit of research and experimentation, I had only made a few macarons with the Raspberry White Chocolate filling recipe I found in Australian Women's Weekly 'Macarons & Biscuits'.  I filled up the rest of the biscuit stock with the dark chocolate ganache.

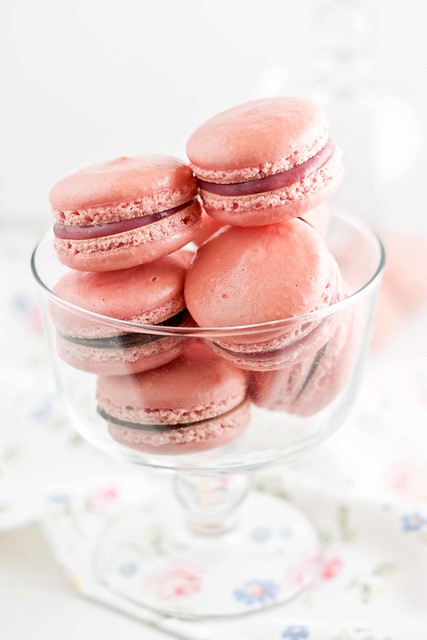
One of the challenges I had faced many years ago when I managed to achieve consistent macaronage was to get the perfect pastel shade cookie without browning. Pretty peaches, Bubblegum pinks and Melon greens were what I was after. Hence, when I was sure that macaronage was still within my reach last week, I couldn't wait to get them out in every bubble gummy shades... First up, is of course, the girly pink colour. I baked these at 155C without using the fan mode and left them on the lowest rack in the oven.  They turned out quite decent with very little browning.

So if you have a weakness for anything sweet and pretty, this one's for you.

Macarons 6 (250)
Recipe ( I had used Trissa's Recipe which uses the French Meringue Recipe here)

Please refer to the recipe at Trissa's post. Her recipe has been tried and tested by many and I find it less troublesome to follow. A few points to take note :

1. I added the pink colouring after all the castor sugar has been added and the meringue is relatively stable.

2. I let the macarons dry out for 1.5 hours in an air conditioned room before baking. If you are staying in a cooler region with lower humidity you can cut down the drying time to 30mins.

Raspberry White Chocolate Filling (Australian Women's Weekly Macaroons & Biscuits)

60ml         Pouring cream
150g         White chocolate
1 tbsp        Raspberry Jam

1. Bring the cream to boil in a small saucepan. Remove from heat; add chocolate, stir until smooth. Stir in jam and tint with pink colouring. Refrigerate until spreadable.

2. Sandwich Macarons with filling.


Sunday, July 24, 2011

French Fries Balls - Pommes Noisettes


Pommes Noisettes9

Pommes Noisettes7

Pommes Noisettes8

We have eaten French Fries often enough... it was the first item I ordered from Mac Donalds when they opened shop here some 30 years ago and  it is one of the most popular accompaniment with everything from Fish to Burgers to Steak... We can rationalise all we want about how oily and calorie loaded they are, but in reality, I think there is no one who can resist a well cooked Fries. Frozen fries are now so readily available from the supermarket that few would consider it worthwhile to prepare our own fries from scratch.

Indeed, making good fries from scratch is troublesome. I actually had to start almost 2 days in advance the last time I prepared fries for a gathering - but it was all worth it.
As I appraised the bag of russet potatoes in my kitchen like it was my own innovation challenge, 3 dishes popped in my mind and one of them is actually a variation of the Pommes Frites (French Fries), the Pomme Noisettes. The Pomme Noisettes is actually a distant and vague impression from my childhood. At that time, a certain Frozen Food company had started commercialising these frozen potato balls. The advertising campaign was aggressive and they made sure that those deep fried potato balls looked golden and delicious in the commercials... I believe all the kids back then were sold.

To create these, I had used a melon baller to scoop out balls of raw potatoes. These were then simmered in boiling water to pre-cook them. The boiled potatoes were then cooled down and chilled overnight. The first fry took place at 130C until the potato balls turned yellowish brown. These were once again chilled for half a day before deep frying it again at 190C. Fries made this way are amazingly crispy on the outside and fluffy in the inside.  I had chosen to season these with the Japanese Shichimi Togarashi (7 spice chili powder) to give it a little spicy kick.Be warned, these are really addictive and will run out in no time at any beer party.  Though pretty in their Noisettes shapes, scooping these balls out from the potatoes actually created alot of wastage. For practical reason, I would cut these into little cubes next time I make them.

To get the right puffed up crispy finish, the temperature of the oil needs to be well controlled. To be honest, I am not totally satisfied with my Pommes Noisettes. I do think I did not control the temperature of my oil well and hence, it did not retain its crispness for very long. Nevertheless, they are still addictive and goes superbly with a cold cold beer...

Pommes Noisettes6(250)

Recipe :

Russet Potatoes
Oil for Deep frying
Shichimi Toragashi (can replaced with Truffle salt, paprika or other smoked salt)

1. Peel Russet Potatoes or other floury potatoes. Choose bigger potatoes if you want to scoop balls out of them. Cut the peeled potatoes into half horizontally. Systematically scoop out potatoes will a melon baller to minimise wastage.

2. Run the potato balls under water for a few minutes to remove excess starch.
3. Boil a pot of water. Add a generous amount of salt (10% weight of water). When the water starts to boil, add in potato balls. Let water come back to boil and reduce heat to just a simmer. Do not let the potatoes boil else they will turn to mash.
4. Let potato balls simmer for about 3-5 mins until just cooked but not too soft.
5. Drain the water from the pot. Chill potatoes in the fridge overnight.
6. Heat a pot of oil to 130C. Fry the chilled potato balls in the hot oil until light brown. Remove potatoes with a slotted spoon. Drain off excess oil and chill in fridge overnight. (At this stage, you can freeze it to store)
7. Heat a pot of oil to 190C. Fry the chilled potatoes until golden brown.
8. Remove from oil, drain and sprinkle with Shichimi Toragashi.


Monday, July 18, 2011

Chocolate Macarons -Experimenting With Adriano Zumbo's Recipe

Macarons 2

Macarons 7

Macarons 9

Have you noticed something interesting among successful pastry chefs? Whether it be Pierre Herme, Australia's Adriano Zumbo or our own Singapore home grown Chef Pang Kok Keong, they invariably have an accolade of macaron trophies that applaud their pastry wizardry.

I deem the macaron the holy grail of baking. I started experimenting with it possibly 4-5 years ago,  before I started blogging. At that time, macarons were difficult to come by in Singapore and they were (and still are) frightfully expensive. I did most of my research on line and would be baking every evening, trying out one recipe after another, adjusting one condition after another... throwing out one tray of cookies after another... not because I liked to eat macarons but because I was obsessed with the quest of getting my hands on the holy grail...
When I finally achieved consistency, using the Italian Meringue technique, I felt proud and at peace with myself....

For all who had attempted to make the macaron, you would know that these cookies are more temperamental than a prima donna and has to be coddled with utmost attention and sensitivity. There is no fool proof recipe for macaron - too many factors can rub the spoilt little biscuit the wrong way. If you are new to macaron baking and is successful for the first time with a particular recipe, congratulations - you were very lucky... the next challenge then requires you to reproduce this with the consistent outcome again again and again.... Among the many pressure points that can kill your joy are

1. The stability of your egg white;
2. The end point of meringue deflation (what some people call macronage, the lava flow consistency you need to achieve before piping them out.)
3. The air drying time which can be affected by room temperature and humidity - In humid Singapore, don't expect to dry your macarons properly in 30mins as is usually stipulated in most recipes)
4. Your oven condition.

The recipe is the least of my worry - most of them, if you scrutinise closely have roughly the same component ratio. (The ones with higher sugar to almond meal/egg white ratio tend to be more stable to work with but you will need to have a very sweet tooth to enjoy them.)  The real challenge lies in the technique and conditions - the only way to grasp these is to be prepared to make batch after batch until you understand the limitations of your working conditions, until you can recognise what the macronage end point looks like...
Macarons 6
I have been inspired to bake macarons again by an elimination challenge in Australian Masterchef. In the challenge, the contestants are expected to create Adriano Zumbo's Macaron Tower. What intrigued me was not the unique flavours of the macarons (if you can't get the biscuit right, no amount of clever flavour ideas will redeem you) but the baking condition recommended in Zumbo's recipe - he had recommended that the macarons be chucked into a 200C oven, turn the oven off for 10 mins before finishing the baking process at 155C for another 9 mins. Too many voodoo oven settings have been written for the macaron... Pierre Herme's recommendation to insert the macarons into a 220C oven and immediately change the setting to 180C to continue the baking process with a wooden spoon jammed into the oven door to keep it slightly ajar ...sounds amusingly like old wife's tale.

However, the temperature ramping is not without its purpose. The higher temperature crisps the shell of the macaron while the lower temperature cooks the inside of the macaron while keeping it soft and chewy. The end result is not a biscuit that is crunchy through - that would have made it a meringue - it should have a crisp shell with a gooey center. This method, I think, is especially useful if the sugar to almond meal ratio is about 2:1. Higher sugar ratio, I think, will be able to crystallise better at lower temperature to give a glassy crispy shell even at a lower temperature e.g. 150 - 160C.

Macarons 8

I tweaked the recipe and added about 50g of cocao powder to the original recipe (see below). I also dried the macarons in my air-conditioned living room for 1.5 hours before baking.
The result is very good. As promised the shell is crisp while the center remains chewy and gooey...
I urge you to play with the recipe. Do not be discouraged if you do not get it right the first (few) time round - especially if you've never made macarons before. Repeat it and pay attention when you do. Till my next macaron (I am still not a fan), may we all find macronage!

Macarons 11(250)
Recipe : Please refer to Adriano Zumbo's Recipe on Masterchef Website for instructions.

225g     Almond meal
225g     Icing sugar
50g       Cocoa Powder
82.5g    Egg White

225g     Castor sugar
55.5g    Water
82.5g    Old egg white
1.5g      Powdered egg white


Chocolate Ganache Filling :
240g     Dark chocolate
250g     35% Fresh cream

1. Heat cream in a saucepan until it boils.
2. Remove from heat and boil the boiling cream into a bowl that holds the chocolate.
3. Let it infuse for 3 mins. Stir the chocolate gently until it is totally melted.
4. Cool down to pipe-able consistency.

Friday, July 15, 2011

Baked Burgandy Snails/Escargots - Easy French Cooking

Burgancy Snails 8

Escargots 1

Burgandy Snails 6

Burgandy Snails 3

My favourite French Restuarant in Singapore is the Au Petit Salut which was helmed by Chef Patrick Heuberger (who has since left Au Petit Salut to start the very successful, Le Bistrot du Sommelier).  I started going there some 10 years ago and had always found myself returning to it when I was at a loss of where to go when I have guests or gathering with friends. The original Au Petit Salut was a cosy friendly brasserie serving delicious bistro style French food at a very affordable price - especially for their set lunch menu. Its success led to the opening of its second restaurant with a finer dining atmosphere. For the longest time, my order would be a clockwork regularity of : Burgandy Snails, Braised Beef Cheeks and Profiteroles. I tried to be adventurous with other dishes but invariably, at least one of the above three dishes would find its way to my dining table.

I have always been a great champion for its Burgandy Snails. I take delight in convincing first time visitors to the restaurant into trying this very French starter. Most guests would require a little prodding as they hesitate over the thought of eating these slimy slugs. However, once they have dug in, they would start to ask for extra servings of baguette to mop up the delicious parsley butter.

I attended Chef Patrick's class quite a while back where he taught this dish. His recipe is quite different from the normal Baked Burgandy Snail recipes which I have come across on the internet.  I won't be publishing his recipe here but I will only say that his Garlic Parsley Butter is much more complex. He incorporates tomatoes, bread and even parma ham. So flavour is amazing and it has more body than a simpler herbed butter.

I suspect that this may not be the same recipe as is served at the restuarant. This one feels a little more rustic.

My photographs do not do credit to the dish but after mopping up the last bit of parsley garlic butter with the 6th slice of baguette, my tummy felt warm and fuzzy... I will sleep well tonight.

Burgancy Snails 5(250)
For those who are interested to make this at home, this would be a good reference to start with.

Wednesday, July 13, 2011

Creme Brulee With Caramelised Banana

Creme Brulee 2

Creme Brulee 8

Creme Brulee 6


We all know that the meaning of food has expanded beyond the humble role of a sustenance fuel.... how else would one explain the popularity of reality TV programs like Masterchef, Topchef, Ironchef, Hell's Kitchen...?  Among these productions, my favourite has to be the Australian Masterchef. As Lisa Abend stated in her book, 'The Sorcerer's Apprentices', Food 'should be a source of nurture and nourishment.'-it is the Universal ambassador that celebrates the bounty of nature, binds culture, brings joy and aspires. In my humble opinion, Australian Masterchef is the only reality cooking program that has given the right focus to food and cooking. (Observation made from the Season 2 screening which is airing here now)

I love it that the program pushes the contestants out of their comfort zone, forcing them to deliver beyond their own imagination. I respect that in the midst of the competitive heat, it takes time off to send its contestants to masterclasses to brush up their skills and I am even more delighted to pick up little tricks and know-hows in the cooking masterclasses conducted by George and Gary. This is possibly the only cooking reality show that I walk away, feeling educated and inspired. Last week, the contestants were whizzed away to Paris and were asked to cook 2 dishes that would be quintessentially French enough for a Parisian bistro.

I found myself slipping into the contestants' shoes as they sprint towards the market for their ingredients.... wondering what I could potentially pull out of my own little hat if I were them. I found myself poring over  my limited collection of French Recipes, (most of which are desserts) after the show -  of which my favourite at this point, is Justin North's beautiful book, French Lessons.

First up, is the quintessential Creme Brulee which no self respecting French Chef would do without. The humble Creme Brulee can be served in so many ways, infused with so many different beautiful flavours, I am literally spoilt for choice.

Creme Brulee 9
Here, I am sharing a plain vanilla Creme Brulee served with a rum glazed caramelised banana. The Creme Brulee can be pre-baked and stored in the fridge. This can then be bruleed and served with freshly prepared caramelised fruit. The contrast between the hot fruit and the cold custard is actually quite delightful. I urge you to try it out for yourself.

Creme Brulee 8 (250)
Recipe : (Basic Creme Brulee From Justin North's French Lessons)
Creme Brulee
350ml      cream
125ml      milk
1/2           vanilla pod
7              egg yolks
70g          castor sugar
demerara sugar

Bananas
2            mini bananas or 1 normal sized bananas sliced.
2 tsp      demerara sugar
Splash   Rum ( enough to deglaze pan)

Method :
1. In a pot, heat milk,cream with vanilla pod and vanilla seed (scraped from pod). Once milk starts to boil, remove pot from heat and cool down to room temperature.
2. In a mixing bowl, whisk egg yolks and castor sugar together until light and thick. Remove the vanilla pod from the cool milk/cream and pour slowly into egg yolk mixture. Stir gently to combine.
3. I left the mixture in the fridge overnight to 'degas' the air bubbles which has formed during the whisking and stirring from (2).
4. Preheat oven to 110C. Pour cream mixture into creme brulee ramekins and lay them in a bain marie. (Pour in hot water as cold water will take a long time to warm up in the oven)
5. Bake the cream in the oven at 110C for 45 mins until set.
6. Cool down and let the creme brulee rest for 2 hours at room temperature. You can store this overnight in the fridge. If you do, make sure you blot dry the surface condensation with kitchen tower before torching.

7. Bananas
In a frying pan, add a little butter and caramelise bananas with sugar until slightly brown. Do not over cook as bananas will turn mushy. Remove bananas from the pan. Add a slug of Rum to deglaze the pan. Pour the deglaze over the bananas.

8. Sprinkle demerara sugar over surface of creme brulee. More sugar will give a thicker glassy and crunchy caramel sheet.
9. Spoon caramelised bananas over the creme brulee and serve immediately.

Saturday, July 9, 2011

Lime Thyme Cream Phyllo Cones - Easy Dessert Recipe

Cones 11

Cones1-1

Cones 12-1

Let's be absolutely honest and not pretend to be lofty about it - when we cook, we cook to please others... We revel in the sense of pride and achievement when the ones we feed manifest delight over what we serve them. Well, luckily for most of us (food bloggers like us, anyway...) we actually find delight in cooking and pleasing our audience. So in the end, the endeavour is quite a win-win for both parties actually... wait a minute, I need to tag a little asterisk to that... provided the audience is appreciative.

The urge to please motivates the cook to constantly look for exciting and delicious recipes... and once in a while, impressive good food can run contrary to the general impression that 'good food is trouble'...
I picked up this recipe almost 10 years ago at a company team building cooking event. I was given the task of creating this dessert dish which eventually went on to become the unofficial winner of the meal. It was the first time I marinated strawberries with balsamic vinegar and I recall creasing my brows in sceptism as I read through the recipe then. It was also the first time I infused cream with a herb like thyme and I believe it was possibly also my first time having a working experience with those flimsy phyllo sheets. Yes, I was a late bloomer when it comes to pastry... The flavours, I recall, were so subtly elegant and the presentation with the phyllo nests ( I modify it to a cone here), so gourmet that I almost believed that I have some innate talent for baking.

And...wait for it.... the recipe is really easy to follow.  Utterly accessible and feasible for home cooks of all abilities!
Doubt not and hesitate not - get into the kitchen and start cooking!

Cones 11(250)
Recipe :

Lime Cream :
2 cups cream
4 sprigs thyme
1/2 cup sugar, castor
5 tbsp lime juice

Marinated Strawberries:
1 punnet strawberries
1 tbsp balsamic vinegar
2 tbsp castor sugar

Phyllo Cones :
6 sheets phyllo pastry
2 tbsp clarified butter

Method :
1. Heat cream and bring to boil. Remove from heat and put in thyme sprigs to infuse for 20mins
2. Remove thyme. Return to heat ad bring back to boil. Add sugar and let simmer for 3-4 mins.
3. Take off heat and stir in lime juice. Chill in fridge for 2 hours.
4. Dice strawberries and sprinkle sugar and balsamic vinegar tover it.
5. Allow to marinate for minimum 30mins.
6. Butter 3 sheets of phyllo, layer on top of each other, then cut to rectangles. Wrap them around butter cone molds and bake in over at 180C for about 10mins or until brown.  (Alternatively, cut sheets into 4 inch squares and press these squares into lightly greased small muffin tins.

Assembly :
1. Pipe or spoon Lime thyme cream into phyllo cases. Top with marinated strawberries and serve immediately.

Wednesday, July 6, 2011

Financier Pistachio

Financier 1

Fiancier 7

Financier 7

As a curious and somewhat avid baker, nothing delights me more than sussing out interesting ingredients, flavourings that I can experiment with. My frequent overseas business trips take me to markets which are bigger and more mature in such disciplines affording me access to interesting ingredients which are otherwise hard to come by in Singapore.

During my recent trip to Hong Kong, apart from getting tart molds, I had also managed to cinch an interesting Pistachio Paste. A thick nutty paste that comes in a hue that resembles deep chlorophyll, the 100% Pistachio Paste reminds me of Sicilian Pistachios that are generally smallish and when ground, yield a jade green powder. The paste on its own is utterly delicious - a little like a drier Pistachio butter spread. I guarded the little 100g tub almost possessively....

Financial 5


I have decided to try out the paste using one of Pierre Herme's Financier recipes. Like the Madeleine recipe I had tried earlier, Pierre Herme has once again incorporated inverted sugar in his recipe which results in one of softest and moistest Financier I have ever tasted... a moistness that I am still not quite used to expect from a Financier. The pistachio paste turns the tender crumbs into a glistening emerald green, by itself, quite a lovely sight to behold. 

Once again, I know this precious paste would be on my replenish list when I stop by in Hong Kong next time. 


Fiancier 7 (250)
Recipe

Icing Sugar          90g
Almond meal       30g
Hazelnut meal      5g
Bread flour           35g
Baking soda         1g
Egg white             95g
Invert Sugar         5g (if not available, just use glucose syrup)
Pistachio Paste     25g
Melted brown butter    60g
Lemon zest                  Pinch
Pistachio nuts      25g (roasted at 160C for 7mins and chopped)

Method :
1. Mix icing sugar, almond meal and hazelnut meal in a mixing bowl. Add in sifted bread flour and baking soda.
2. Add half of the egg white and blend with the dry ingredients until well corporated.
3. Add invert sugar and mix until totally combined.Add the remaining egg white and mix until homogenous.
4. Add in pistachio paste and mix until well corporated.
5. Stir in brown butter gradually, stirring well to ensure well mixed.
6. Add lemon zest. Mix well. Scoop batter into a piping bag.
7. Pipe batter into a oiled financier mold to 80% filled.
8. Sprinkle chopped pistachio nuts on top.
9. Bake at 190C for 10 -12 mins.
10. Cool down and demold.

Saturday, July 2, 2011

Hong Kong Egg Tarts - Flaky Egg Tart, 酥皮蛋挞


Egg Tart 7


Egg Tart 4

Egg Tart 5

I have always wondered about the Egg Tart. It has all the elements of a western pastry, from the short crust/ puff pastry and the egg custard to the little tart molds but yet, I have only seen them offered at Chinese Dim Sum restaurants or bakeries in Chinatowns. There is no doubt that these had originated from Southern China. Some postulated that Southern China/ Hong Kong, through their interaction with the Western world could have adapted the egg tart from the English tart. These custard filled tarts have also been associated with the Portugese egg tart pastry, Pastel de Nata. Whatever it is, we know that the Chinese love their egg tarts. I have so far identified three basic varieties of Dan Ta, as they are fondly referred to in cantonese.

The one featured in my last post, has a short crust pastry which is easy to handle and is generally the variety most would try to bake at home. The key is to make the crust just thin enough to hold the glorious silken tender custard.

The second variety is the Portugese egg tart which uses a puff pastry crust and is filled with an egg custard mixture that would caramelise upon baking. If one uses store-bought ready rolled puff pastry, this could be the easiest egg tart to whip up at home.

The third variety is what is normally served at dim sum restaurants and comes with a flaky crust that can only be achieved with an obscene amount of shortening and deft pastry folding skills. The recipe requires one to wrap a highly oily dough with an oil free 'water dough' . This is not unlike making puff pastry from scratch but the ratio of the oily dough to water dough is much higher, thus rendering this a very difficult dough to handle... especially in warm and humid Singapore. I have been told by a dim sum chef that at the restaurant, they would normally roll out the dough (开皮) in a cold room. Once the dough is rolled out, it is folded in 3 folds, rotated 90 degrees and rolled out again. This process is repeated twice while for the third time, instead of 3, the dough is folded in 4 folds before it is rolled out to the desired thickness and cut to size. This process gives the dough the nice layered flakiness.

Egg Tart 2
It was with a little bit of gungho spirit and a little hubris that I embarked on the venture of baking this at home. I don't have a cold room to work in and I am not skilled enough to work as quickly and deftly. As a result, even though my crust still tastes lovely and flaky, the discernible pretty layers were missing. I also experimented with the oven temperature to find the right balance to bake the crust to a crisp but not turn the custard into rubber ducky.

I have to admit that this is not the easiest recipe to work with and I am glad that I have managed to roll and fold the dough as required. However, there is still room for improvement. Lining the tart cases more evenly would have to come with practice and deftness ... especially so for a dough that wilts under the heat of the thumb.

Egg Tart 7(250)
Recipe :

Pastry Dough :
Oil Dough
Shortening                 180g
Butter                         50g
Plain Flour                 150g

Water Dough
Bread flour                 29g
Plain flour                   90g
Egg                             12g
Custard Powder          7.2g
Water                          60g

Egg Custard Filling : Refer to here

Method :
1. Mix ingredients for Oil Dough together in a cake mixer fitted with the paddle attachment. Mix until smooth and wrap dough between plastic sheets and chill for 3-4 hours.
2. Mix ingredients for Water Dough in a mixer fitted with the dough hook and blend until dough is no longer tacky to touch.
3. Wrap dough between plastic sheets and chill for 20mins.
4. Roll out Water Dough and place oil dough in the middle, fold and roll as illustrated below:
Flaky Tart

5. After final fold, roll out dough to about 0.5cm thickness, cut out rounds with a cookie cutter and line tart molds with the dough.
6. Fill the lined tarts cases with egg custard.
7. Bake for 13 mins at 200C.
8. Remove from oven, cool down and serve while warm.


LinkWithin

Related Posts with Thumbnails