


Bread making is an artistry that requires alot of devotion to technique and respect for the bubbling chemistry that forms the basis of this age old staple food. I have until now, only looked on with envy at others who had churned out loaves after loaves with seemingly effortless perfection. I have been encouraged by others to give this a go but I guess bread-making is a little like going-to-the-dentist for some or my fear of cats... unfounded but nevertheless...
Late last year, I had openly commented that I shall make bread baking one of my resolution for the coming year. This is my way of forcing myself to get something done. It was the same at work, when I knew I had to force myself to get something done by a certain timeline, I make myself declare my commitment to a big group of people at a meeting. When you do that, you have nowhere to hide but to forge ahead.
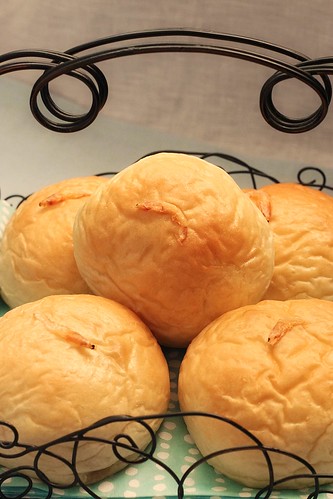
My first baby step was attending Valerie Kong's Sweet Soft Buns class a couple of weeks ago. First introduced by the Japanese and later made wildly popular in Singapore by local bread shop , BreadTalk - the Yukone(Water Roux, 汤种) method is a brilliantly simple technique to make very soft and springy buns that will retain its softness for days! I am still baffled by how the addition of just a small lump of flour mixed with hot water can have such an amazing effect. I intend to find out more.
The class was clear and easy to follow but I think the real value I got out of the class was that it had piqued my interest and started me thinking and wondering.... It prompted me to search for similar recipes, made comparisons and explore options.
The most classic way of water roux method requires one to 'cook' a small portion of flour with water from room temperature to 65C. Once the temperature of the roux reaches 65C, heating is stopped.
Then variations started to emerge where boiling hot water is poured directly into a small portion of the flour. (well, I guess, by the time the flour is mixed with the water, the mixture will probably cool very quickly to around the same temperature) This is mixed well and let to 'proof' over night.
The method I use is the latter method - perfect for a lazy bum like me. A variety of dried materials can be used - from just purely bread flour, to a mixture of bread flour/ plain/cake flour/ milk powder/ whole wheat flour... the possibility is endless.
The recipe I am using here is a combination of Valerie's formula with Alex Goh's recipes. For the filling, I am using the Spicy Fried Dried Shrimps from my last post - but there is really a whole range of variation that one can play with.
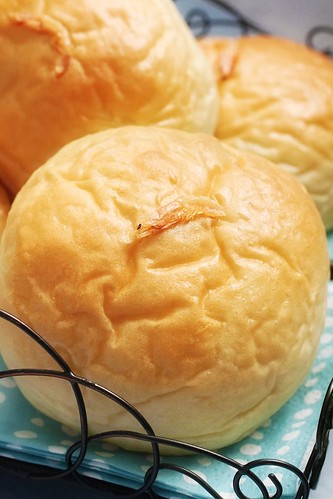
Looking at these soft sweet buns, I am happy with the results but I am still trying to figure out how the wrinkles appear overnight.... if anyone has insight to this, please do enlighten :)
Recipe : (Soft Buns)
Water Roux
Bread Flour 50g
Boiling water 75g
Bread Dough
Active Dry East 6gm
Bread Flour 160gm
Plain Flour 40gm
Sugar 50gm
Salt 2gm
Water 50gm
Egg 1
Butter 40gm
Method :
1. Mix water roux ingredients together in a bowl. Cover bowl with cling wrap and store in fridge for 12 hours.
2. In a mixer fitted with a bread hook, add flour, yeast, sugar, egg and water. Start mixing at slow speed for 2 mins. Add salt and continue to knead until dough lifts from the wall of the mixing bowl.
3. Add (1) and continue to knead for 3 mins. (I am using Kitchenaide speed 2)
4. Add butter and increasing kneading speed to speed 4.
5. Continue kneading for 15 mins on speed 4 until dough is no longer sticky and does not break when pulled to perform window test.
6. Place dough in a slightly oiled bowl. Cover with cling wrap and leave to proof in a warm area for 45mins.
7. With lightly floured hands and table top, knead (6) to form a smooth round ball. Divide dough into 12 balls - about 40g each.
8. Roll each small ball into a round ball and leave to proof for 10mins.
9. Flatten each ball and roll out to a circle with a rolling pin. Place 18g of Hei Bee Hiam filling in the center of the dough and wrap and seal the edges of the dough to form a ball.
10. Leave to proof for 1 hour.
11. Brush with egg white and decorate.(I used a Sakura ebi shrimp)
12. Bake at 185C for 8-10mins until brown.
13. Leave to cool.


50 comments:
从外表看来就知道面包很软,内馅也很吸引人。我很喜欢:)
汤种和烫种比较的话,我比较喜欢后者。也许没有温度计,我觉得单凭肉眼判断,我的汤种都做的不好。
The buns look like a big fluffy pillow. I can see the softness in it. I never try this method before. I am going to do that this weekend. Thanks for sharing it Shirley.
hehe you have been doing so much baking recently! i'm g;ad you fulfilled one of your resolutions! and by the sounds of it, maybe we will see more bread on the blog :)
Aarrrghhh, I want one! Actually, more than one. It's breakfast time and I just woke up. Love that little garnish you stuck to the top of the bun. I want to try the water roux method as well. Regarding the wrinkles, how did you store the buns?
Exactly as I imagined them when you spoke of them in your Shrimp post earlier. I had no clue that there was a different technique to getting that soft bun look and texture. Bread Talk and Rotiboy were my favourite haunts in Singapore :-)
Bookmarking these to make with a chicken filling. Thnx Shirley!
Waaa the buns look lovely!!! I have not overcome my fear of bread yet. Haha mebbe I can try it one of these days. Lol.
:) christine
The funny thing is...I was just wondering how you got those wrinkles!! Because my buns never have wrinkles- but i actually like them because the store bought buns which from the shop I usually buy them from do :D Your buns look really light and soft :) Will we be seeing more buns on your blog in the near future?? :D
very yummy & lovely buns! :)
Those buns really looks soft as clouds! Congratulations on your success in bread making. You wld never have failed anyway Shirley. Love the basket :))
Nice bread! I actually love the wrinkles on your bread, they just look cute. Your breads look very soft, bake more bread to share ya!
I want to start baking my own bread, so curious about this method. Read about it before but never tried it! Thank for sharing :) Happy Friday!
I can't wait till you "practice" more. It looks beautiful for someone who recently attempted bread! Esp with the hei bee hiam.. grrr.. i want it!
gotta try this method...love the buns - looks so soft and fluffy!
thks for sharing :)
I just had my hands on bread making with the same method few days back and the bread was truly soft.
Today I tried the cooking method and Arrrghhh, my bread is still in first stage proofing after 4 hours. It's growing, but very slowly. I guess I might have killed half my active dry yeast when I mixed it with too warm milk.
I guess we have to make more to gain experience. Ganbatae!
OOO, your buns looks so airy and soft! They look really good....
I used to buy some buns quite regularly from BreadTalk when I still lived in Sydney. Your buns look very soft and have got perfect colours!
You did great Shirley! This bread is so different to what I'm used to and it's a different method as well with, very interesting!
I adore these buns! They looks so downy soft and remind me of the buns of my childhood! :D
Yumm! Love the 2nd pic. So beautiful and delicate. Love the prop you used in the photo.
Those look so perfectly deliciously fluffy!
Hi Shirley,
So you were at the class too :) Yours look good! I'm so inspired, going to try it today! So excited :D
I thought you might make Hae Bee Hiam rice dumplings but you made buns. Better still cos I prefer buns and can eat lots of them!
Shirley,
I made this yesterday, and I love it very much! The buns were really very soft! I think I overbaked it a little, the next day, it wasn't as soft. That could also due to the wholemeal flour I used. But it's the best bread I've baked so far! Thanks soooo much for sharing the recipe!
@Jane - I am so glad to hear this! One thing you may also want to take note is when you have cooled down the bread and place it in a plastic bag, it will remain very soft.
Oh, thanks for the tips Shirley! Must it be ziploc bag or normal plastic bag?
Jane.. Just normal plastic bag is ok. Just don't leave it exposed or sitting around on the table...
This has to be one of my favourite buns that I ate so frequent when I was in Malaysia!
if i hadnt read the post and if they were covered in icing sugar i would have thought they were jam doughnuts! Hey, thats not a bad idea eh....
Hi Shirley, really thank you for sharing this bread recipe in your blog. I made these yesterday and they were indeed very very soft and good.. My kids had one after another even after lunch.. and they even compared recipes saying this is the best bread dough..
Thanks once again for your generosity.
Great day, cupcake
Cupcake - It is always so gratifying to hear that it worked out so well for others. You've just made my day!
Shirley, my buns just fresh out of the oven and I couldn't wait to sink a bite into it. Very soft, light and fluffy. Awesome. THanks for sharing.
Same as Min, me too love the wrinkles on your bread. I tried out this recipe n they turn out good. Thanks for sharing.
Una verdadera delicia!!
Gracias por compartir
Saludos, Angeles
Hi Kokken
U mentioned that u used the Kitchenaide speed 2 to knead the bread dough.
Like u, I find the art of bread making very fancinating and my interest in bread making grew strongly each day. I am now looking for a stand mixer to help me in the kneading. U mentioned that u used Kitchenaide speed 2 to knead dough for ur Hei Bee Hiam buns.
May I know what is the max. power of ur Kitchenaide mixer. I understand most Kitchenaide mixers come with only 300 above watts but never more than 500 watts. As such, is the power strong enough to do the kneading and will mixer burnt when kneading takes more than 15 mins?
What brand of mixer wud u recommend for bread?
I have in mind the Kenwood KM030 which comes with 1400 w and a strong stainless bread dough hook. I usually use 500 gm flour.
Blessings
Priscilla Poh
Hi Priscilla, there are 10 speeds on my kitchenaide- which is the entry level Artisan model. It is good enough for me to get a smooth dough after 15 mins kneading with the dough hook.
I am not an expert in mixers but I did hear from some people that for bread kneading, the Kenwood unit is better than the Kitchenaide. The Kitchenaide, I find, is extremely efficient for meringue beating.
I normally make small portions at a time so my Kitchenaide can still handle it. I believe I won't be able to scale it up too much.
Thnx Kokken for ur swift reply. Ur reply double confirmed I shud go for the Kenwood KM030 mixer. I saw the demostration performance of the s/s bread dough hook which is very strong indeed. The power at 1400 watts is so much safer for larger batch of bread kneading that requires more than 20mins without over heating.
Ya, Kokken, I noticed that u made dough of smaller capacity.
Well, high time I get the Kenwood mixer priced at S$999 since I am so much into bread and pau making.
Kokken, I love ur creations be they pau or bread. They really look like store bought types. I hv much to learn from u and I hv marked ur pau recipe to try out after getting some HK white lotus paste and pau flour from Kwong Cheong Thye yesterday. I think the HK version lotus paste at Kwong Cheong Thye is more compact and better version (more concentrated) compared to its in-house brand of lotus paste which is more moist. The moistness suggests more corn flour cud be added to the paste, hence, not authentic.
I also got myself some cooked glutinous rice flour for snowskin but a little hesitance in trying out as it calls for shortening.
Kokken, what do u think of shortening? Hv u any idea about replacing shortening with other form of healthier fat?
Sorry for being so "long-winded"
Blessings
Priscilla Poh
Hi Priscilla- Yes, I am not a big fan of shortening either. If pork lard is available here in blocks, I would gladly prefer that over shortening. Generally, I think you will need some type of solid fat. I am not comfortable with eating uncooked shortening. If you are not too concerned about colour, maybe can try some solidfied olive oil spread? I am also wondering if cream cheese would work.
Just want to clarify about the water roux ingredient portions that you posted. U posted 50g bread flour to 75ml water?? Is that correct? I have always read that the portion of flour to water should be 1:5
I would like to try your recipe but just want to confirm on the water roux.
Thanks! :)
Hi Alice W- yes, the portion is correct. This is a variation of the water roux method. Boiling hot water is just poured over the flour to form a lump. The traditional 1:5 water roux method requires cooking the roux over fire at 65C until it turns into a gluey paste... (please see my Hokkaido Milk Bread). This method is simpler and yields very soft buns too.
Hi Kokken69,
Thanks for your clarification. I followed your recipe and baking instructions and made Ham and Cheese with Kewpie Mayo buns today. They turned out fantastic! Soft and fluffy!
I used my Kitchen Aid Artisan mixer as well but just wondering why my dough still remain sticky and didnt form into a ball during the mixing at Speed 4. In the end, after the 15min mixing, i just dumped it onto the table and form a ball with my hands. Buns still turned out great! Recipe's a keeper.
Thanks again!
Hi Alice, glad that you gave this a try! The dough is indeed a little more tacky than normal bread dough.... Possibly due to higher butter and moisture content but I can still get a window when I test the dough after 15 mins... Yes, I agree, this is a great recipe.... A few others have tried it and all loved it..:)
Hi Shirley, I tried your recipe with good result. I have made some sesame pork floss sweet buns and my family enjoyed the buns so much. Thanks for sharing.
Are there adjustments to existing bread recipes you will need to make when you put in the TangZhong ? Should I cut down on the wet ingredients? Am very inspired by your soft buns :)
@baking4GEM- Yes, you are correct. Try taking out the same amount of water / milk in your original recipe when you introduce Tangzhong. I would even think you may need to reduce the flour in the recipe by the same amount. I am not too worried about flour as we can possibly introduce more when we knead/shape the dough...
Thanks for this wonderful recipe! I've made this a few times with great success!!!
Hi Shirley,
I made buns using this recipe few times before and the results were amazing. and it made me feel like a bun-pro :p Just curious, if I freeze the dough, will it yields the same fluffy buns?
@RC : Oh, I am so glad that this recipe worked for you! I have never tried freezing the dough so I cannot really comment on this. But I am thinking the stage at which you decide to freeze the dough is going to be important. I reckon you should proof the dough at room temperature to relax the gluten strand enough, cut it up, shape it before you try to freeze it. If I were to experiment, I would do it like this. Well, perhaps next time, I will just throw a few buns into the freezer to see how it turns out....
Thanks for your reply.. I'm making them now and planning to put some shaped doughs in the freezer later.. :D
Hi, can I check with you the amount of tang zhong you used? As I have the 1:5 portion of tang zhong made and fridges. But I would like to try your recipe. Thank u very much!
Claire
Do u bring the tangzhong to room temperature before use?
Post a Comment