Announcement

This site will be migrating to a new address.
Please visit me at @Køkken and change your subscription to this blog to my RSS Feed

You Will Be Redirected!

Please do not leave any more messages on this blog. I will not be publishing or responding to any more comments left here. You will be automatically redirected to http://www.atkokken.com All posts have been migrated. You will be able to locate any posts by performing a quick search at my new site. Thank you.

Wednesday, March 28, 2012

Creamy Mushroom Pasta With Sausage


MushroomPasta4

As you may already suspect by now, I love pasta - it may even be safe to say that I enjoy all food Italian. I had concluded many years ago when I visited Rome twice in a short span of 3 months, that one has to be really unlucky to get bad food in Italy.
I look forward to July when I would be vacationing in Turino and Milan.

In the meantime, I am happy to whip up a quick and tasty pasta dish in my humble kitchen.
MushroomPasta10

MushroomPasta1

Originally a vegetarian recipe featuring just mushroom, I tried to perk it up with sausages.
The white wine cuts through the creaminess to keep the dish refreshingly light. I am now totally enamoured with cooking with cream and white wine. You can find this similar pairing in my last pasta dish, Spaghetti with Creamy Garlic Prawns which was equally delicious.

MushroomPasta6
There is really nothing much more to say about this easy everyday concoction. I leave you with the photos and the recipe. Bon Appetite!

Creamy Mushroom Pasta With Sausage
MushroomPasta6(250)
Recipe
250g. Spaghetti
100g. Sausages sliced
60ml. Olive oil
600g. Swiss brown mushrooms, sliced
2. Garlic cloves
125ml. White wine
300ml. Cream
3tbsp. Finely chopped Italian parsley
30g. Grated Parmesan cheese

Method:
1. Cook pasta to al dente and set aside.
2. In a frying pan fry sausage until cooked.remove and set aside.Heat olive oil in the same pan and fry mushroom for 3 minutes until softened. Add crushed garlic cloves and fry until fragrant.
3. Add white wine and simmer until 50% of liquid has evaporated.
4. Add cream and chopped parsley. season with salt and pepper.
5. Add cooked spaghetti from (1). Toss well to coat. Add sausage and serve with grated Parmesan cheese.

Saturday, March 24, 2012

Pistachio Marble Pound Cake


Pistachio Pound9

This is for all the pound cake lovers out there. I fail to track the number of pound cake recipes I had worked through Tish Boyle's The Cake Book. I think very soon, I would find myself baking through the whole Cake Book - it is just so reliably good.

Pistachio Pound7

Pistachio Pound2

This recipe is modified from Tish Boyle's Rich Marble Pound Cake With Chocolate Glaze. I have chosen to skip the frosting and keep it simple. I have also chosen to marble it with a pistachio flavoured batter rather than the chocolate one featured in her book.

Pistachio Pound8
The effect is quite lovely as I had imagined. In place of the dark brown swirl, the jade green marbling instantly brightens the otherwise plain pound cake and makes it look... brand new. Talk about a cake-makeover!

I am going to keep this post short as I am rushing to tie things up before I leave for my travels again. Have a great weekend everyone and enjoy the pound cake!

Rich Pistachio Pound Cake
Pistachio Pound7(250)
Recipe

342g/3cups Cake Flour
2tsp Baking powder
1/2 tsp Salt
500g/1.5cups Castor sugar, divided (Please reduce this to 300g- original recipe is too sweet)

20g Natural cocao powder (I replaced this with 50g Pistachio paste)
90ml Water

340g/3sticks Unsalted butter

1.5 tsp Vanilla Extract
5 large Eggs
120ml (1/2cup) Whole milk

Method :
1. Preheat oven to 325F/ 190C. Grease the inside of a 10inch bundt pan and dust with flour.
2. Sift Cake flour, baking powder and salt and set it aside.
3. In a mixing bowl fitted with a paddle attachment, cream butter at medium speed for 2 minutes until creamy.
4. Add sugar and continue to cream for 4 mins at medium to high speed.
5. Add vanilla extract. Add eggs one at a time and mix at medium speed until well mixed.
6. Add sifted flour mixture in 3 additions and alternating it with 2 additions of milk.
7. Mix cocoa powder with water in a small bowl. Add 3 cups of the batter to the cocoa mixture and stir until blended. (I added my pistachio paste here instead of the cocoa mixture)
8. Spoon 1/3 of plain batter into the prepared bundt pan and smooth it to an even layer. Spoon 1/3 of the chocolate (pistachio) mixture over the plain layer and smooth to even out. Repeat until all batter is used up finishing with the chocolate layer.
9. Bake at 190C for 60-75mins or until the skewer comes out clean.

Wednesday, March 21, 2012

Baked Banana

Banana2
When I first saw this recipe in Chef Gregoire Michaud's Never Skip Dessert last year, I had eagerly bookmarked it. I remember thinking to myself, this is like a creme brulee in a banana - as opposed to the banana in creme brulee which I had made before... :)  The clever quirkiness of this dish appeals to me and the recipe seems easy enough. Chef Michaud had included a Yuzu Thyme Ice Cream as a second component to this dish. I decided I can cut myself some slack and serve it with a store bought vanilla ice cream. Easy peasy, no?
Banana3

Banana1
But little had I expected to work through a whole bunch of bananas and still not get a decent shot at this.... Don't get me wrong, the preparation of the baked banana was simple enough and it tasted delicious with a crispy crust of caramelised sugar on top.
What stumped me was that wretched scoop of ice cream! Getting the ice cream to thaw to just the right texture to get a perfect quenelle proved to be especially tricky! By the time I got the ice cream to thaw / freeze right, the bananas had wilted out on me. Then, by the time I baked a second batch of bananas, the sky turned impossibly dark as stormy weather set in.... I had no choice but to do this again the next day and this time round, I decided to just skip the scoop of ice cream altogether.

This is a great great way to serve a tropical dessert. If you like bananas, the sweetness of the fruit pairs really well with the vanilla custard.
Be sure to use a ripe banana to ensure the best flavour and do not get alarmed when your banana turns black in the oven. I actually find it quite cool to plate a charcoal black banana.... :)

Baked Banana
Banana2(250)
Recipe : (from Never Skip Dessert by Gregoire Michaud)

3 pcs         Large curved bananas

150gm      Milk
150gm      Cream
40g           Sugar
1.5pc        Eggs
1 pc          Vanilla pod (scraped to get vanilla beans)

Method : 
1. Boil milk, cream, sugar and vanilla beans.
2. Strain this into eggs and mix well
3. Preheat oven to 190C.
4. Slice the banana length wise in half.
5. Remove the pulp from the banana. Chop up the pulp and lay a few pieces in the banana skin.
6. Place the banana on a baking tray and fill it with the custard cream.
7. Bake at 190C for 20mins.
8. Remove from oven and sprinkle with sugar. Using a blow torch, caramelise the sugar.


Sunday, March 18, 2012

Mocha Kuih Lapis

Pin It
MoccaLapis5

I say, I am becoming quite good at this! This is my third Lapis and all three times, they have turned out deliciously successful.
The first two cakes were baked during Chinese New Year. The strangest compliment I've received was when a friend told me that my Lapis was really good because her dog had liked it.....  Apparently, Snowy her dog, has extremely discerning taste. She would not just eat anything given to her and apparently she loves buttery desserts.... I am not an animal person so I have no idea whether that is normal.
MoccaLapis12

MoccaLapis13
Back to the Lapis. I baked this again because my father's 76 year old Malay doctor friend had been refusing to charge him when he went to see him for a skin condition. My father had been unwilling to go back for a follow up session because he knew the doctor is not going to charge him again. ( For those who are not familiar - this is an Asian thing. We feel indebted when we receive free things from friends.)  To force my father to go back to the clinic again, I volunteered to present the doctor with a Lapis when we go back again.

To be quite honest, at one point, I did wonder if it would be appropriate to present a 76 year old man with a cholesterol laden sweet but I went ahead with it anyway because, the Lapis is generally perceived as an indulgent treat and is extremely popular with the Malays (and non-Malays alike).  In fact, I have not met anyone, who does not enjoy the Lapis.

Coincidentally I saw Rima's gorgeous Mocha Lapis post last week. It was the most perfect lapis I have ever seen in my life. The texture looked exceptionally gorgeous. I was literally brimming with excitement until I saw the recipe.... The 9 inch cake uses 45 egg yolks, almost 1kg of butter and a mind whopping amount of sugar. I baulked and chickened out.

I decided to take a few elements from Rima's recipe and came up with a modified, recipe.
I am still extremely pleased with the texture of this Lapis and I hope with more practice, my lapis would one day look as good as Rima's.

Mocha Kuih Lapis
MoccaLapis5(250)
Recipe : 
(makes a 8″ square)
375g      butter
1            vanilla pod
180g      full cream condensed milk
5            whole eggs
12          egg yolks
200g      fine sugar
3g          baking powder
130g      cake flour
20g        butter milk powder (you can substitute this with milk powder)
2tbsp      mocha emulco
1tbsp      cocao powder
Method
1. Preheat oven to 230 C using the normal top and bottom heat to heat up the entire oven. If your oven has grill function with temperature control, use that.  
2. Line the bottom of a 8″ square pan. 
3.Cream butter, vanilla seed (scraped from vanilla pod) and condensed milk together until light and fluffy. Set this aside.
4. Beat eggs, egg yolks, sugar and baking powder together until ribbon stage.  Add the butter from (3) into the egg mixture and continue to beat at high speed.
6. Sift flour and fold into the batter.
7. Divide batter into 2 portions. Add mocha emulco and cocoa powder into one portion. Mix well to combine.
8. Heat the empty cake pan in the oven for 2 mins. 
9. Remove pan from oven and spread a portion of batter in the pan. (Measure your batter for every layer to ensure that your layers will be even) Level batter with a spatula and grill for 3 mins or until dark brown. 
10. Remove from oven, press cake layer to remove excess air. Spread another portion of batter, level it and grill for 3 mins or until dark brown. 
11. Repeat 9 and 10 (alternating 3 layers of plain batter with 3 layers of mocha layer) until the batter is finished. 

Tuesday, March 13, 2012

Spaghetti With Creamy Garlic Prawns

Pin It
GarlicSpg5

This one is for the serious aromatic lovers - garlic, leek and parsley- this recipe has it all in generous portions.

I am thankful that I am not allergic to to any of the aromatic vegetables. I have a colleague in Italy who is allergic to garlic and I don't know how he overcome meal time challenges at one of the gastronomic capitals of the world. I imagine it to be pure torture.
I am also fortunate that I happen to love the distinctively pungent aromas of wonderful herbs and vegetables such as garlic, parsley, coriander, celery etc. I well up in frustration when friends I dine with reject herbs with a strong smell. I try hard to be tolerant but it will always remain beyond my comprehension.

In a world laden with processed food and additives, garlics boost our immunity and minimise heart ailments. Leek on the other hand,is a great source of fibre and has laxative, antiseptic and anti-arthritic properties.

GarlicSpg2

GarlicSpg8
Cooking a recipe like this will have all your neighbours thinking that you are a great cook. The aroma is intoxicating and evokes imagery of sizzling gourmet food. It doesn't hurt when the recipe is really easy to manage.
So who's afraid of the aromatics???

GarlicSpg7(250)
Spaghetti With Creamy Garlic Prawns
Recipe:

2 tbsp Olive oil
16 Raw medium size prawns, shelled and deveined
30g Leek chopped
40g Garlic, minced
1/2tsp Chilli flakes
125ml Dry white wine
50ml Cream
250g Spaghetti
3 tbsp Chopped flat leave parsley

Method :

1. Season prawns with salt. Heat half the oil in a frying pan and prawns to the pan and cook at high heat for 2-3 mins or until cooked. Remove from the pan, cover and keep warm.

2. Start cooking pasta in a large saucepan of boiling water until al dente. (I used tagliatelle which required me to cook for 12mins hence I start early here)

3.Heat the remaining oil in the same pan, add the leek and cook, stirring over medium heat for 2-3 mins or until softened. Add the garlic and chilli flakes and stir for 1 mins.

4. Pour in the wine and simmer for 4 mins or until reduced. Add the cream and simmer for 3 mins or until just thickened.

5. The pasta should be ready and drained by now.

6. Stir parsley into the sauce and season with salt to taste. Return drained pasta into the pan and stir to coat.

7. Divide among serving bowls and top with prawns.

Friday, March 9, 2012

Jam Topping Sponge Cake

Pin It
Jam Sponge4
When I was growing up, cakes did not look anything like what we see today - we almost never saw anything with fresh cream and one can totally forget about intricate entremets. What we had then were rustic, simple and predictable. I recall that we would always look forward to marriage celebrations among family friends, waiting for the day when they would personally deliver the red invitation card and the box of engagement cake. Yes, those were strange times when the bride/ groom family would be running around distributing dozens of boxes of cakes and wedding invitation cards. Depending on how close one is to the family, one may get either one or two boxes of wedding cakes.
Jam Sponge9

Jam Sponge6
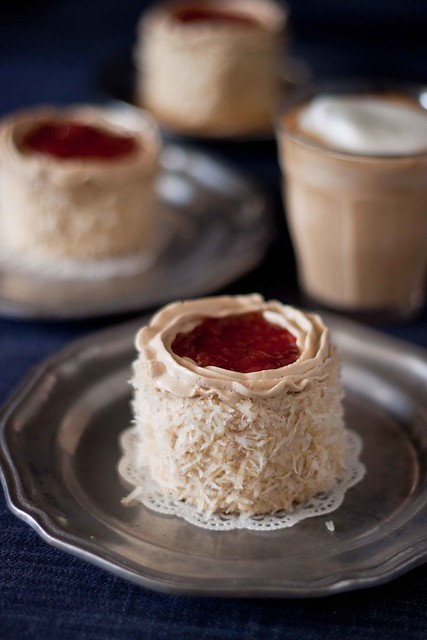
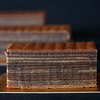
The contents of those cake boxes were almost always the same- typically an assortment of 10 slices of sponge cakes frosted with delicious butter cream. Some would be crusted with chocolate rice, others would be dotted with colourful jams.  Quite often, the ones with chocolate would get snapped up first after which we would reach for those topped with jams... The tradition has become simplified over the years. Nobody runs around distributing cakes on their engagement day anymore. Instead these have been replaced by cake vouchers which one can redeem from the bakery stores.

Jam Sponge8
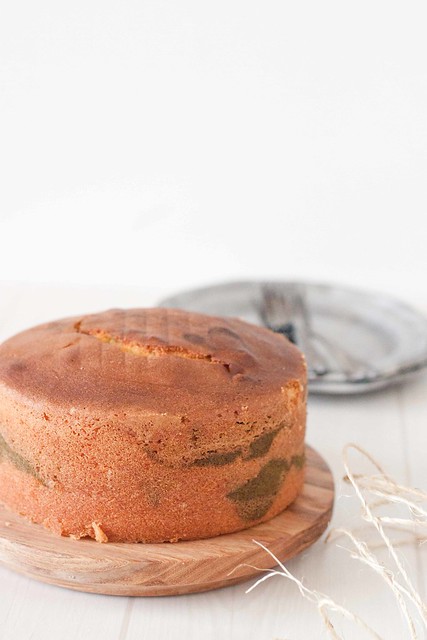
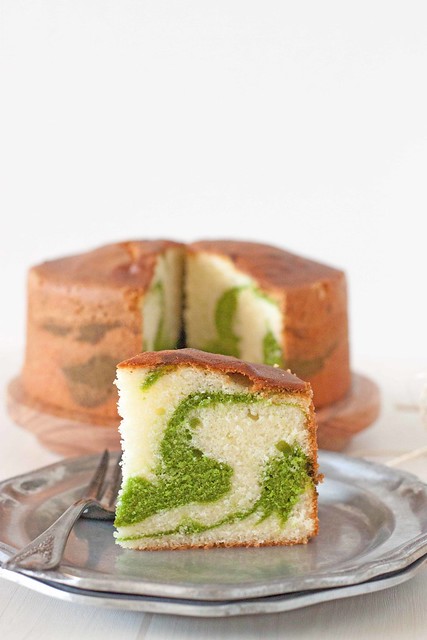
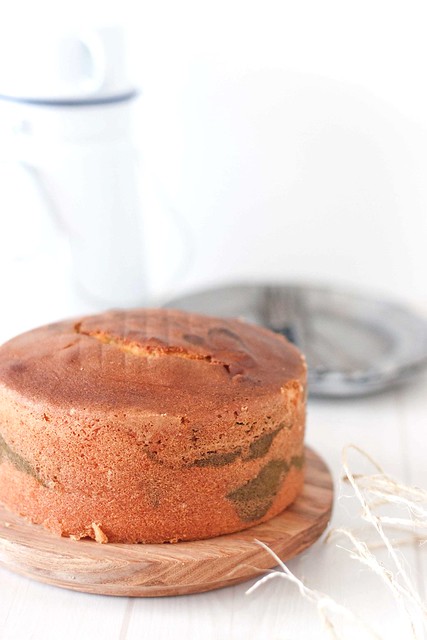
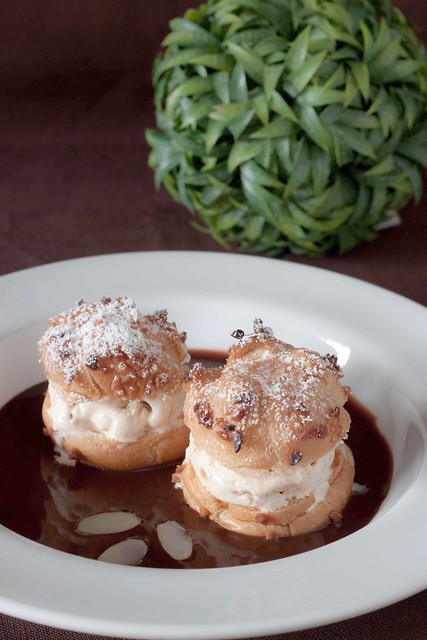
When I spotted these in Alex Goh's Creative Making Of Cakes, I knew that I would have to make these just  to revisit childhood nostalgia. My cake is not completely the same as what we used to have.The sponge cake is more refined, the butter cream is fluffier and lighter and the jam tasted less artificial than what I used to have 30 years ago...(even though I tried to buy the cheapest jam I could find off the supermarket shelf) but it still managed to give me flash backs of those pink floral cake boxes tied with raffia ribbon and those lacquered red invitation cards...gosh, I have not seen those in ages!

If you are from the same era as I am, you will love this. Memories are the world's most potent ingredients...

Jam Sponge4(250)
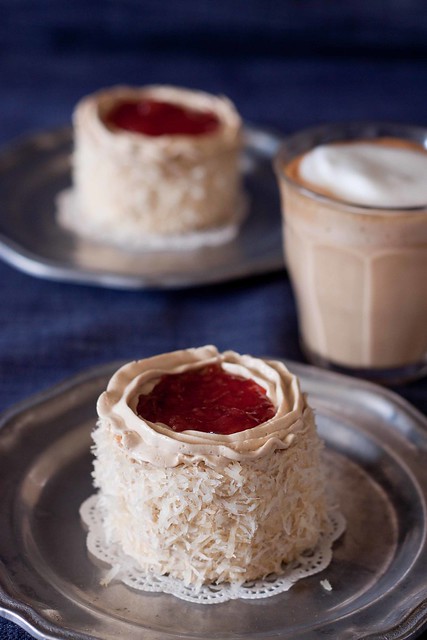
Jam Topping Cake  (Adapted From Alex Goh's Creative Making of Cakes)
Recipe 
(A)
150g                Sugar ( A tad sweet, I would reduce this to 120g next time)
15g                  Cake Emulsifier
(B)
5                      Eggs
130g                Flour
1tsp                  Baking powder
(C)
40ml                 Water
(D)
85g                   Melted butter
Desiccated coconut
Strawberry jam
Butter cream for frosting. I used left over butter cream from here.

Method:
1. Preheat oven to 190C. Mix (A) until well blended in a mixing bowl. Add (B) into the same bowl and start to whisk with balloon whisk until thickened.
2. Add (C) and continue to whip until light and fluffy. (ribbon stage - with the help of the cake emulsifier, this can be achieved very quickly and it stays very stable)
3. Fold in (D) and mix till well blended.
4. Pour the batter into a 12 inch square tin lined with parchment paper.
5. Bake at 190C for 20mins.
6. Remove from oven. Lift cake out of baking pan (so you should cut the parchment paper such that it overflows and allow you to grip the edges to lift the cake out of the tin) and leave to cool on a wire rack.
7. Peel off parchment paper when cake is completely cooled. Cut into 2 equal slices.
8. Sandwich  the 2 slices together with butter cream.
9. Using a 3 inch round cutter and cut the cakes into rounds. (alternatively, you can just slice into rectangular slices which will reduce wastage)
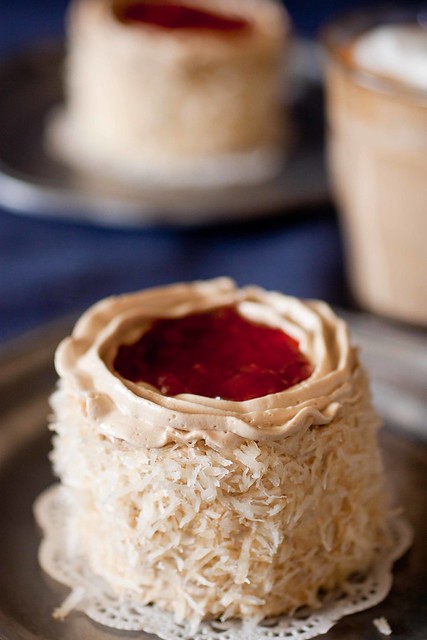
10. Coat the outside of the rounds with butter cream and cover with desiccated coconut.
11. Pipe a ring of butter cream at the top of the cakelet. Fill center with your favourite jam.

Thursday, March 1, 2012

Almond Choux Puff with Caramel Ice Cream & Chocolate Sauce

Pate Choux2
Pin It

If the Genoise Sponge is Lesson 1 in a Culinary Baking Course, then Pate A Choux is possibly either a pre-cursor of Lesson 1 or a more achievable Lesson 1 itself.... Like the genoise sponge, it is plain and non fancy but it serves as the foundation of so many classic and new creations that we have become familiar with.

It has truly transcended all cultural boundaries, for how else would I still bear childhood memories of munching on soft wrinkly cream puffs filled with dry pasty custards? Or that swan-like cream filled puff sitting in the neighbourhood bakery store?
Pate Choux7
Pin It

Of course, with affluence and greater exposure to everything in the world, our palate has become more discerning. I don't think those wrinkly cream puffs with dry pasty custards would work any more.  Thankfully, there are still many ways to 'glam up' the humble Pate A Choux. One can let one's imagination take flight and work with a myriad of interesting cream fillings as exemplified by ZenChef's creation. Or, if you are, like me too lazy to whip up a pastry cream ( my secret confession - creme patissiere is one of my least favourite things to prepare) , there are still many other ways to add pizzazz to your choux puffs.

I made an easy chocolate sauce here to line the plate with and simply sandwich the puffs with Haagan Daz Caramel Biscuit & Cream ice cream. Present this to your guests on a plate like the way I did and they would think that they are eating dessert in a fine-dining restaurant!

Pate Choux7 (250)
Almond Puff With Caramel Ice Cream & Chocolate Sauce
Recipe (Adapted from The Patisserie Of Tony Wong
Choux Puff
125g             Water
4g                  Sugar
2g                  Salt
50g                Butter
75g                All purpose flour (sifted)
100g              Eggs
Diced almonds to garnish
Egg wash

Chocolate Sauce
130g              70% dark chocolate
250g              Water
125g              35% whipping cream
50g                Sugar
1g                  Vanilla extract

Method:
Choux Puff: 
1. Boil water, sugar, salt and butter in a saucepan.  Add all the flour into the boiling butter solution and mix well.
2. Cook dough until the mixture forms a ball and comes away from the sides of the pan.
3. Beat the batter on medium speed with a paddle attachment until just warm.
4. Add egg, one at a time. Scrape away the batter from the sides of the pan to the center and continue to mix well.
5. Spoon the choux dough into a piping bag fitted with a plain tip. Pipe 4-5cm diameter choux paste. Brush with egg wash.
6. Sprinkle with diced almond and bake at 200C in a preheated oven for 30-35mins.

Chocolate Sauce:
1. Cook all ingredients in a saucepan until all the chocolate is melted. Simmer down the sauce to thicken.

Assembly :
1. Slice choux puff in half.
2. Spoon chocolate sauce into a shallow plate.
3. Place bottom half of puff on the chocolate sauce. Top with a scoop of ice cream. Cap with sugar dusted top half of puff and serve immediately.

LinkWithin

Related Posts with Thumbnails