Announcement

This site will be migrating to a new address.
Please visit me at @Køkken and change your subscription to this blog to my RSS Feed

You Will Be Redirected!

Please do not leave any more messages on this blog. I will not be publishing or responding to any more comments left here. You will be automatically redirected to http://www.atkokken.com All posts have been migrated. You will be able to locate any posts by performing a quick search at my new site. Thank you.

Monday, August 30, 2010

Juicy Meat Balls


Meat Ball 1

IMG_3554

You've probably noticed that I love to work with minced meat. The pack of minced pork is possibly the most versatile ingredient I have in my fridge... after the trusted eggs, of course. After the last successful attempt at braised minced meat sauce, I decided to make more and stock them in the freezer. After the stock up, I was actually left with a balance of some 200g of minced pork which I had to consume before I leave for my week-long business trip.

Taking every cooking opportunity now to experiment with new recipes, I decided to try out a deep fried meat ball recipe I saw in a Japanese cookbook titled ' The Basics Of Chinese Cooking' - as silly and hilarious it may sound but sometimes, I truly think that it could be helpful to refer to a non-native interpretation of the familiar. It is in these interpretations that we sometimes discover important things/steps that could have already been taken too much for granted by the native writers. When I flipped through this cookbook at cafe book store, 25 Degrees Celsius, When I saw this recipe, I knew immediately that the writer behind the recipes is authentic - for one simple reason - this is the first time, I have seen instructions given in a cookbook to add water to minced meat.  It is common practice to add water to minced meat/ meat after marination to retain the soft and juicy texture of the meat - this is a practice most of our grandmothers / mothers would have been doing. However, I think it has occured to very few of them to pass this 'trick' down - possibly because it is so insignificant. I have made it a habit to do this when I prepare sliced beef/ pork, burgers and other minced dishes. When I first learnt about this 'trick' many years back, I was elated because it made me realise that one does not need to use fatty pork all the time to get a soft juicy pork dish.

This recipe exceeded my expectation when it went a step further to use ' Spiced Up Water' to 'hydrate' the pork. Below, I have documented my first step by step illustration of the preparation. Quick and easy to prepare, the results are impressive. Goodbye to tough and dry meatballs. These meatballs, as illustrated by the cross section photo of the meat ball above, is 'fine-crumbed' , tender and juicy.

(Edith, I am thinking of making this for the event you are planning.... paired with an onion gravy. What do you think? )

Picnik collage 1

1. Soak Spring Onion and sliced ginger in water and rub with hands to infuse water with the flavours. This is effective in removing 'porky' smell of the minced meat.

2. Add seasonings and egg. Blend well.

3. Slowly add the infused 'spice water'. Stirring well to incorporate water into meat.

Picnik collage 2

4. Mix well with hand until minced meat turns into a gluey paste.

5. Shape mince meat into balls.

6. Heat enough oil in a wok, deep fry meat balls over low heat until golden brown.

Meat Ball 1(100)
Recipe :

Minced Pork 200g
Spiced Water
Spring onion 1 stalk
Ginger 3 slices
Water 50ml

Seasoning
Salt 1/4 tsp
Soya Sauce 1/3 tsp
Sesame Oil 1/3 tsp
Pepper 1/8 tsp
Corn flour 2 tsp

Friday, August 27, 2010

Fruity White Wine Jelly - Pondering Over LadyIronChef's Controversy


WWJ 3

Those who have been following the Singapore Flogosphere would have caught the buzz over the rather disturbing controversy involving well known local food blogger, LadyIronChef. Yahoo News had reported that he had abused his privilege when he was invited to a food tasting session at a local restaurant. By the time I got to hear about it from fellow bloggers, LadyIronChef had apparently already been bashed up so badly online, suspended his blog and issued a post to share his side of the story.... All these took place at the time when I was just about to go for another food tasting invitation and because of that, the episode had a greater sense of relevance for me. My 2 colleagues whom I had asked along to help me work through the huge tasting menu pulled me aside to show me the Life section of the Straits Times when I stepped into the office that morning. They were concerned if I had gotten clearance for them to join me...

When I finished reading the article in my office, I started to ponder and reflect on the whole meaning and relevance of this space which I call  my blog and the even greater social virtual space which we have come to refer to as the Blogosphere. In all honesty, I seriously cannot remember why I had started a food blog. Till date, possibly only 5 of my friends have seen my blog. The colleagues who went with me for the food tasting session have no idea what my blog looks like and I have no intention to show them...  I think this leads me to one of the most fundamental motivation of blogging - stripping all excuses and reasonings away, the common denominator that will always remain is Self Indulgence. Probably more than 80% of all bloggers out there started out using the blogosphere as a platform to ramble and indulge in things that are of interests to themselves. Some do it with more gusto and ambition while others are happy just to continue with the rambling and attract like minded people to partake the indulgence together.  The seriously ambitious will be able to turn their space into a business platform while the rest who continue to manage their space as a personal hobby room could become an interesting and cost effective promotion avenue for marketers.

Everyone loves perks... and to me, food tasting invitations, product reviews and product giveaways are just exactly those. I remember discussing this with Zurin, pondering over why we have been chosen to host giveaways when our blogs (at least my blog) could hardly be considered to be 'box-office-ratings-stars'... similarly, my food tasting opportunities did not present themselves to me because I am better than others but because a generous blogger had referred me. The fact that one is offered perks does not neccesarily mean that one is better than the next blogger - to let these get into one's head and let these fool one into believing that they deserve better treatment than others is sad and appalling.

I do not judge LadyIronChef but his case had sent a shudder through me- I am amazed at the sheer number of people/ blogggers out there who are so quick to pound on him. Never knew such cruetly exists in the blogosphere...I tend to agree with him that it takes 2 and possibly more hands to clap. He had been presumptious and rude but it seems the marketer at Private Affairs had also been reckless and unprofessional.
WWJ 6

Enough of the weighty stuff and now for something soft and sweet... I share with you today, an absolutely simple dessert treat. Totally self-indulgent as it requires zero skill - I just wanted to photograph and eat something pretty - so if you will, indulge with me...

WWJ 100
Recipe:

200g                                Mixed fruits (I used frozen mixed berries)
Gelatine                           20g
Water                              100ml

Sugar                               50g
Water                              300g

White Wine                      100ml
Lemon juice                      2 tsp

Method :
1. Mix gelatine wiht 100ml water and set aside at room temperature for 15mins.
2. In a heavy saucepan, heat water and sugar until sugar dissolves. Add (1) and remove from heat and stir until completely dissolved.
3. Add white wine and lemon juice. Cool down with stirring over an ice bath. (This will allow the jelly to start setting - viscosity will become higher. When fruits are added at this point, they will not all float at the top of the mold.)

4. Add fruits to (3) and pour into mold. Refrigerate for at least 3 hours until firm and set.

Tuesday, August 24, 2010

White Chocolate Steamed Bread ホウイトチョコ蒸しパン


WC Steamed Cake 3

WC Steamed Cake 2

When I posted the Strawberry & Milk Steamed Cake/bread last week, I was able sense that there is significant interests out there in steamed bread/cakes. Undoubtedly Asian by origin, these steamed bread/ cakes probably had their roots in all the steamed dumplings and steamed buns that our forefathers were eating.

Huat Kuey/Fatt Ko has never been a glamorous item on our to-eat list. Most either associate these with those hard and dense cakes sitting on the worship altars or coarse, rustic poor man's food- at least, those are my impression.

It is always delightful to find interesting interpretations on set ideas and cliches. All it takes is some curious and creative soul to wonder out of the box a little and the possibilities become endless - the dated can be transformed to become current, the boring and tacky can suddenly become interesting and chic....
This was the excitement I felt as I first flipped through the Steamed Bread Cook Book.

WC Steamed Cake 7

The last post on Strawberry & Milk Steamed Bread was based on the a very basic vegan recipe, without eggs and oil. There are a total of 3 basic recipes for the steamed bread, the second one is demonstrated here with the White Chocolate Steam Bread recipe. Containing egg and a little oil, this recipe ought to be softer than the first but because I ran out of Top flour and Rice flour, I susbtituted with the only flour I have in my pantry - which is the cake flour.  Texture is, I feel, denser than the last one made with rice flour. Nevertheless, it was good enough to have my neighbour stop by after eating it to ask me how I made it - did I put condensed milk in it, she asked.... The creamy white chocolate saved the day. Hmm... I wonder if my deceased ancestors will like these if I were to use them for prayer next time... now- that's turning the current dated!

I am going to stock up on more flour and experiment with the third basic recipe later this week. Look out for it.

WC Steamed Cake 8(100)
Recipe :

1                   Egg
45g               Black Sugar (I used the Japanese black sugar. 黑砂糖)
60ml             Milk

100g             Top flour / Plain flour
1tsp              Baking powder for steamed cakes

10ml             Salad oil
35g               White chocolate

Method :

1. Heat water in a pot to boiling and stand by for steaming.
2. In a mixing bowl, add egg, sugar and mix with a hand whip until well combined. Add milk and mix until sugar dissolves.
3. Add flour and baking powder until a smooth paste is obtained. Incoporate oil into the batter.
4. Pour batter into lined pudding cups.
5. Add white chocolate into each cup.
6. Steam over medium heat for 12- 15mins.

Sunday, August 22, 2010

Braised Mushroom Meat Sauce 香菇卤肉燥


MMS 2

MMS 3

Too busy to prepare dinner, yet again? Here's the uber versatile meat sauce to the rescue! When paired with  steamed white rice, you get one of the staple Taiwanese dish, Braised Meat Sauce Rice (肉燥卤肉饭). Just as most overseas Singaporeans would crave for Char Kuay Teow when they are away from home, most Taiwanese I know would long for Braised Meat Sauce Rice when they have been living abroad for extended period of time.

The meat sauce, once prepared, can be split into portions and frozen for up to a month. As and when required, these can be defrosted in the microwave oven and voila, you have a delicious and flavourful sauce that can be used to accompany rice, noodles, blanched vegetables etc... the possibilities are endless and limited only by your own creativity.

I love eating Braised Meat Sauce Rice(卤肉饭) when I am in Taiwan but 2 issues continue to bug me :

1. The Taiwanese BMSR is served with very little meat sauce over the rice. It always leaves me with a sense of insuffeit.

2. My colleagues had warned me that delicious as the dish may be, one needs to consume this with restrain as the dish  is loaded with so much fat that it makes little piggy looks like an anorexic model. This revelation immediately brought the food whimp out of me.

The traditional Braised Meat Sauce uses one of the most fatty portion of the pig, which is the cut near the neck of the pig. Rich in tendon,the grind from the neck(some say the fat/lean ratio is 7/3) allows the meat to braise over long period of time without turning into mush.

In addition, pig skin is also added to the braise to thicken it with its natural collagen.

Preparing this at home, allows me to modify the recipe to make it a little more healthy.

MMS 1

Below is my modified recipe but I have to admit that I am sure about the exact quantity of the seasonings  used. I just seasoned according to taste. That, in my opinion, is the essence of Chinese cooking- it is not about a 2 teaspoon of sugar or 1 tspn of salt - it is about tasting with your tongue and recognising the flavours....and by doing that, my minced meat sauce turned out to be seriously good. If I can achieve this, so can you!

MMS 5(100)

Recipe :

Minced Pork 300g (I used 80% lean pork, 20% belly pork)
Dried Shitake Mushroom 3 pieces
Red Shallots 30g
Chicken Stock 100g (with extra)

Seasoning
Oyster Sauce 1 tbsp
Dark Soya Sauce 20ml
Light Soya Sauce 30ml
Rock Sugar 1/2 tbsp
White Pepper 1/4 tsp
5 spice powder 1/4 tsp
Chinese Wine 1 tbsp

Method:

1. Season minced pork with light soya sauce, dark soya sauce, a little sugar,sesame oil and a little corn starch. (all seasonings not stated in recipe)

Soak shitake mushroom in water and dice into small cubes.

2. In a heated wok, add 1 tbsp oil, fry sliced shallots until brown and crispy. Strain out the fried shallots. Retain the oil in the wok.

3. Heat the shallot oil , fry mushroom until fragrant.Add minced meat and stir fry until 70% cooked.

4. Add all seasoning. (adjust qty according to taste)

5. Add chicken stock and simmer on low heat for one hour. Add crispy fried shallots. Continue to cook another 10 mins. Turn off heat and if possible leave the minced meat over night.

6. Heat up again before serving.If a thicker texture is preferred, thicken with a little potato starch solution.

Friday, August 20, 2010

Poor Man's Fried 'Shark's Fin' - 平民桂花翅


Gui Hua 1

Tea Cup 2

When I was living in Guangzhou, China a few years ago, one of my favourite Cantonese dish was what they called Guai Fa Chi (桂花翅) literally translated to mean Osmanthus Sharks Fin. The Osmanthus really denotes the fried eggs used in the dish. Scrambled to golden yellow crumbs, the eggs resemble the tiny flowers of the Osmanthus plant and for those who are not familiar with the Osmanthus flowers, you must , you must try to look for them at Chinese Tea house next time. Less initmidating than rose and more elegant than Jasmine, the sweet, demure fragrance of the Osmanthus is one of my favourite scents.

I have eaten this dish at many restuarants in China - the more glitzy of which would use real shark's fin for this dish while the less fancy eating outlets would substitute the shark's fin with green bean vermicelli, (transparent noodle) 粉丝 another one of my favourite food - thus the name, Poor man's Fried Sharksfin.

Gui Hua 8

Both tastes equally good when done correctly - which really isn't suprising when you consider that Shark's Fin is really tasteless. What is important when substituting with vermicelli though, is to make sure that the transparent noodle does not get over cooked. Softening the noodles excessively will render it brittle and take the 'gelantinous bite' out of it. 

Gui Hua 6

A successful attempt at should yield noodles that is fried relatively dry. The bottom of the plate, should not be wet or too oily.

Traditionally, duck eggs would be used to augment the fragrance of the fried eggs. However, this is not accessible to me and therefore I substituted with chicken eggs. Poor Man or otherwise, this is a simple but tasty dish - and since I have chosen to abstain from eating Shark's fins, I couldn't be more happy to be a Poor Man.

Gui Hua (100)
Recipe : ( Adapted from 真味香港菜)

Transparent Glass Noodles                 50g
Ham (or crab meat)                            30g
Bean Sprouts                                      A handful
Eggs                                                   2
Salt                                                    1/2 tsp
Chicken Stock                                    1/2 cup
Oil                                                      1 tbsp

Method:
1. Soak transparent glass noodles in cold water for 5-10 mins until softened. Cut the glass noodles with scissors to about 6-7cm.
2. Slice ham into thin strips.
3. Blanch bean sprouts in hot water for 1 min.
4. Break eggs seperately into 2 separate bowls. Season with a little soya sauce.
5. Heat wok and add a little oil.  Pour in 1st egg into wok and scramble quickly over low heat with four chopsticks. Remove from heat, dish out and set aside.
6. Heat 1 tbsp oil in heated wok, fry ham until fragrant. Add  (1). Fry quickly in the wok. While frying the noodles, slowly add in chicken stock and salt. Simmer a little to let noodles absorb the flavour. Continue to fry until noodles is a little dry.
7. Slowly add in the 2nd egg. Frying to ensure the eggs get cooked and noodles become quite dry.
8. Add bean sprouts and scrambled eggs and fry for another 30sec.
9. Dish out and serve with rice or eat on its own.

Thursday, August 19, 2010

Strawberry & Milk Steamed Bread 蒸しパン


Steamed Cake 3

The good old steamed cake (Huat Kueh/ Fatt Ko) is gaining some serious popularity in Japan and Taiwan. The Taiwanese are crazy over the savoury version, where the cakes are steamed with pork floss, minced meat sauce and fried shallots, to name a few. The Japanese like their cakes/bread steamed with sweet potato, pumpkin, mochi, red bean etc. I picked up the popularity vibe while prowling the various cookbook sections of bookshops in Tokyo and Taipei. It is generally a good barometer to measure what is gaining following in the market. This is especially true in Japan where meticulous attention is given to specific genres of pastry/ cakes. Nowhere else in the world will you find over 10 different publications featuring only chiffon cake recipes or swiss roll recipes or donuts ... So, when you see books featuring only Fatt Ko recipes, you know the fad has landed.

I bought my first Fatt Ko recipe book early this year and tasted my first Japanese Fatt Ko in Singapore 3 weeks ago. For those who are interested, check out Mushiya at the swanky but confusing  new shopping center, Ion Orchard. I was intrigued by the combination of mochi (steamed rice cake) with red bean topping on the Fatt Ko. The delightfully soft bread when eaten with pieces of chewy mochi was quite a novel and pleasant experience.... and thence my motivation to make steamed bread took off.

Steamed Cake 2

I knew that I had to get the basic steamed bread right - the fancy flavour and topping variations can be built in later. Having made traditional Huat Kuey before, I knew I have to pay attention to the different ingredients that are called out for in the recipe. The tradtional Huat Kuey, I feel is more symbolic than tasty. The steamed bread recipes had specified the use of a baking powder that is specially meant for steamed pastries. Apparently this kind of baking powder will result in a plump and soft steamed bread. I managed to find this recently at my favourite supermarket in Hong Kong, City Super.

Though the original recipe had called out for plain flour, I chose to use Japanese rice flour instead. The Japanese rice flour has been known to impart a more bouncy texture to cakes. Over the last few years in Japan, it has become a popular flour  for chiffon and sponge rolls.

Extremely simple to whip up and the results are extremely good ! The soft, bouncy texture of the bread was exactly what I had been trying to achieve. When eaten warm, the tenderness of the bread evokes a sense of bliss and happiness.... : )  Encouraged, I believe I will start to build in the fancy toppings next.

Steamed Cake (100)
Recipe

100 ml                 Milk
3 tbsp                  Condensed milk
Sugar                   25g

Rice flour             75g (or plain flour)
Corn Starch         45g
Baking powder    1tsp ( baking powder for steaming)
Strawberry Jam    5 tbsp

Method :

1. Boil water in a pot.  Line pudding molds with cup cake liners.
2. In a bowl, mix Milk, condensed milk and sugar with a hand whisk until sugar is dissolved.
3. Add dry ingredients into (1) - continue to mix until a smooth paste is obtained.
4. Spoon (3) into each cup cake liner. Fill each liner to 3/4 full.
5. Add a tbsp of strawberry jam into (4). Using a skewer, gently fold batter in each cup to cover the jam.
6. Steam over boiling water for 15 mins.
7. Cool down to warm to touch. Spoon a tsp of strawberry jam over the cake and serve with tea.

Sunday, August 15, 2010

Chocolate Chip Mochi Bread - Recipe Search


Mochi Bread 3

Mochi Bread 6

I have been searching for this recipe for the longest time and I believe I am not the only one out there on this very  frustrating quest. It all started with the Mochi Bread sold at Sun Moulin, one of my all time favourite Japanese bakery in Singapore. I can no longer recall when Sun Moulin first started to offer this interesting bite-size bread that used to be crusty on the outside but yields a chewy, glutinous texture in the inside. However, in the recent years I do notice that the bread has lost its crusty outer layer but it still retains the signature chewy rice-flour center.

Since Sun Moulin, I have tasted similar snacks in various flavour in Taiwan, Japan and Hong Kong. It was when I had wanted to try making this on my own that the futile quest began. Though wildly popular in Taiwan and Hong Kong, I have not managed to find any comprehensive start-from-the-scratch recipe for it - this must be one of the best kept secrets in the bakery industry! What has gained popularity with Mochi-Bread-Chefs-Wannabes is the Mochi Bread Pre-mix. (麻署预拌粉) There are cook books and websites that boast delectable mochi bread recipes all based on the Pre-mix flour.... it is frustrating for me as I had been 'tricked' into purchasing one such cookbook on-line. This is analogous to purchasing a cook book that teaches one to cook instant noodle... utterly audacious.

Armed with a single thread's lead from My Cooking & Baking Passion's recipe, I had tried her recipe a couple of times but it did not quite turn out right. Somehow, my Mochi bread just stubbornly remained like a dead pile of dog poop in the oven - it just wouldn't rise evn after I had tried to increase the amount of leavening agent in the recipe. Judging from the comments of others who had tried the recipe, it seems like I am not the only one who was experiencing disheartening disappointment.

Early this year, when I was in Korea, I managed to find the Korean Mochi Bread Pre-mix flour. This yielded a rather delicious bun but it is still very much different from Sun Moulin's mochi bread. The Korean formula yielded something that was closer to a crusty roll, while Sun Moulin's bread was softer and more chewy.

Mochi Bread 5

Finally, last week, when I was in Hong Kong, I managed to find what they call Mochi Ball Pre-mix (麻署波波预拌粉). Working with a chocolate chip mochi bread recipe from the cookbook I had been 'cheated' into buying, I was skeptical but when the tray came out from the oven, I have to concede that this is possibly the closest I have gotten to the Sun Moulin morsel. The bread puffed up quite nicely in the oven but started to collapse when they were cooled. However, I am not too worried, as I suspect that my oven temperature could have been a little too low and if I have added a small dash of baking soda, it would possibly hold its shape better. When I liked was the chewy glutinous rice cake texture inside. The little bread was truly delicious and I must have eaten at least 6 of them while I was photographing them.

Mochi Bread 7

Delicious as they may be, I am still left with a dissatisfaction that this was not made from scratch. Hence, I would like to launch an appeal to all who are reading this, if you have a clue to making this from scratch, please do share. Is this indeed the industry's best kept secret? I sincerely hope not....

Mochi Bread (100)
Recipe :

Mochi Bread Pre-mix           100g
Cocoa Powder                     2g
Shortening                            26g
Egg                                      17g
Milk                                     117g
Sugar                                    7g

Chocolate Chip                      40g

Method :
1. Preheat oven to 190C. Sieve Pre-mix and Coca Powder together.
2. In a mixer fitted with the paddle attachment, blend all ingredients, except chocolate chip together.
3. Using a spatula, fold in chocolate chip.
4. Pipe batter using a round piping nozzle onto baking sheet.
5. Bake for 15mins.
6. Cool down.

Monday, August 9, 2010

Teochew Yam Paste - Or Nee


Yam Paste 6

Yam Paste 4

Yam paste or fondly known as Or Nee is a firm Teochew dessert favourite among many here in Singapore and Malaysia. For most of us old enough to remember, our first Or Nee was probably being served at a Chinese wedding banquent dinner. The much anticipated last dish of the 10 course meal... by which time, most diners would have already overstuffed themselves with food but when this was served... it was like 'Oh, Or Nee, die die must eat'. As its popularity grew, this traditional treat became more accessible.

For me, the novelty wore off very quickly even though my friends and family continue to stay enameled with it. Reason being, most of the Or Nee I have eaten are generally, too oily and too sweet. To achieve the smooth texture, copious amount of oil needs to be homogenised with the mashed yam paste. Sugar being a natural humectant, smoothens the paste even further. (if you have ever tried making peanut butter, you would be baffled by the way the pasty peanut mixture miraculously turn smooth and creamy upon the addition of sugar) You would never catch me ordering Or Nee on my own - that was how excited I am about it.

However, my last food tasting session at Chaozhou Inn, altered my perception of Or Nee. It wasn't oily at all, had the right amount of sweetness and a subtle coconut milk fragrance that complemented amazingly well with the Yam. I started to wonder about doing this on my own. I tried googling for an Or Nee recipe but the only thing that stuck in my mind was the Creamy Mashed Potato recipe that I learnt from Tim Ross-Watson's class. I wondered if I could recreate the creamy yet light and fluffy texture of the mashed potatoes with Yam. There are a few commonalities, one of the key being the amount of fat to be incorporated. As any French chef would tell you, the secret to a really good mashed potato is lots and lots of butter. (1/3 of the weight of potato, at least!) Then, of course the mashing technique would also impart an element of airiness to the mash.

Yam Paste 2

Determined to create my very own Yam paste recipe, I went at it with a few basic points :

1. My mouli grater came out the closet to help me get an airy,fluffy mash.
2. I used minimal canola oil to blend into the Mashed Yam. (I noticed some bbloggers would use Olive oil but I thought the flavour of Olive oil would be too strong and may not complement the natural Yammy fragrance.)
3. Instead of cream/milk typically used to cut mash potatoes, I chose to use coconut cream.

The end result? Superb! Possibly the best Or Nee I have ever tasted!I have to apologise to Chaozhou Inn's Chef Yu but I really do like the texture of my Or Nee - I think the credit needs to go to my mouli grater. The creamy yam paste feels almost like a mousse in the mouth. Yes, it is that light and fluffy. It literally disappears on your tongue before it can goo up your mouth. The caveat : alot of grinding and pushing it through a fine sieve. So I leave it up to you to decide if you have the patience to go through all that trouble...other than that, it is actually quite an easy dish to prepare.

Yam Paste 3 (100)
Recipe :

300g Yam (boiled and mashed*)
50g Canola Oil
50g Coconut Cream
30g Sugar
Pinch Salt

Method :

1. * Yam was boiled in water until soft. I mashed this up coarsely with a fork then proceeded to grind it further with a mouli grater. Measure out 300g of this grated mashed yam.

2. Place (1) in a mixer fitted with a paddle mixer. Start mixing the mashed yam at medium speed. Slowly drizzle in Canola oil until smooth and well incorporated.

3. Transfer (2) into a saucepan and start heating over low heat. Add coconut cream in 5 additions. Stirring well to incorporate totally after each addition.

4. Add in a pinch of salt. Lastly, add in sugar and continue to stir over fire until all sugar dissolves.

5. Push (4) through a fine sieve to get the final smooth creamy yam paste.

6. Serve with syrup marinated gingko nuts.

Sunday, August 8, 2010

Chaozhou Inn $20 Dining Voucher Giveaway - Winner Announcement

IMG_1429

Picnik collage

The winners for the $20 dining voucher has been drawn. Congratulations, Mrs Multitasker, Bakertan, Passionate About Baking ! Please email me a postal address to which Chaozhou Inn can mail the vouchers to you.

Enjoy your meal at Chaozhou Inn!

Thursday, August 5, 2010

Sneak Preview : Mee Rebus


Mee Rebus

Mee Rebus 5

A sneak preview at the Mee Rebus which I will be bringing to a potluck gathering initiated by Pei Lin of Dodol & Mochi. This is my first attempt at making Mee Rebus and I've decided to make use of a new recipe which I had picked up at Chef Keong's class at Chef Cooking Studio last month. This potluck session presents the  perfect occasion for me to test the recipe.
Different from standard  Mee Rebus recipes which usually calls for mashed potatoes to make up the thick starchy gravy, this recipe cuts back on the quantity of pototoes and uses Honey Dew Melon and Pineapple instead. Hence, the overall meal feels less starchy and less heavy on the stomach.

This is the pre-test and I thought it was pretty successful. After the photo shoots, I heated up the gravy again and tried cutting it with more water to reduce the viscosity. That got even better!

I shan't publish the recipe as it shall be unfair to Chef Cooking Studio but all you resourceful bloggers out there - I am sure you will be able to find many basic mee rebus recipes on the blogosphere. This will give you a good starting point to tweak the recipe.

Sneak Preview Over! Cheers!

Tuesday, August 3, 2010

Restaurant Review : Chaozhou Inn & a $20 Dining Voucher Giveaway

IMG_1429

IMG_1525

I have to admit when I received the invitation to review Chaozhou Inn, my mind went blank. I struggled to remember if I have heard or seen this restaurant before. A little homework later, I found out that this is actually part of the Fish & Co., group. I was duely intrigued but was unable to associate the ubiquitous family seafood restuarant with... authentic Teochew cuisine.

Tucked away at the basement of Parkway Parade shopping center, Chaozhou Inn was a stark contrast to Sakae Sushi next door. The modern oriental setting was tasteful and ... haute. One almost feel a little intimidated because it looked...too nice to be a family restaurant. However, dear readers, be fearless and you shall be delighted. Featuring a comprehensive but very relevant selection of Teochew dishes, this is a delightful discovery.

The Teochews, who hailed from eastern Guangdong province, is the second largest Chinese dialect group  in Singapore. Teochew cuisine is definitely among what I like refer to in Chinese as Big Cuisine, 大菜. You will find Teochew restaurants in Hong Kong, Taiwan, Malaysia and Singapore. The very best fine dining Chinese restaurants in Singapore are generally Cantonese or Teochew. Cantonese cuisine, characterised by savoury, robust flavours, appeals to our craving for richness. Teochew Cuisine on the other hand, focuses on retaining the natural flavours and freshness of ingredients. With little additional seasoning, Teochew Cuisine is famed for being clear, subtle and intricate. (清,淡,巧,雅). While it is easy to find mid market cantonese family restuarants in Singapore, I can't seem to recall coming across too many authentic Teochew restuarants that are positioned for the mid-market segment. Chaozhou Inn seems to fill this gap perfectly.

Dumpling Collage
The tasting menu I was served included some of their signature dishes and 3 new dim sum creations. First on the list is the chef's new Steamed Spinach Dumpling with Prawn & Dried Scallop (瑶柱菜苗饺). Commonly prepared with Chives, this is created specially for those who do not take well to the pungent smell of chives. Without the chives, the dumpling is decidedly less exciting but the sweetness of the prawns and dried scallops more than make up for this subtle morsel.
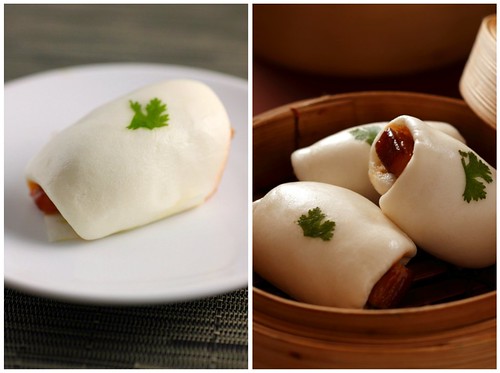
Pork Buns Collage
Next, came the 
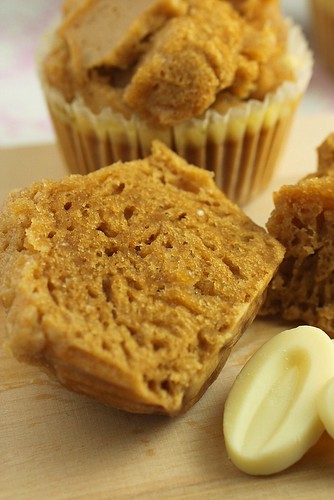
Braised Pork Belly Bun Chaozhou Style (鲍汁扣肉包). I am not an expert when it comes to braised pork belly but I suspect that this may not be juicy or 'melty' enough for pork belly die-hard fans.

Sesame Cake Collage
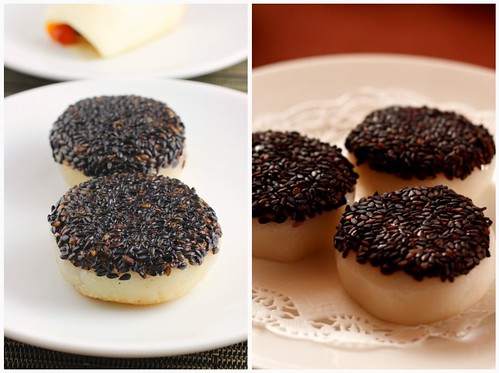
The winner for me among the new dim sum creations was the Pan Fried Black Sesame Cake (豆沙煎软饼). Pan fried to a slight crisp, the rice cake remains soft. I love it that the bean paste filling was just sweet enough, and this, eaten with the fragrant crunch of the sesame seeds was really delicious. Restrained by social graciousness, I had to stop at one but I know I would gladly finish the whole serving of 3 cakes.

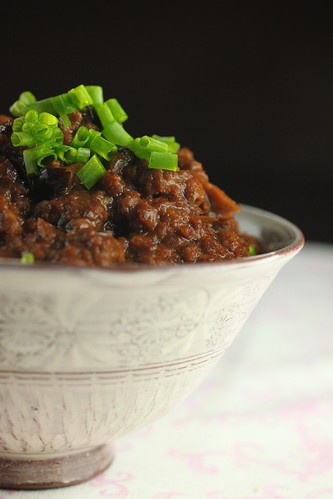
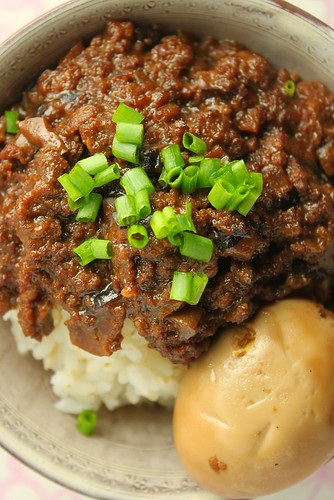
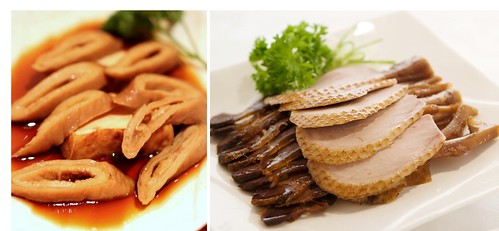
No respectable Teochew restaurant will be caught without really good braised dishes on their menu. (滷水拼盤)
  Braised Collage 

Teochew braised dish often involves the slow braising of Goose, Goose Gizzard, Goose Liver, Tofu , Pork Intestine etc in a special sauce prepared with a complex mixture of over 10 Chinese herbs and spices. Chaozhou Inn's braised platter stays true to its Teochew roots. Most of the braised dishes we get in Singapore tend to lean towards the richer taste of cantonese cuisine. Chaozhou Inn's preparation is authentic and I hope Singaporeans will learn to appreciate it.

Steamed Pomfret Chaozhou Style

Similarly, no respectable Teochew restaurant will be caught without steamed fish on their menu. Their best selling steamed fish is the Teochew Steamed Pomfret. Steamed with pickled mustard cabbage, tomatoes and plum, this dish yields a clear broth that is so light and  fresh that I can litereally  slurp it up like a soup. Unfortunately, the pomfret was a little overcooked. When informed, chef Francis Yu conceded that the kitchen could have steamed it for an extra minute too long. I certainly hope to revisit this soon.

Chao Yang Four Treasure Vegetables

Double Boiled Old Yellow Melon Soup

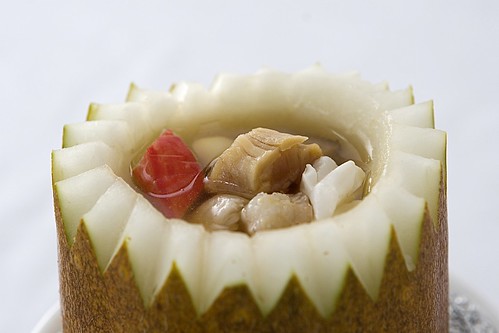
If you are one who enjoys a good soup, you will not be disappointed by their popular Double Boiled Old Yellow Melon Soup (八宝老黄瓜炖盅). Priced reasonably at $8 per melon portion, this light and invigorating soup is truly value for money. I enjoyed it so much that I actually contemplated making it at home. However, I decided that it would be unpractical for, to even remotely achieve the same effect, I will have to steam this for hours. The amount of gas I will have burn over this one little melon - it would be better for me to pay $8 for it!

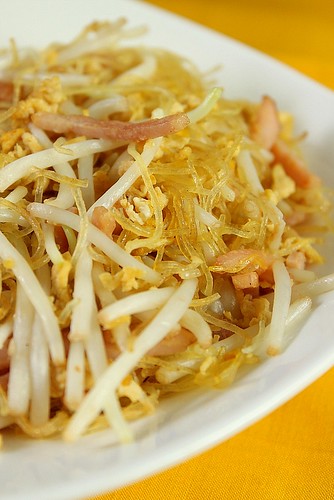
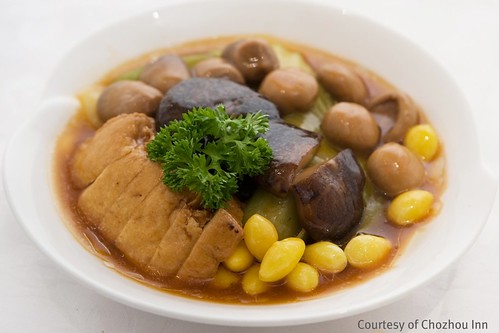
The vegetable dish on the tasting menu is another one of their best selling dish. Chao Yang Four Treasure Vegetables.(潮阳四宝蔬). Prepared with Mustard cabbage, Tofu, Dried Mushrooms, Straw Mushrooms and Gingko Nuts in a abalone sauce,  this is a very memorable dish for me. I was pleasantly suprised by the tenderness of the Mustard Cabbage - it literally distingrated in my mouth. This is certainly different from the crunchy texture that I usually eat.

Yam Paste
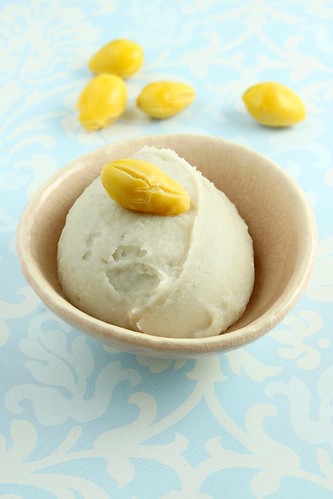
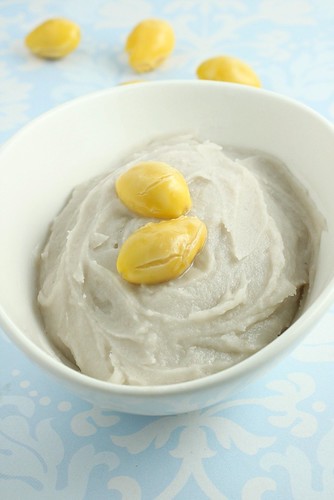
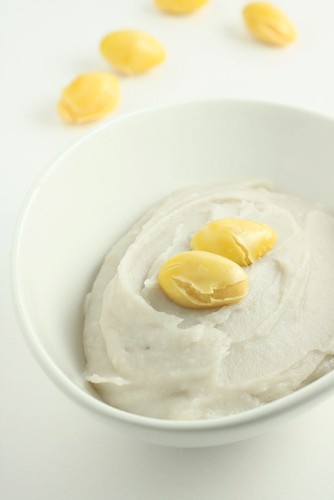
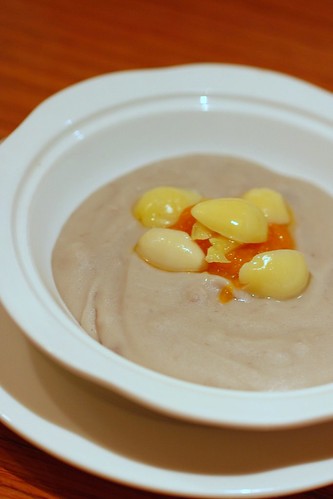
Another must-try is the Yam Paste With Gingko Nut and Pumpkin (福果芋泥) . If you have seen floating oil scimming the surface of this popular Teochew dessert once too often, you will be happy to know that Chaozhou Inn's Yam Paste is smooth and creamy... sans the oily heaviness. Chef Yu shared his little trick with me but I would encourage you to go taste it and discern that interesting element :) .

All in all, I was really thrilled about finding Chaozhou Inn. I have no doubt that the authentic Teochew menu, great dining ambience and the affordable price list will win diners over.I don't think this would be politically correct, but I really think we can do with more Chaozhou Inns and less Fish & Co...

For all Singaporean readers who are reading this, there are $20 vouchers to be given out to 3 lucky readers. This would be a great chance to check out Chaozhou Inn. I am going back again to check out their weekday a la carte buffet dinner. Impressive menu priced at $23/ head - it's too important to pass.

To win the $20 voucher, please leave me a comment telling me about your favourite Teochew dish. Make sure I have access to your contact details...Last day for entry will be on Sunday, 8th August! Bon Appetite!

A big thanks to Sharon Poh of Fish & Co., for inviting me to the food tasting session.

80 Marine Parade Road, B1-84D,
Parkway Parade, Singapore 449269
Tel : (65) 6346-6617
Store Locator Here

LinkWithin

Related Posts with Thumbnails