Announcement

This site will be migrating to a new address.
Please visit me at @Køkken and change your subscription to this blog to my RSS Feed

You Will Be Redirected!

Please do not leave any more messages on this blog. I will not be publishing or responding to any more comments left here. You will be automatically redirected to http://www.atkokken.com All posts have been migrated. You will be able to locate any posts by performing a quick search at my new site. Thank you.

Saturday, September 25, 2010

Oreo Lemon Cheese Cake - LiveSTRONG With A Taste Of Yellow

Cake 12

Cake11

Cake 3

October 2nd has been announced as LiveSTRONG Day 2010. On this day, 514 events will be held in the 416 cities of 52 countries to raise awareness and show support for the fight against cancer. LiveSTRONG Organisation, founded by Multiple Tour de France Champion, Lance Armstrong is a body that inspires and empowers people affected by cancer. To better understand what they do, please visit here.

I first learnt about this organisation last year at Barbara's blog, WinosandFoodies. I was still new to blogging then and had been inspired by her story to participate in her own Livestrong event, LiveSTRONG With A Taste Of Yellow.

LiveSTRONG Day has now gone massively global. Unfortunately, there is almost zero awareness in Singapore. How I wish some organisation would organise a cycling event in Singapore on LiveSTRONG Day to raise awareness.

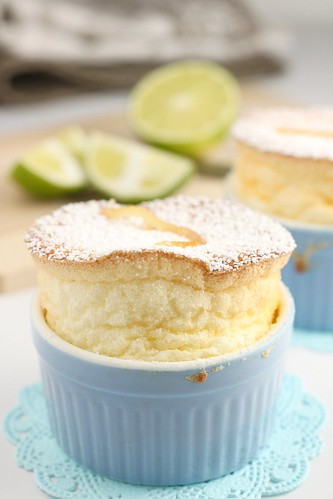
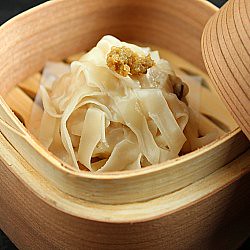
Last year, my entry for LiveSTRONG With A Taste Of Yellow was Pumpkin Ang Ku Kueh. It was my first pariticipation in a blog event and I felt really happy doing it...  For this year, the usual criteria of cooking with a yellow food applies. In addition, Barbara has also implemented the Heart element into this year's event. I have been really looking forward to join in the fun again and have been toying with many options. Eventually, I settled for this Oreo Lemon Cheese Cake which I have found in popular Hong Kong pastry chef, Tony Wong's cookbook. Tony Wong was the executive pastry chef at The Royal Garden hotel in Hong Kong and now has his own patisserie. When I was working out of  Guangzhou, a few years back, I would sometimes hop over to Hong Kong for the weekend and one of my favourite haunts would be City Super. Tony Wong used to conduct classes as a guest chef at City Super in Hong Kong and they were always fully booked before I could even get my hands on the class schedule. His creations are always lovely and I suspect his handsome good looks was also another reason why his classes were so popular... :-P...

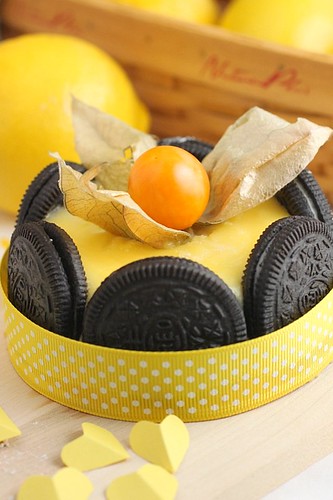
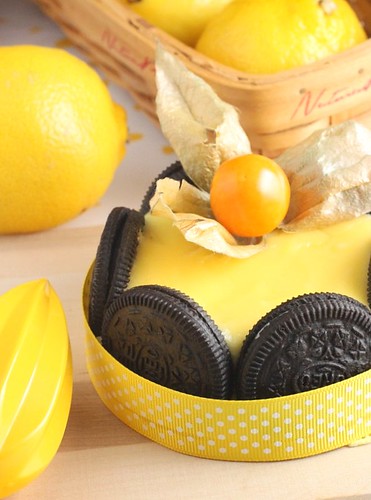
How can one go wrong with Oreo, Lemon and Cheese Cake? Simple to put together, this is one cheese cake that does not even ask for a base.
Process Collage
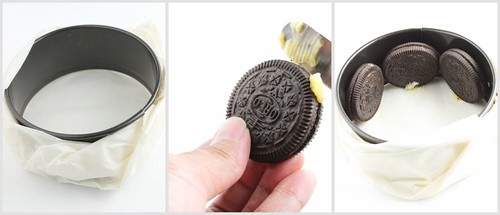
A cake ring is wrapped with baking paper before it is lined with a ring of Oreo Cookies. (Held in position with a dot of softened butter) The cream cheese can be prepared quickly and this is baked without a water bath. Easy breezy and once baked, this can be dressed up easily with fruit toppings and ribbons... and you have a lovely creation that makes you feel like a proffessional patissier  :).
Cake 8

My last note to support LiveSTRONG Day - Life is fragile, live strong, live without regrets...

Livestrong


Cake10 (100)
Recipe :
Cream Cheese (softend at room temperature)    280g
Sour Cream                                                      75g
Sugar                                                                110g
Corn Flour                                                        20g
Egg                                                                   150g
Lemon Juice                                                      55g
Lemon zest                                                       1 lemon
Vanilla extract                                                   1/4 tsp
Oreo Biscuit                                                     10 pieces

Utensil :
16 cm diamter round cake mold (I scaled down and used a mini springform ring for mine)

Method :
1. Beat cream cheese, sugar and corn flour to mix well. Add sour cream and beat until smooth. Add egg gradually, one by one.

2. Add vanilla extract, lemon juice and zest. Scrape the ingredients from the sides of the mixing bowl to the sides of the mixing bowl to the center and mix well. Pour into the cake mould. Bake at 140C in preheated oven for about 45-50mins.

Monday, September 20, 2010

Mooncake - 月圆花好庆中秋

Mooncake 6-1

Mooncake 1

Piglet 2

Mooncake 3

L has told me not to be overly sucked in by this little food blogging project. Not to be too mindful about how many visitors I am getting every month. Not to be too obsessed with how my photos turn out - for they all look quite pretty to him. He wanted me to take it easy and just enjoy this little project - treat the perks that may come in the various forms (ranging from encouraging comments, to increasing readership to giveaways and food reviews) as little bonuses and pick me ups - never get addicted to them and be obsessed over them. I am glad that I have him to inject these occasional doses of practicality for if left unchecked, I probably would start reaching and yearning for the MOON...

If not for this blog, I am quite sure I will never be motivated to bake the mooncake... and further clutter my kitchen with 3 new sets of bulky wooden mooncake molds! If not for this blog, I wouldn't have to confront the ugly reality of how sinfully caloric these pastries are. I think one full sized mooncake would easily be close to a thousand kcal. Despite all the hype about replacing lard with vegetable oil,using low sugar lotus paste... there is still no escaping from the fact that the secret to a silky smooth filling and tender pastry is lots and lots of oil.

In my attempt to achieve decent results, I made 3 batches of mooncakes.
I experimented to
1. get the correct dough to filling ratio to fit my mooncake molds
2. knock the raw mooncake out of the wooden mold without getting them out of shape - a really noisy affair.
3. get the right baking temperature and baking time so that the mooncake does not crack while baking.
Mooncake 2

Mooncake 9
It was all quite tiresome and I now have a load of mooncakes which I know I will never eat... I had originally thought about bringing them to the office but the last time I checked today, the office pantry is already bursting with boxes of mooncakes presented by suppliers. Mooncake overload!

Well anyway, I am glad that I made my mooncakes in small bite sizes...I probably will stash them away and heat them up for tea....over the next few weeks.... Meanwhile,during this festival of reunion and happiness, here's wishing everyone a happy mooncake festival!

Piglet (100)
Recipe :
Dough
Golden Syrup 180g
Peanut Oil 60g
Alkaline Water 8g
Plain Flour 225g

Filling
White Lotus Paste 600g
Melon seeds 200g

Glaze
Peanut oil 1 tsp
Egg 1 beaten

Method:

1. Combine golden syrup,peanut oil and alkaline water and mix until smooth.
2. Add flour and mix well.
3. Cover the dough and let it rest for 2 hours. (some recipes ask for this to rest overnight but I find resting overnight results in a dryer dough which cracks more easily during baking)
4. Divide dough into individual portion of 14g
5. In another mixing bowl mix lotus paste and melon seeds.
6. Divide lotus paste into 34g portion.Roll this into a ball.
7. Pre-heat oven to 180C.
8. On a lightly floured board, take a portion of the dough and with the palm, flatten this into a flat round wrap.
9. Wrap a portion of the lotus paste with the wrap.
10. Lightly flour the mooncake mold and press 9 into the mold and knock it out of the mold.
11. Grease a baking tray and arrange the raw mooncakes on the tray.
12. With a spritzer, mist the mooncakes liberally with water.
13. Bake the mooncake in the oven for 10 mins at 180C. Remove the tray from the oven and carefully brush the egg and oil glaze over the top of the mooncake.
14. Return the tray into the oven and continue to bake at 160C for 10mins until the pastry bounces back when lightly pressed.

The mooncake will look puffed up when it is removed from the oven. Let it cool and age over for 3 days at room temperature before consuming. The mooncake will progressively darken in colour and soften in texture as the oil bleed out.

For the piglet, I used 60g plain dough for a mid sized piglet mold.

Thursday, September 16, 2010

Lemon, Lime, Orange Soufflé

Souffle 5

Souffle 8

Souffle 2

Souffle 6

The soufflé is widely considered as the most initmidating dessert to bake. This is the second time I am making the soufflé, the first was a number of years ago when naivete had led me to experiment with my first chocolate soufflé with ignorant fearlessness. Yes, ignorance can be bliss. As eccentric cook James Beard once said : " The only thing that will make a soufflé fall is when it knows you are afraid of it."  It could have been beginner's luck or it could have been that the recipe was really good but my first soufflé was quite a success... or perhaps I did not know any better - for when I look at these Lemon,Lime, Orange Soufflés now, I cannot really decide if they are success or failures.  The inspiration to revisit the soufflé came from Ellie's post last month. Her fairy-light soufflé has an ethereal quality which brought out the essence of the soufflé.

Ellie's recipe is not your typical soufflé recipe. While all soufflé recipes I have come across use some form of cream base (usually creme Patisserie for sweet soufflé and some form of roux for savoury), this recipe just calls for thickened fruit juice. I had my doubts but Ben O' Donoghue did mention that this recipe is pretty foolproof and yes, I was mesmerised by Ellie's results.

Souffle 1
I was elated when I saw the soufflés rise in the oven... elation gave way to concern when they started to lean lopsidedly to one side......more concern when they started to brown leading me to wonder if I should take them out of the oven before they turn cinnamon brown.... I resisted the temptation to open the oven door and when the 12 mins baking time was up and I took them out of the oven, they look really pretty and fairylike.... I quickly dusted the soufflés with powder sugar and struggled to transfer the hot ramekins from the baking tray to my 'tabletop photo studio' .... by which time, I had noted with dismay that the fine pores of the soufflés hase sagged to form aged wrinkles.( painful reminder of the lines on my neck!)  My consolation was that they did not collapse on me while I was photographing them. They held their form well for more than 15 mins before I dug into them with my spoon for the 'dig in' shots. The taste was astonishing - devoid of egg yolks and cream, it was light and super refreshing with the tangy flavours of the citrus fruits.

So, is this too high, too low, too dark, too wrinkly ? I really don't know.... Ellie's photos are still haunting me...

Souffle (250)
Recipe from Almost Bourdain's Lemon, Lime, Orange Souffle

Monday, September 13, 2010

Steamed Egg Custard With Minced Meat Sauce- 肉燥蒸水蛋

Steamed Egg 3

Steamed Egg 6

Cucumber 3

Those who had caught my earlier post on Braised Mince Meat Sauce may remember how proud and pleased I had been over the dish. It was definitely the most versatile dish I have made thus far and it tasted amazing! Encouraged by the success over the dish, I went on to make a second batch of the meat sauce a few days after I published my post. This time, I had made a bigger batch,separated them into 5 smaller portions and kept them frozen in the chiller. As a result of that convenient arrangement, I get to cheat a little for today's post and prepare dinner in less than 15mins...

Steamed egg custard is a dish I remember my mother cooking very regularly during my younger days. She would normally steam it plain and serve it with soya sauce drizzled over the top. Other times, she would also steam it together with minced pork which is another tasty dish by itself.  My mother by any standard is not considered a good cook - possibly because she has no one to coach her in the kitchen. My grandmother, I was told, passed away when my mother was still very young. I vaguely remember my father telling me that when they first got married, my mother was rather ignorant about the ways around the kitchen. Hence, I have to admit that her steamed egg custard is hardly a winner, by general standard. Very often, they were overcooked and tasted somewhat bland but whatever it was, we still liked them as kids. Hence very very much later, when I had my first Chawan Mushi (Japanese steamed egg custard) in a Japanese restaurant, I was really blown away by the smooth silken, wobbly texture of the egg custard. Till this day, I still order the Chawan Mushi every time when I dine in a Japanese restaurant.

Compared to my mother, I am much more lucky - today, there are many more ways than ever to access cooking tips and recipes. The countless cooking programs on TV, the wide selection of cookbooks available in bookshops, the comprehensive as well as fancy cooking classes and last but not least, the avalanche of food blogs out there that makes you feel like you are surrounded by a gargantuan team of  cooking mothers, grandmothers, and peers guiding you to become a better cook, literally, everyday. Everybody now, can potentially cook a good meal, it is just a matter of whether you are bothered enough to do it.

I am not sure if my mother knew that there is a Golden Rule for steaming egg custard. I first learnt about this golden ratio over a TV cooking program when I was working in Guangzhou,China many years ago. The magic numbers stipulated by the Golden Rule is 1,3,7. One can of Swanson's Chicken stock (about 400ml), 3 eggs and 7mins steaming. This ratio has never failed me since. Recipes may vary a little with more or less liquid or eggs depending on how firm you prefer the custard to be. Chinese steamed egg custard tends to have a firmer texture while the Japanese Chawan Mushi is more tender.
After getting the right mixing ratio, the next challenge would be to master the intensity of the heat to ensure a silken smooth finish. Overly strong heating yields 'pock marks' on the surface of the custard. I normally steam my egg by leaving the lid of the steamer slightly ajar.

IMG_3859

For today's variation, I had spooned some Braised Minced Meat Sauce over the steaming custard when the surface has set. I can't describe the sense of satisfaction I felt when I removed the cover of the steamer to reveal a silken smooth custard that reminds me of the soft, spotless complexion of a chubby baby....

Cucumber 2
I had also prepared a simple side dish which is made up of shredded iced cool cucumber topped with the Braised Minced Meat Sauce.
Steamed Egg 250-100

Recipe :

Egg Custard
Seasoning
Salt                       1/4 tsp
Chinese Wine        1 tbsp
Pepper                   Dash

Egg                        3
Chicken Stock       400ml

Braised Mince Meat Sauce (Recipe Here)

Method:
1. Boil water in a pot. Break eggs into a bowl and lightly beat with a fork, carefully not not create too much bubbles.
2. Add seasonings to the beaten egg. Stir well to incorporate.
3. Add chicken stock and stir well to incorporate.
4. Using a filter, pour the egg solution into bowls.
5. Steam over high heat for 30s, reduce heat to medium and continue to steam for 5mins.
6. Spoon Minced meat sauce over the set custard in the steamer and continue to steam for another 2 mins.
7. Serve immediately while hot.

Sunday, September 12, 2010

What I Ate In Bangalore....

Khansama 1

Khansama 3

Khansama 5
India, is not a favourite business trip destination for most of us. I have yet to come across any one colleague or business contact who honestly looks forward to going to India for business. I cannot say I do either... but then when one travels too often for business like I do, one will no longer look forward to going any where for business trips anymore. Still, I need to find motivation to sustain my energy and ethusiasm. I always believe that positive energy begets positivity in what one does. No matter how dreadful and uninviting the destination may be, I have learnt to find interesting elements to keep me engaged. Very often, these elements are related to gastronomical or retail adventures - I am, after all, a true blue Singaporean.

My trip to India last month left me a little weary about my dining experiences. Limited to eating at the same multi-cuisine restaurant in the industrial estate for most part of the week, my initial excitement for Indian food  waned quickly and I started to feel cranky and yearn for variety.  As a result of which, when I had to travel to Bangalore again last week, I half loaded my luggage with biscuits and cup noodles. However, I am happy to report that these really became irrelevant as I had the best Indian food I've eaten for a long time. I share with you the one restuarant that impressed us so much that we returned for a second meal immediately the next day after our first meal.

Situated in the swanky UB City Shopping Complex in Bangalore, Khansama marketed themselves as the Royal Indian Master Chef. Khansama is a Persian rooted Indian term that translates to mean, a man servant who acts as a cook or a household butler.  While working in the stately royal palace kitchens, the Khansamas were known to' generate rare and flavoursome recipes to satisfy their King's gastronomic fancies....' and  'the Khansamas kept their recipes, a closely guarded secret'.  When one steps into the Khansama Restaurant, one feels like one has gained privy and access into the private dining hall of the royalties and statesmen of bygone Mughal era.
Khansama 7

Khansama 4

The Mughal Empire, for those who are not familiar refers to the Indian-Islamic power that ruled a large portion of India from 15th to 18th century. Almost all of the outstanding architectures we see in India now were built by the Munghals (E.g. Taj Mahal). The North Indian cuisines ( The Tandooris, Kebabs, Naan...) which we have become so familiar today originates from the Mughal -an era of conquest, construction, wealth and relative stability, Khansama brings back the magnificence of the Mughlai period with rich tapestry, golden copper tablewares, beautiful wall murals and emblems of conquest.

I remember poring through their pictureless menus, salivating over the description of each dish.There are so many dishes which I would love to sample but because there were only 3 of us, we couldn't order too much. We have learnt from our Indian dining experience, that we should never be greedy. One appetizer to share and 2 main dishes with bread or rice is more than enough. Indian cooking is generally so rich and heavy that eating any more than that would leave one uncomfortably full and flatulent. During this second dinner at Khansama, I started my meal with Chicken Shorba which is a chicken soup simmered in Indian spices with a drizzle of lemon juice and coriander. Vaguely similar to the Ayam Soto, this is richer and feels many times more comforting and nutritive than Ayam Soto - definitely going to be a repeat order for me if I get to go back again.
Chicken Shorba

The appetizer, Garlic & Butter Prawns is another impressive dish made up of tandoori prawns embedded in a fragrant bed of spiced fried garlic. It was so good that my Chinese colleague requested to order a second portion.
Garlic & Butter Prawns

As a result of the double portion appetizer, we only had one main dish to eat with the gorgeous rotis.(flat bread) My colleague picked a Curry Lamb dish which was so rich in flavours and spices that no hint of  'lamby' smell could be detected. However, I did find the dish a tad too salty for me.

Lamb

Roti

Finally, I must write about the Masala Pan,the typical 'breath freshner' served after the meal. Masala Pan is usually a mixture of nuts and herbs which standardly consists of cardamon, menthol, fennel seeds with a little sugar chips. When the attentive staff at Khansama brought over the intricate copper bowl, I was intrigued.
Bowl

Masala Pan 2
Laden with crushed ice, the bowl consisted of 3 carefully prepared Masala Pan bundles. Wrapped in a silver foiled raw betal nut leaf is a mixture of  what I could identify as, rose jam, cardamon, menthol, toasted dessicated coconut and sugar chips. As I followed my colleague's example and chewed on the Pan, I was rather quick to frown and declare that it tasted wierd but as I continued to chew on it, the raw taste started to grow on me...I was able to finish the whole Pan bundle. These pretty little packets that came nestled in the copper bowl, had my breath smelling of roses....I wasn't sure if it was the roses or the intricate copper bowl but for a fleeting moment, I felt like a royal concubine!

Khansama

UB CITY
2ND Floor, UB City Mall,
Vittal Mallya Road,
Bangalore - 560 001.
Tel : +90 080-41114499

Friday, September 10, 2010

White Wine Grape Jelly

Jelly 7

Jelly 8

Molds 1

Molds 2

This is the same recipe I used for the last Fruity White Wine Jelly except that I replaced the mixed berries with the Kyoho grapes I bought from Korea last week. I have always loved jellies ever since I was young. I remember those jello packs my mum used to make jellies from - a sizable little packet of crystal mixture of gelatine,sugar and I suppose artificial flavourings. My mother would be making these jellos out of those old fashioned aluminum molds (shown in third photo above). Nowadays, we have many more options when it comes to molds. There are plastic cups and fancy silicone ones. I have myself, accumulated many fancy silicone molds like these but I have to confesss, as simple as these jello recipes may be, I am always very apprehensive when I make them - simply because, I find it a challenge to unmold them from their molds. With the silicone molds, I have almost never been able to get them out of the molds successfully with all imprints intact. I have the same problem when baking with silicone molds. I find Silicone molds convenient for simpler fares like muffins and cupcakes but disappointing when you are looking for nice, evenly browned imprint details (e.g. bundts, madelaines, canneles).  I have been  giving away my collection of silicone molds and have turned to anodized aluminum molds instead.

My recent attempts at making Jellies have also made me realise that the best molds to use for jellies would still be the old fashioned aluminum molds. A quick immersion of the cups/ bowls in lukewarm water is sufficient to release the jellies to yield beautiful details. Previous examples include the Fruity White Wine Jelly and the Strawberry and Cream Jelly.

So the next time you are tempted to buy another fancy colourful mold, be aware of the limitations. The humble cheap aluminum cups may be more trustworthy.

For recipe of this, please go here.

Jelly 1

Wednesday, September 8, 2010

Fu Yong Egg White Broccoli

Brocolli 3

Brocolli 5

Brocolli 1

There was an article published in the local news paper, The Straits Times last week which caught my attention and made me a little pensive.  The article reported that 1/3 of the elderly population above 50 years old in Singapore are at risk of malnutrition. (that works out to be an absolute number of 300,000!) Some of these are from the lower income bracket who live alone while others are from normal, well to do background.

In today's affluent Singapore, it is hard to believe that there are people who are suffering from malnutrition because they cannot afford to eat well. I do not doubt that there will always be a small slice of the population who are less fortunate but this figure could never be 300,000 (of the above 50 year old bracket). I am strangely disturbed because I fear that I, myself would be part of that group in the years to come - primarily because I don't think I am,like most of these old folks, eating right.

I have seen elderly relatives within my family who are attempting to drastically change their eating habits because of health issues that have surfaced. Some are eating much less, eshewing carbs, oil and salt. I used to look forward to the delicious food cooked by my aunt but for almost 10 years now, her cooking has become bland and tastes like saw dust. She has practically cut off all salt, sugar and oil and is quick to buy into any health tip she reads and hears over the media. Sometimes, I think it is precisely these extreme paranoia that creates malnutrition.

I love my food and I am generally a small eater. However there are a few bad habits which I have not been able to kick - I don't like my greens and I don't drink enough water. These coupled wth my intent to stay slim, have me skipping meals and abstaining carbs.  The article was a small wake up call for me (at least for as long as it stays fresh in my mind) - I have to be disciplined and eat more vegetables.

I am not very creative when it comes to cooking vegetables. When I am at a lost, the 2 vegetables that I usually reach for are the Spinach or the Broccoli. This time, I decided to go with the trusted Broccoli because I have a can of crab meat in my pantry which would expire in another 3 months. I know broccoli may not be well liked by most people, but it is high in nutritional value. Kids are usually made to eat these by masking it with cheese. I like to 'mask' it with a good gravy. IMG_3729

I had steamed to cook the broccoli florets for 3 mins and drenched it with a gravy prepared separately. The crab meat and the flavourful gravy made the broccoli tasty... tasty enough to have me finish the full portion of vegetables. Today's quota for vegetables... Done! Thump thump!

Brocolli 250-100
Recipe :

Canned Crab Meat              45g
Ginger                                  2 slices
Spring Onion                        3-4 pieces (3-4 cm in length)

Sauce
spring Onion, ginger                 3-4 pieces (3-4cm in length), 3 slices
Chicken consomme                 200g
Salt                                         1/3 tsp
Pepper                                   dash
Wine                                     1/2 tbsp
Sesame oil a little

corn flour                              2 tsp
water                                    4 tsp
Egg White 1

Method :
1. Cut broccoli into florets and steam over boiling water for 3 mins.
2. Season steamed florets with a little salt and sesame oil

3. In a hot wok, heat some oil and fry ginger and spring onion till fragrant. Add crab meat and season with a little salt and pepper. Dish out and set aside.
Sauce
4. Heat up the wok again, add some oil and fry ginger and spring onion until fragrant. Remove ginger and spring onion from the wok and add the chicken consomme and heat until boiling. Add all seasonings. Mix the corn flour with water. Add slowly into the boiling liquid until the desired thickness is acheived.

5. Using a hand whisk, whisk in egg white. Scoop gravy over the broccoli and crabmeat.

Sunday, September 5, 2010

Chrysanthemum Shumai - 菊花烧卖

Shumai 6
Shumai 1
Shumai 3

Rushing through another minced meat dish before I leave again. I believe, this will be a recipe most will appreciate- simply because it's preparation is so simple and yet it looks like it belongs to a high end Dim Sum restuarant.

Even the name sounds a tad more refined and beautiful than the usual fare we turn out in the humble home kitchen. Aptly called the Chrysanthemum Shumai, the petal effect is achieved by coating the minced meat with shredded shumai wrapper instead of just wrapping the filling like a normal dumpling.

Shumai,everyone should know, is the staple steamed meat dumpling served at all Dim Sum restuarants. The Chinese love to eat their Shumai's with soya sauce or black vinegar. We from Singapore and Malaysia would usually have it with Chilli sauce. The Japanese take theirs with yellow mustard and I recently learnt that the Philippinos take their Shumai with Calamansi sauce.

I ate mine today with a Yuzu Pepper paste (the pint sized dollop in the photos) which I bought in Japan earlier this year. A little spicy with the citrusy tang of the Yuzu, it went really well with the prawn and pork based mince in this shumai dish.

For the fun of it, I documented my prep steps again to share with you...

Prep Collage 1
1. Sautee chopped onions with a little oil until it turns fragrant and transparent.
2. Mix all ingredients together and mix well.
3. Let mixture marinate for 30mins.
Prep Collage 2
4. Cut Gyoza wrappers into strips.
5. Lay the wrapper strips on a tray.
6. Shape marinated mince into balls and place on the bed of wrapper strips.
7. Coat each ball with wrapper strips.
8. Place each coated ball on a piece of baking paper (I used small paper squares used for Chinese Pao, steamed buns)
9. Steam over boiling water for 9mins.
10.Serve immediately while hot.

Shumai 3
Shumai 5

Shumai 6(250)
Recipe: (Will make around 10-12 balls, depending on the size of the ball)
Filling:
Minced Pork 150g
Prawns (peeled & chopped) 50g
Diced Onions 60g
Diced Mushroom 1 dried shitake mushroom soaked in water

Seasoning
Salt, Sugar, Sesame Oil 2/3 tsp each
Chinese wine, Spice water 1 tbsp each
Beaten Egg 1/2
Corn Flour 2 tsp

Shumai/Gyoza Wrapper 24 pieces

LinkWithin

Related Posts with Thumbnails