Announcement

This site will be migrating to a new address.
Please visit me at @Køkken and change your subscription to this blog to my RSS Feed

You Will Be Redirected!

Please do not leave any more messages on this blog. I will not be publishing or responding to any more comments left here. You will be automatically redirected to http://www.atkokken.com All posts have been migrated. You will be able to locate any posts by performing a quick search at my new site. Thank you.

Monday, January 31, 2011

Bourke Street Bakery's Macadamia Nut Short Bread

MS 1
MS 5
You may have already noticed that almost every popular Chinese New Year pastry we are serving for the festival is buttery, eggy and richly rich. Catch phrases such as 'soft against the tongue', 'melt in your mouth', 'short and buttery' are the usual ravings for the scrumptious treats that we are reaching for during this holiday season.

In my attempt to find something a little different to put in my cookie platter with my Pineapple Tarts, I decided to try out another recipe from what I suppose is now my favourite cookbook fom Bourke Street Bakery. This is a very buttery but rustic shortbread. Everyone should know by now the secret to an amazing shortbread is really copious amount of good butter. While most of the shortbread recipes I have come across call for creaming the butter and sugar together until a smooth whipped cream texture is obtained, this one simply requires the butter to be worked into the dry ingredients with fingertips - very much like the way short crust pastry is prepared. This method, when used with fine grain castor sugar instead of powder sugar, yields a more grainy texture hence, my earlier rustic comment. The shortness of most short bread - the melt-in-your mouth sensation- is usually achieved with the use of corn flour but BSB's recipe calls for rice flour instead.  In recent years, the Japanese have raved about using rice flour for chiffon and sponge cake to impart a light and springy texture. Hence I was rather curious when I saw this not so common ingredient in the recipe. Last but not least the addition of chopped macadamia nuts just added another dimension of marvel.

MS 2

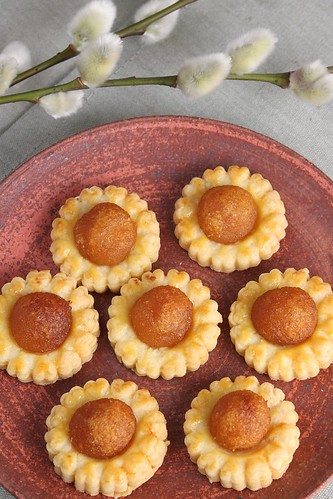
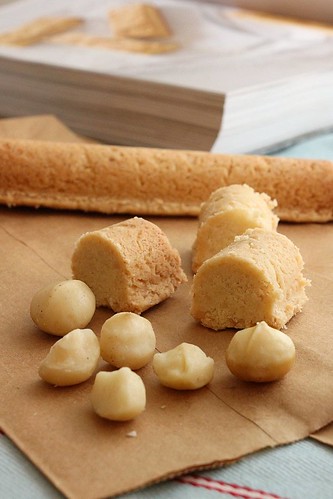
As no liquid is used in shortbread recipes, the dough is commonly pressed compactly into a square mold, baked and cut into fingers or squares while it is slightly warm. For Chinese New Year, I have learnt that cookies are best served in small bite sized morsels. (For those who are unfamiliar with the customs of Chinese New Year, we typically house hop, visiting as many as 4 or 5 friends/ families in one day... eating from house to house. Hence food are usually best served in small bites..the smaller the better.) So instead of using a rectangular / square baking tray, I chose to make my shortbread in my long financier molds. When these are turned out, they take the form of a long slim stick. These can then be cut easily into small nuggets.

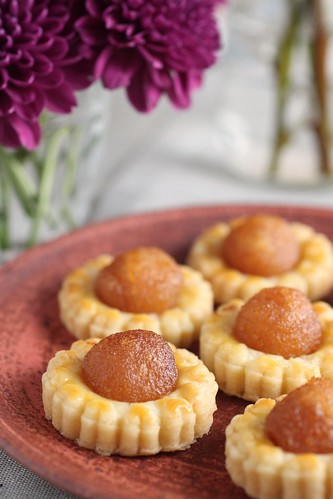
How do they taste?.. Crumbly and buttery, they melt away on the tongue like sweet nutty sand - rustic heaven!

MS 1(100)
Recipe (Macadamia Shortbread from Bourke Street Bakery)

Ingredients
175g         Unsalted butter
250g         plain flour
60g           rice flour
1tsp          baking powder
1/2 tsp      salt
125g         castor sugar
80g           Macadamia nuts, chopped. (do not use food processor as it will turn into a paste)

Method :
1. Preheat oven to 180C.
2. Sift plain flour, rice flour,salt and baking powder together. Add castor sugar to the flour mixture and stir to combine.
3. Cut the butter into 1.5cm cubes. Rub the cold butter into (1) with finger tips until mixture resembles bread crumbs. Add chopped macadamia nuts, rubbing together to combine. and then knead to form a dough.
4. Pat the dough into a lined square tin (20cm x 20cm x 4cm). Smoothen the surface of the dough with the back of a spoon.
5. Set (4) in the fridge for 20mins to set.
6. Bake @ 180C for 30-40mins until the shortbread is light golden. Allow to cool in the tin before turning it out. Using a serrated knife, cut the shortbread while it is still slightly warm into fingers.

Thursday, January 27, 2011

Pineapple Tarts

Pineapple tart 13
Pineapple tarts 17
Pineapple tarts 16
By the time this is published, most of you would have seen,baked and eaten one pineapple tart too many in the last few weeks to want to read about yet another Pineapple Tart post...

As popular and festive as it may be for Chinese New Year, I have never made the pineapple tart before. I wrote about how futile it would be to try to create a tart that is good enough to hold its own against the myriads of family heirloom recipes here. A couple of sightings last few weeks prompted me to give this a go this year. First glimpse was sighted on Ju's Tweet. Second came in the form of a step by step guide to homemade pineapple jam at Wendy's blog.

Some of you may know that I had traveled to 2 continents and 3 regions in the last 2 weeks. I touched down at midnight last Saturday and was already stirring at my first batch of pineapple jam on Sunday morning. Made with ripe pineapples, I found the jam too sweet even though I had reduced the amount of sugar suggested by the recipe. In my desperation, I tried to balance the sweetness with fresh lime juice. This complemented the jam so well that for all subsequent batches, I retained the lime juice component.

For me, the element that blew my mind was the little ball of homemade jam on the buttery pastry. Juicier and fruitier, this is starkly different from the dry sticky pre-packed paste sold at bakery supply stores. And really, cooking the jam is more easy and effortless than I had originally thought.

Pineapple tart 11
Typical of me and prompted by my vegetarian sister, I also experimented with organic wholemeal flour for the pastry. The pastry took on the strange musty brown colour of the wheat flour. Although the texture was very similar to the cookie made with refined all-purpose flour, a 'wheaty'/grassy after taste lingered. I am not keen to see the scrunched up faces of friends I will be serving these to, so I guess between my sister and myself, we will have to clean these up.

P.S.: Just learnt that j3ss kitch3n is hosting a Aspiring Bakers event for 'My Favourite CNY Cookie'. I shall contribute this to join in the fun!

Pineapple tarts 17 (100)
Recipe :
Pastry (Adapted from Ju's Recipe)

200g            All purpose flour
50g              Corn flour
1 tbsp          Icing sugar
1/4 tsp         Salt
140g            Butter
2                  Egg yolks
1/2tsp          Vanilla extract
1.5 tbsp       Cold water

1 egg yolk for glazing

Method :
1. Sift flour,corn flour,icing sugar and salt together in a mixing bowl. Refrigerate for 5 mins.
2. Cut chilled butter into cubes.
3. Add cubed butter into flour and work the butter into the butter with finger tips until mixture resembles breadcrumbs.
4. Mix egg yolks, vanilla extract and cold water together in a cup. Add this to (3). Work briskly with finger tips to mix the liquid with the flour. Gather the dough into a ball and refrigerate for 10-15 mins.
5. Roll out dough to 0.8mm thickness. Cut dough with pineapple tart cutter.
6. Brush egg yolk glaze over the cut dough.
7. Place a ball of pineapple jam on the dough.
8. Bake at 160C for 20mins. Cool down and store in air tight containers.

Pineapple Jam (Please refer to Wendy's post if you need more details)
Recipe
1000g         Semi ripe pineapple, cut into chunks and puree in a blender.
150g             Castor sugar
1                   Lime juice
2                   Twigs of cinnamon

Method
1. Place pureed pineapple into a large heavy pot.
2. Add lime juice, and cinnamon. Heat over medium heat until 80% of moisture has evaporated. Stirring occasionally.
3. Add sugar. Stir once and leave to reduce further over medium -low heat until jam is 90% dry.
4. Increase heat and continue heating for another 10mins. Stirring 2-3 times to avoid burning.
5. Reduce heat to low and further dry up jam.
6. Remove from heat and cool down completely.

Monday, January 10, 2011

Guest Post @ Rasa Malaysia : Singapore Fried Hokkien Mee

Rasa Malaysia is a site that needs little introduction. Owned by Bee, I don't think I exaggerate when I say that, the site presides over the Asian Food niche in the Flogosphere. As such, I was extremely flattered to learn that Bee had actually noticed my humble blog and had generously invited me to do a guest post at her site.

Deciding what to feature in this guest post for Rasa Malaysia is not easy. The site is already so rich in content, it is literally an Asian Food encyclopedia.(especially for Malaysian/Singapore food)

Hokkien Mee 6

I am glad that I can still bring something new in the form of the Singapore Fried Hokkien Mee. Please head over to Rasa Malaysia to read about my all time favourite Singapore street food.

Hokkien Mee 8

Saturday, January 8, 2011

Bourke Street Bakery's Berry Custard Tart

Strawberry Tart

Strawberry Tart 3

Strawberry Tart 8

Strawberry Tart 4

When delectable strawberries start to find their way into grocery stores, it is difficult to fend off their draw. Those little red gems are trickling in from the North - Japan and Korean. Albeit still a little pricey as it is still not the peak season for these strawberries but they are too alluring to ignore.

I think I will need to officially proclaim the Bourke Street Bakery cookbook as my favourite cookbook of 2010 moving into 2011. I find myself flipping through it every other day, drooling over the rustic,scrumptious treats.For the third time, I am drawn again to their tart recipe... yes, I am that boring but trust me, dear folks, they are truly delicious.

Less work than the Ginger Brulee Tart or the Passion Fruit Meringue tart, this one works with a classic creme patissiere filling. I, have, for some reason always feared the pastry cream. I have a tendency to either overcook or undercook it. Stirring the custard in the pot, I am always unsure if I have already reached the 'end point'.

Bourke Street Bakery handles the creme patissiere a little differently and for the first time, I feel that I have really achieved a successful custard! First whisking the sugar and plain flour into the egg yolks, a smooth base is already created before the warm milk was added. Cooking the custard without corn flour, allows it to thicken gradually, hence the custard continues to stay smooth and light. For this tart, the custard was further aerated with the addition of whipped cream. The overall texture was silky smooth,creamy yet light with just the right level of sweetness - a perfect combination with the tart pastry and the juicy berries.

I can't wait to use this custard again and again...!

Strawberry Tart(100)
Recipe :
1 quantity of short crust pastry (see here)
750g creme patissiere (see below for recipe)
20ml Grand Marnier
80ml Pouring (whipping) cream
500g Strawberries (original recipe features a mixture of strawberries, blueberries and raspberries)

Method :
1. Prepare tart cases as demonstrated here.
2. Whisk creme patissiere with Grand Marnier on high speed until smooth.
3. Whip whipping cream into soft peaks. Fold the whipped cream into (2) and place in the refrigerature for an hour to chill.
4. Spoon about 2 tablespoons of the custard mixture into each tart case and arrange berries on top. Serve immediately.

Creme Patissiere (You need to triple this recipe for the above tart recipe)

250ml milk
1 vanilla bean, split lengthwise
50g castor sugar
3 egg yolks
15g all purpose flour

1. Into a saucepan add milk and vanilla seeds and bean. Heat up until just boiling point. Remove from heat and pour into a container to cool. Refrigerate at least 6 hours to allow vanilla to infuse.

2. Gently reheat milk over low heat. Put egg yolks in a metal mixing bowl. Gradually whisk sugar into egg yolks until completely combined. Continue whisking while adding flour until a smooth mixture is obtained.

3. Pour warm milk through a fine sieve into (2). Whisk until smooth.

4. Pour (3) back into saucepan and bring to boil. Stirring it continuously with a wooden spoon. Once the custard boils, reduce heat to a simmer for another 5 minutes. Stirring must be done throughout.

5. Cool down and refrigerate.

Saturday, January 1, 2011

Crabcakes with Lemon-Dill Mayonnaise

Crabcake 6

Crabcake 4

Crab cake 1

During the 2 weeks that I was 'trapped' in New Jersey, I had the worst meals of the trip at the company cafeteria. However, one of the highlights of the trip also happened amidst the meetings and debates... For team building exercise, the whole group of us went to Viking Cooking School for a cooking-bonding session. Although I have done similar sessions in Asia, I was still brimming with excitement as we walked into the Viking Range Showroom. I was especially mesmerised by their range of sturdy, rugged-looking stoves and ranges. When I eventually got to cook over these heavy-duty ranges, I was really impressed by the intensity of the heat from the open flame burner. These would be perfect for Chinese cooking where cooking in a  wok over high heat imparts a unique essence to the food known as 'wok hei' ( translated literally to read wok's energy).

Anyway, I digressed... we were split into groups of 3 and given a recipe pack to prepare 6 dishes for our dinner. We had picked an advanced recipe pack which featured Fish and Shellfish Cookery. The Vikings team literally spoon fed us throughout the whole session, demonstrating every step and ensuring that we followed instructions. As a result of which, it was not as challenging for me and I got a little restless during the session. However, the recipes yielded some delicious preparations which I couldn't wait to replicate.

Crabcake 7

The dish that I enjoyed most are these crabcakes with Lemon-Dill Mayonnaise. Meaty and tasty, these were perfect for yesterday's New Year's Eve party. To all who continues to drop by my humble blog, I wish to usher in the new year with you with this delicious crabcake and may today be a great start to an amazing 2011 with good food in abundance!

Crabcake(100)
Recipe :
Crabcake
2 tbsp Mayonnaise
1.5 tsp  finely minced fresh flat-leaf parsley
2 green onions, green tops only, finely minced
1 tsp seafood seasoning (such as Old Bay)
1 large egg white
2 tbsp Japanese breadcrumbs
400g crab meat (jumbo lump)

1. Preheat oven to 200C. Position rack in the center of the oven.
2. Combine mayoonaise, parsely, green onions, seafood seasoning, egg white and breadcrumbs together ina mixing bowl.
3. Gently fold in crabmeat, coating it thoroughly. Chill in refrigerator for at least 15 mins.
4. Place a medium, non-stick frying pan over medium high heat. Add 2 tbsp canola oil and heat through. Lightly oil the insides of a round food ring/cutter. Place food ring on pan and spoon one fourth of the crabmeat mxiture into the ring. Press gently to pack tightly. Carefully lift the round ring straight up. Repeat with the remaining crab meat.
5. Cook crabcakes until the bottoms are golden brown, about 3 mins. Carefully turn each crabcake over. Cook for 1 min, then transfer pan to oven and cook for additional 5 mins.
6. Transfer crabcakes to warmed plates. Garnish wtih lemon wedges and serve with lemon dill mayonnaise.

Lemon Dill Mayonnaise

1 large pasteurized egg yolk.
1/2 tsp Dijon mustard.
1 tsp finely minced lemon zest
1 tbsp freshly squeezed lemon juice
1/2 cup canola oil
3 tbsp extra-virgin olive oil
3 tbsp chopped fresh dill
1/8 tsp fine salt
1/8 tsp freshly ground white pepper.

1. Briskly whisk together beaten egg yolk, mustard, lemon zest and lemon juice until it is pale yellow in colour, about 1 min.
2. Pour oil (drop by drop at the beginning) very slowly while whisking constantly and vigorously. After the first few drops of oil has been absorbed pour the rest of the oil in a slow steady stream into the mixture while whisking energetically.
3. Keep whisking until mayonnaise becomes smooth.

Monday, December 27, 2010

New York Central Park - A Little Photo Gallery

CP 8
CP Collage1

I must have traveled to New York more than 10 times over the last 15 years. During the earlier years, I would travel there to visit my grand uncle and grand aunt in Brookyln. I recall how their neighbourhood at Prospect Park populated by blacks and hispanics would morph to become rather hip and cosy. Subsequently, when I started working for my current American employment, I would frequent Connecticut and New Jersey at least once a year. Hence I am not totally unfamiliar with Manhattan. I am very comfortable with the subway and am used to walking 40 to 50 blocks in the city.

My visiting habits in Manhattan has gradually changed over the years. My 'free days' to roam get shorter so I no longer go to the musuems (I lost count of the number of big and small musuems I had visited). I am also no longer excited about department stores like Birmingham, SAKS Fifth Ave etc. Now when I do get to Macy's I would head straight for the household department and I would never pass by a Williams Sonoma store without just popping in for a quick twirl (even though all of them carry the same merchandises). Fine food stores like Dean & Deluca, Zbar and Wholefoods are also my favourite haunts.

CP Collage2

Despite it all, there remains one place which I will always set aside time for when I am in Manhattan... It has become somewhat of a pilgrimage for me... going to Central Park. Summer in Central Park bustles with energy when buskers perform and superfit rollerbladers power glide through the park. Winter in Central Park is a little more pristine and quiet.... the trees are bare, the ponds are frozen...the joggers looking more austere in their long tights, hats and gloves.

I was lucky that the only free Saturday I had was not too cold to walk and sit around in the park for immediately the next day, temperature dropped and the big chill set in.

CP Collage6
I started my walk from Strawberry Fields, the little plot dedicated to the memory of John Lennon. It was only a few days earlier that the public was commemorating John Lennon's death anniversary on the 8th Dec.
CP Collage 3
Loved the rows and rows of benches where people would sit and enjoy the scenery or read...
CP 1-1
Whoever thought of putting the park in the city was brilliant and for me this is possibly the strongest identity of New York City yet....

Friday, December 24, 2010

Saying Merry Christmas With Martha Stewart's Ginger Bread Cupcake

Cupcake 7

Cupcake 3

Ginger Cupcake 1

Getting back to blogging after a month long haitus is proving to be harder than I thought. Amidst meetings in New Jersey, shopping in Manhattan and  catching up with friends in Conneticut, I put all blogging activites on the back burner. When I got back a week ago, I found myself drawn into a spring cleaning mode - it all started with the bumper load I lugged back from Williams Sonoma - I desperately had to clear out old clutter to make way.... for shiny new toys. Things got worse when the company's account department cast their ultimatum, warning me that if I do not submit my 9 months' old overdue expense reports, I can kiss all my money good-bye...... that was my week leading up to the Christmas holidays.

As cold as it might be, Manhanttan was absolutely lovely around Christmas and drew visitors like a big magnet. Some highlights of my 3 weeks stay in US included my usual walk in Central Park on the only sunny Saturday before the chills set in, lingered in Williams Sonoma and Wholefoods supermarket, played X-box in a mobile arcade, cooked at the Vikings Culinary Center and ate some good food and...some not so good ones.

Interestingly, I was inspired to bake this Gingerbread Cupcake because of an unpleasant cupcake experience I had in Conneticut. I was told that when well known Cupcake Bake Shop, Crumbs opened one of its latest branch at posh and trendy Westport, it made the neighbourhood quite happy. However, I was skeptical right from the moment I walked into the store. The cupcakes were bigger than my fists and although there appeared to be a myriad of mouth watering flavours to choose from, their 'Signature size', in my opinion, took away their prettiness. We bought 2 cupcakes, the GingerBread and the Apple Caramel to bring home for after dinner dessert. Both were so coyingly sweet that I had to throw out my share after one bite.

The recipe I have chosen today is taken from Martha Stewart's Cupcake cook book. This has to be one of the best cupcakes I have had for a long time.
Cupcake 6

I like this even better than the Donna Hay chocolate cupcake. The Christmasy spices are warm and comforting. Devoid of any milk/liquid or leavening agent, the cupcake turned out to be suprisingly soft and fluffy. If you are still deliberating on what to bake for Christmas, I would strongly recommend this.

Last but not least, before I return to my expense reports, here's wishing all my lovely friends out there a Merry and Wonderful Christmas!

P.S. : Swee San, thanks for the reminder. I will be more than happy to submit this for your giveaway event.
So, officially - This is my entry for the Christmas Giveaway hosted by Swee San of The Sweet Spot.

Cupcake 3 (100)
Recipe : (Adapted from Martha Stewart's Cupcakes)
Cupcakes
1.5Cups          all-purpose flour
2   tbsp           ground ginger
2 tsp               ground cinnamon
1/4 tsp            freshly grated nutmeg
1.5 cups         unsalted butter, room temperature
3 tbsp             unsulfured molasses
4 large            eggs , room temperature
3/4 cup           brown sugar (I cut the sugar by 50%)
1 tsp               Vanilla Extract

For Decorating
Gingerbread Cookie cutouts
Fluffy Vanilla Frosting

Method :

1. Preheat oven to 350F. Line standard muffin tins with paper liners . Sift flour together with spices.
2. With an electric mixer on medium-high speed, cream butter and sugar until pale and fluffy. Add the molasses, and beat until combined. Add eggs one at a time, beating until well incorporated. Beat in vanilla. Reduce speed to low and slowly add in flour.
3. Spoon out batter into cupcake liners to 3/4 full.
4. Bake in oven for 25 mins or until skewer inserted into the center of the cupcake comes out clean.

Fluffy Vanilla Frosting

113g              Unsalted butter, softened at room temperature
80g                Icing sugar
1/8 tsp           Vanilla extract

Method :
1. Beat butter using an electric mixer until light and fluffy.
2. Reduce speed of mixer and add in icing sugar.
3. Add in Vanilla extract and beat until smooth and creamy.

Gingerbread Boy

5.5 cups         All purpose flour
1 tsp              Baking soda
1.5tsp            Salt
1 tbsp plus 1tsp  Ground ginger
1 tbsp plus 1 tsp Ground cinnamon
1 tsp                   Freshly ground nutmeg
1 cup                  Unsalted butter
1 cup                  Packed dark-brown sugar
2                         Large eggs
1.5 cups              Unsulfured molasses

Method:
1. Whisk together flour, baking soda, salt and spices. With the electric mixer on medium high speed, cream buter and brown sugar until pale and fluffy. Add eggs and molasses and beat to combine. Reduce speed to low. Gradually add flour mixture, beating until just combined.

2. Divide dough into 3 portions. Flatten in to a disc and place in a plastic bag. Refrigerate until firm.
3. Roll out each disc to just under 1/4 inch thick.
4. Cut with mini gingerbread man cookie cutter.
5. Bake cookies until crisp - 8 to 10mins. Cool down and store in air tight tin.                  

LinkWithin

Related Posts with Thumbnails